The first time I tasted caramelized pears with blue cheese at a cozy little bistro years ago, it was love at first bite. That perfect dance of sweet and tangy flavors? Absolute magic! I must have made ten different versions of this caramelized pear & blue cheese salad at home before landing on this foolproof recipe.
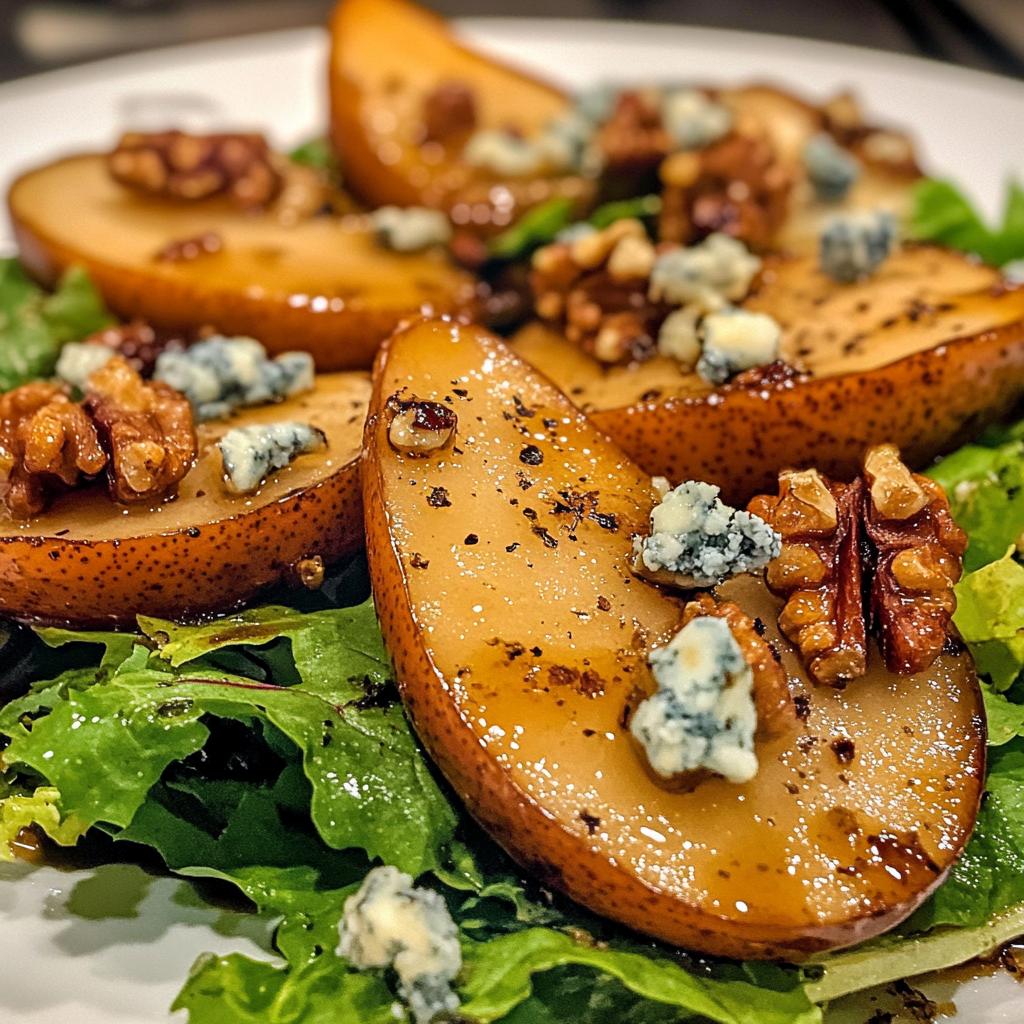
What makes this salad so special is how simple ingredients transform into something extraordinary. Warm, buttery caramelized pears meet creamy blue cheese crumbles, all balanced by peppery greens and crunchy toasted walnuts. It’s become my go-to for everything from casual lunches to fancy dinner parties – that’s how versatile and crowd-pleasing it is!
After testing with every pear variety under the sun (Bartletts work best, trust me!) and sampling more blue cheeses than I’d care to admit, I’ve nailed down the perfect ratios. This salad delivers restaurant-quality flavors with just 15 minutes of hands-on time. The secret? Getting that caramelization just right – golden brown pears with sticky edges that cling to every leaf!
Why You’ll Love This Caramelized Pear & Blue Cheese Salad
This isn’t just another salad recipe – it’s a total game-changer that’ll make you look like a gourmet chef with minimal effort. Here’s why it’s become my absolute favorite:
- 15 minutes flat – From fridge to table faster than ordering takeout!
- Sweet meets savory – That caramelized pear magic against bold blue cheese? Pure perfection.
- Looks fancy, tastes fancy – But secretly so easy to throw together.
- Texture heaven – Crispy greens, creamy cheese, crunchy walnuts, and those melt-in-your-mouth pears.
- Works for any occasion – Tuesday lunch or holiday dinner party? Check and check.
Seriously, once you try this flavor combo, you’ll be hooked. It’s that good.
Ingredients List for Caramelized Pear & Blue Cheese Salad
Okay, let’s talk ingredients – because using just the right stuff makes all the difference here! I’ve learned through (delicious) trial and error that quality matters with these simple components. Here’s exactly what you’ll need:
- 2 ripe but firm Bartlett pears – You want them sweet but still holding their shape when sliced. Too soft and they’ll turn to mush!
- 1 tablespoon butter – Real, salted butter works best for that rich caramelization.
- 1 tablespoon packed brown sugar – Pack it tight in your measuring spoon – we want every bit of that molasses flavor.
- 4 cups mixed greens – My go-to is baby arugula and butter lettuce for that peppery-sweet balance.
- ½ cup crumbled blue cheese – Look for a nice Danish or Gorgonzola – creamy with just enough tang.
- ¼ cup walnuts – Toasted until fragrant (your nose will tell you when they’re ready!).
- 2 tablespoons good olive oil – Skip the cheap stuff here – it’s worth it.
- 1 tablespoon aged balsamic vinegar – The thicker, the better for clinging to every bite.
- Pinch of sea salt & freshly cracked pepper – To wake up all those flavors!
That’s it! Simple, fresh ingredients that sing together. Pro tip: measure everything before you start cooking – those pears caramelize fast!
Equipment Needed
Don’t worry – you won’t need any fancy gadgets for this caramelized pear salad! Just grab these basic kitchen tools:
- Medium skillet – Nonstick works great for those sticky pears
- Large mixing bowl – Big enough to toss everything gently
- Tongs or salad servers – For that perfect gentle toss
- Cutting board & sharp knife – For slicing pears just right
That’s seriously it! Now let’s get cooking.
How to Make Caramelized Pear & Blue Cheese Salad
Alright, let’s dive into the magic! This caramelized pear salad comes together in a flash, but there are a few key steps that make all the difference. Follow along and you’ll have restaurant-worthy results in no time.
Preparing the Caramelized Pears
First, grab your skillet and melt that butter over medium heat. You’ll know it’s ready when it starts foaming slightly – that’s your cue to add the pear slices in a single layer (crowd them and they’ll steam instead of caramelize!). Sprinkle the brown sugar evenly over the pears and resist the urge to stir – let them work their magic for about 2 minutes until the edges start turning golden.
Here’s my secret: use a fork to gently flip each slice when you see bubbles forming around the edges. Another 2-3 minutes on the other side until they’re beautifully bronzed with sticky edges. Transfer them to a plate to cool slightly – this keeps them from wilting your greens when you add them to the salad.
Assembling the Salad
Now for the fun part! In your big bowl, toss the greens with olive oil and balsamic until every leaf is lightly coated. I like to add half the dressing first, then adjust – you can always add more but you can’t take it away!
Layer the slightly cooled pears over the greens, then sprinkle with blue cheese crumbles and toasted walnuts. Here’s where you want to be gentle – use your tongs to lift and turn the salad rather than stirring aggressively. This keeps those beautiful pear slices intact and distributes all the goodies evenly. Finish with a pinch of flaky salt and fresh cracked pepper right before serving.
See? Easy as can be! The whole process takes about 15 minutes, but tastes like you spent hours. Now dig in while those pears are still slightly warm – that’s when the flavors really sing!
Expert Tips for Perfect Caramelized Pear & Blue Cheese Salad
Want to take this salad from good to *wow*? Here are my tried-and-true tips for making it absolutely perfect every time:
- Pick the right pears: Go for Bartletts or Bosc – they’re sweet but firm enough to hold up to caramelizing. If they’re too ripe, they’ll turn to mush in the pan. Trust me, I’ve been there!
- Cheese size matters: Crumble your blue cheese into smallish pieces (about pea-sized). Too big and it overwhelms the salad; too small and you’ll lose that creamy texture. Gorgonzola works beautifully if you want something a bit milder.
- Toast those walnuts: Keep an eye (and nose!) on them while toasting. They’re ready when they’re fragrant and just starting to turn golden – about 3-4 minutes in a dry skillet. Burned walnuts? Not a good look.
- Cool your pears: Let the caramelized pears cool slightly before adding them to the greens. Warm pears are fine, but piping hot ones will wilt your lettuce faster than you can say “oops!”
Follow these tips, and you’ll have a salad that’s as beautiful as it is delicious. Promise!
Delicious Variations of Caramelized Pear & Blue Cheese Salad
One of my favorite things about this salad? How easily you can mix it up! Here are some tasty twists I’ve tried (and loved) over the years:
- Nut swaps: Can’t do walnuts? Try candied pecans for extra sweetness or toasted hazelnuts for a deeper flavor. Each brings its own special crunch!
- Cheese alternatives: Not a blue cheese fan? Creamy goat cheese works beautifully, or for something sharper, try shaved aged cheddar. My vegetarian friends love swapping in feta too.
- Protein boost: Turn this into a main dish by adding grilled chicken or crispy prosciutto. The salty meat plays so nicely with those sweet pears!
The best part? Every version keeps that magical sweet-savory balance that makes this salad so special. Go wild and make it your own!
Serving Suggestions for Caramelized Pear & Blue Cheese Salad
This salad shines in so many settings! For a light lunch, I love pairing it with crusty sourdough bread – perfect for soaking up any leftover dressing. Serving it for dinner? Try it alongside roasted chicken or pork chops. And wine lovers, take note: a crisp Sauvignon Blanc or slightly sweet Riesling makes those caramelized pears sing. Honestly, it’s so versatile – I’ve even served it as an elegant starter at holiday meals!
Storing Leftover Caramelized Pear & Blue Cheese Salad
Okay, let’s be real – this salad is best fresh, but if you must store leftovers (who has leftovers?!), here’s how to do it right. Pack the greens, cheese, and walnuts separately from the caramelized pears in airtight containers. They’ll keep in the fridge for about a day – any longer and those pears lose their magic texture. Whatever you do, don’t try to reheat it – warm wilted greens and melted cheese? No thank you!
Nutrition Information for Caramelized Pear & Blue Cheese Salad
Just a quick heads up – these nutrition facts are estimates since brands and exact measurements can vary. One generous serving of this caramelized pear salad clocks in around 280 calories, with most coming from those good-for-you fats in the walnuts and olive oil. You’re getting a nice dose of fiber from the pears and greens too!
Remember, blue cheese packs a sodium punch, so go easy if you’re watching your salt intake. And that brown sugar? It’s just 3g per serving – barely enough to notice but just right for balancing those bold flavors. As always, adjust ingredients to fit your dietary needs!
Frequently Asked Questions About Caramelized Pear & Blue Cheese Salad
I get asked about this salad all the time – here are the most common questions with my real-world tested answers:
Can I use apples instead of pears?
Absolutely! Firm, sweet apples like Honeycrisp or Fuji work beautifully. The caramelization process is the same – just keep an eye on them since apples cook a tad faster than pears.
What’s the best vegan substitute for blue cheese?
For that creamy-tangy punch, I love using crumbled tofu “feta” tossed with a bit of nutritional yeast. Roasted chickpeas add great texture too – just toss them with smoked paprika before roasting!
Any dressing variations you recommend?
Try swapping the balsamic for apple cider vinegar with a teaspoon of Dijon mustard whisked in. For a creamier option, blend the olive oil with Greek yogurt and lemon juice – heavenly!
Can I prep anything ahead?
You bet! Toast the walnuts and make the dressing a day before. Slice pears just before cooking though – they brown quickly. Assemble right before serving for the freshest taste.
How do I tone down strong blue cheese flavor?
Mix in some milder cheeses like goat or feta – I often do half blue, half something creamier. Or use less cheese and let those sweet pears shine more!
Share Your Caramelized Pear & Blue Cheese Salad Creation
I’d love to see your masterpiece! Snap a pic of your caramelized pear salad creation and tag me – nothing makes me happier than seeing your spins on this recipe. Did you find the perfect pear variety? Discover a killer cheese swap? Leave a rating below and share your brilliant tweaks!
Print
15-Minute Caramelized Pear & Blue Cheese Salad Heaven
- Total Time: 15 mins
- Yield: 4 servings 1x
- Diet: Vegetarian
Description
A refreshing salad combining sweet caramelized pears with tangy blue cheese for a perfect balance of flavors.
Ingredients
- 2 ripe pears, sliced
- 1 tbsp butter
- 1 tbsp brown sugar
- 4 cups mixed greens
- 1/2 cup crumbled blue cheese
- 1/4 cup walnuts, toasted
- 2 tbsp olive oil
- 1 tbsp balsamic vinegar
- Salt and pepper to taste
Instructions
- Heat butter in a pan over medium heat.
- Add pear slices and brown sugar, cook until caramelized (about 5 minutes).
- Remove pears and let cool slightly.
- In a large bowl, toss mixed greens with olive oil and balsamic vinegar.
- Add caramelized pears, blue cheese, and toasted walnuts.
- Season with salt and pepper.
- Toss gently and serve immediately.
Notes
- Use firm pears for better caramelization.
- Substitute pecans for walnuts if preferred.
- Serve chilled for best texture.
- Prep Time: 10 mins
- Cook Time: 5 mins
- Category: Salad
- Method: Stovetop
- Cuisine: American
Nutrition
- Serving Size: 1 serving
- Calories: 280
- Sugar: 12g
- Sodium: 320mg
- Fat: 18g
- Saturated Fat: 6g
- Unsaturated Fat: 10g
- Trans Fat: 0g
- Carbohydrates: 22g
- Fiber: 4g
- Protein: 6g
- Cholesterol: 20mg
Keywords: caramelized pear salad, blue cheese salad, easy salad recipe


