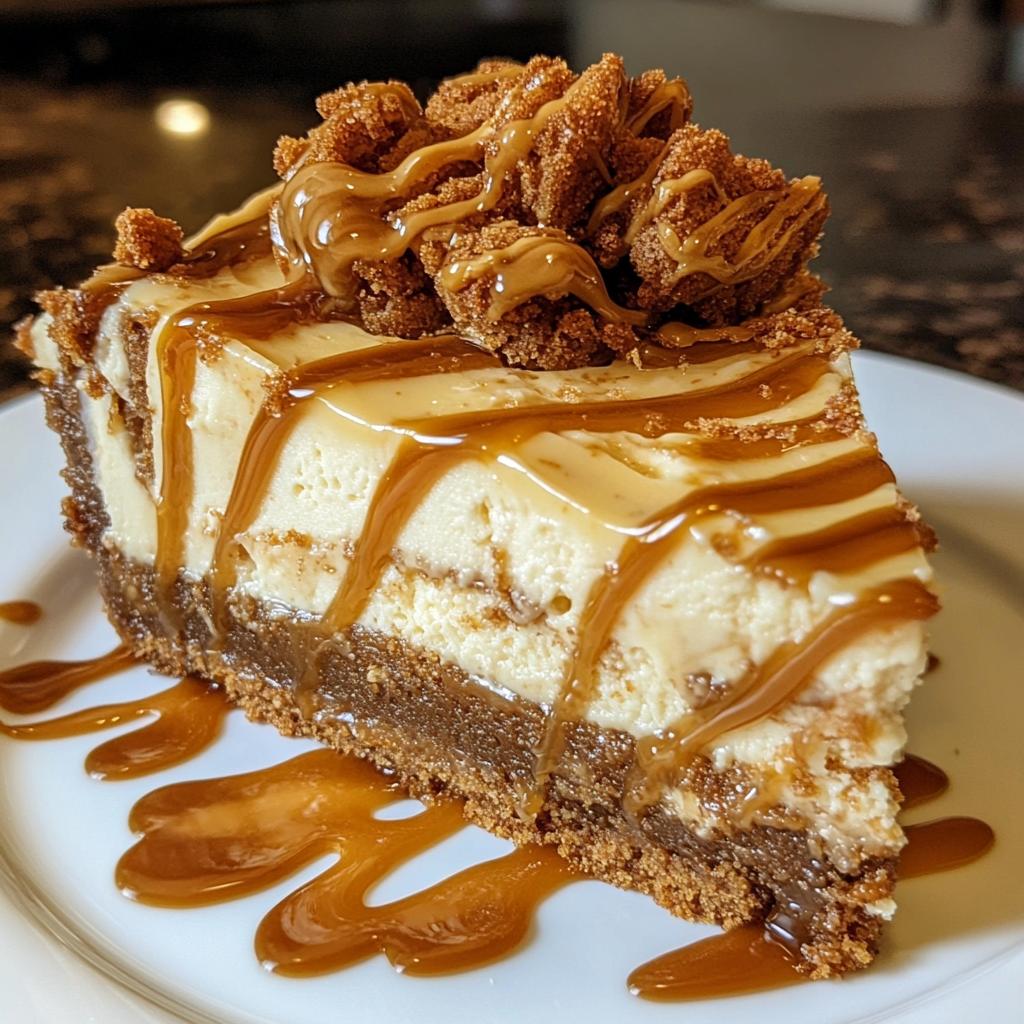
Oh my goodness, if you haven’t tried combining Biscoff cookies with caramel in a cheesecake yet, you’re missing out on pure magic. This Biscoff Caramel Cookie Butter Cheesecake is my go-to dessert when I want to impress – it’s creamy, dreamy, and has that perfect balance of spiced cookie flavor with rich caramel. I first made it for a friend’s birthday and now it’s the most requested dessert in my kitchen. The best part? It’s actually easier to make than you’d think. Just wait until you see how those crushed Biscoff cookies transform into the most incredible crust that pairs perfectly with the silky cookie butter filling.
Ingredients for Biscoff Caramel Cookie Butter Cheesecake
Okay, let’s gather our goodies! Here’s everything you’ll need to make this dreamy cheesecake:
- 2 cups crushed Biscoff cookies – about 24 cookies, crushed until fine (I just toss them in a bag and roll with a rolling pin – stress relief and baking prep in one!)
- 1/2 cup melted butter – unsalted is my go-to, but salted works too for that sweet-salty kick
- 24 oz cream cheese – must be full-fat and at room temperature (trust me, this makes all the difference)
- 1 cup sugar – regular granulated works perfectly here
- 1 cup Biscoff cookie butter – the star of our show! Smooth, not crunchy
- 1/2 cup caramel sauce – homemade or store-bought, just make sure it’s thick
- 1 tsp vanilla extract – pure vanilla if you’ve got it
- 3 large eggs – also at room temperature (I set them out with the cream cheese)
That’s it! Simple ingredients that come together to make something truly special. Now let’s get baking!
How to Make Biscoff Caramel Cookie Butter Cheesecake
Alright, let’s dive into making this heavenly cheesecake! Don’t let the fancy name fool you – the process is straightforward if you take it step by step. I’ll walk you through each part, from that irresistible crust to the final chill in the fridge. Just follow along, and you’ll have a showstopper dessert in no time.
Preparing the Crust
First things first – that buttery Biscoff crust! Take your crushed cookies (you should have about 2 cups) and mix them with the melted butter until it looks like wet sand. I like to use a fork to really work the butter into every crumb. Then, dump it into your springform pan (I use a 9-inch one) and press it firmly and evenly across the bottom and just a bit up the sides. Here’s my trick – use the bottom of a measuring cup to press it down nice and flat. Pop this in the fridge while you make the filling – it helps the crust set up better.
Making the Cheesecake Filling
Now for the creamy part! Beat your room-temperature cream cheese and sugar together until it’s completely smooth – no lumps allowed! This might take 2-3 minutes with a mixer. Scrape down the sides, then add the Biscoff cookie butter and caramel sauce. The vanilla goes in now too. Oh, the smell at this point is incredible! Once that’s all combined, add the eggs one at a time, mixing just until each is incorporated. Don’t overmix after adding the eggs – we want a creamy texture, not an airy one. The batter should be silky smooth and beautifully tan with caramel swirls.
Baking and Cooling
Time to bake! Pour the filling over your chilled crust and smooth the top. If you want to prevent cracks (who doesn’t?), use a water bath. Just wrap your springform pan in foil and place it in a larger pan filled with about an inch of hot water. Bake at 325°F for 45-50 minutes. The center should still have a slight jiggle when it’s done – like Jell-O. Turn off the oven, crack the door open, and let it cool slowly for about an hour. This gradual cooling helps prevent cracks too. Then, refrigerate for at least 4 hours (overnight is even better) before serving. The wait is torture, but it’s so worth it when you slice into that perfect, creamy texture!
Tips for the Perfect Biscoff Caramel Cookie Butter Cheesecake
After making this cheesecake more times than I can count, I’ve picked up some foolproof tricks to guarantee perfection every time. First – and I can’t stress this enough – all your dairy ingredients must be at room temperature. Cold cream cheese will leave lumps no matter how long you beat it. When adding eggs, mix just until combined – overbeating incorporates too much air and leads to cracks (and nobody wants a cracked cheesecake!).
For easy removal, line your springform pan with parchment paper before adding the crust. It’s a simple step that saves so much frustration later. If you’re nervous about the water bath method (though it really does help), just place a pan of water on the rack below your cheesecake while baking. The steam creates a more even bake without the hassle of wrapping foil around your pan.
And here’s my favorite tip: warm your knife under hot water before slicing for picture-perfect pieces every time. Just wipe it clean between cuts – you’ll thank me when you see those clean edges!
Variations for Biscoff Caramel Cookie Butter Cheesecake
Oh, the fun part – making this cheesecake your own! My family loves when I switch things up, and here are our favorite twists. For chocolate lovers, drizzle melted dark chocolate over the top before serving – the bittersweet notes cut through the sweetness beautifully. You could even swap the caramel for dulce de leche if you want something richer and creamier (just reduce the sugar slightly if you do).
No Biscoff cookies for the crust? Try graham crackers or speculoos instead – they’ll still give you that lovely spiced flavor. Feeling adventurous? Fold in some chopped toasted pecans for crunch, or layer extra caramel between the crust and filling. The possibilities are endless with this versatile recipe!
Serving Suggestions for Biscoff Caramel Cookie Butter Cheesecake
When it’s time to serve this beauty, go all out! A dollop of whipped cream and a drizzle of extra caramel sauce make it extra indulgent. Fresh berries like raspberries or strawberries add a pop of color and freshness. For a fancy touch, sprinkle crushed Biscoff cookies on top. Trust me, it’s a showstopper!
Storing and Reheating Biscoff Caramel Cookie Butter Cheesecake
This cheesecake keeps beautifully in the fridge for up to 5 days – just cover it tightly with plastic wrap. If you need to freeze it (great for making ahead!), wrap individual slices or the whole thing in plastic, then foil, and it’ll keep for 2 months. Thaw overnight in the fridge when you’re ready to enjoy that creamy goodness again. No reheating needed – it’s perfect cold!
Nutritional Information for Biscoff Caramel Cookie Butter Cheesecake
Let’s be real – this is an indulgent treat, not a health food! Each slice (about 1/12th of the cheesecake) packs roughly 450 calories, with 25g fat, 45g carbs, and 6g protein. Remember, these are just estimates based on my exact ingredients – your numbers might vary slightly depending on the brands you use. It’s totally worth every delicious bite though!
Frequently Asked Questions
I’ve gotten so many questions about this cheesecake over the years – here are the ones that pop up most often!
Can I Make This Cheesecake Ahead of Time?
Absolutely! In fact, I recommend it. This cheesecake needs at least 4 hours to chill anyway, but it actually tastes even better the next day when all those Biscoff and caramel flavors have really settled in. Just keep it covered in the fridge for up to 5 days. Perfect for stress-free entertaining!
Why Did My Cheesecake Crack?
Oh no! Cracks usually happen from either overmixing after adding eggs (which incorporates too much air) or cooling too quickly. My foolproof method? Mix eggs just until combined, use a water bath while baking, and let it cool gradually in the turned-off oven. If cracks do appear, just cover them with whipped cream – no one will ever know!
Can I Freeze This Cheesecake?
You bet! This cheesecake freezes like a dream. Wrap cooled slices (or the whole thing) tightly in plastic wrap, then foil. It’ll keep beautifully for 2 months. Thaw overnight in the fridge – no reheating needed. The texture stays just as creamy!
Print
Irresistible Biscoff Caramel Cheesecake in 5 Simple Steps
- Total Time: 5 hours 10 minutes
- Yield: 12 servings 1x
- Diet: Vegetarian
Description
A rich and creamy cheesecake infused with the flavors of Biscoff cookies and caramel, perfect for any dessert lover.
Ingredients
- 2 cups crushed Biscoff cookies
- 1/2 cup melted butter
- 24 oz cream cheese, softened
- 1 cup sugar
- 1 cup Biscoff cookie butter
- 1/2 cup caramel sauce
- 1 tsp vanilla extract
- 3 eggs
Instructions
- Preheat your oven to 325°F (163°C).
- Mix crushed Biscoff cookies with melted butter and press into the bottom of a springform pan.
- In a large bowl, beat cream cheese and sugar until smooth.
- Add Biscoff cookie butter, caramel sauce, and vanilla extract, and mix well.
- Add eggs one at a time, beating after each addition.
- Pour the mixture over the crust in the springform pan.
- Bake for 45-50 minutes or until the center is set.
- Let cool, then refrigerate for at least 4 hours before serving.
Notes
- Use a water bath for even baking.
- Store leftovers in the refrigerator.
- Prep Time: 20 minutes
- Cook Time: 50 minutes
- Category: Dessert
- Method: Baking
- Cuisine: American
Nutrition
- Serving Size: 1 slice
- Calories: 450
- Sugar: 30g
- Sodium: 300mg
- Fat: 25g
- Saturated Fat: 12g
- Unsaturated Fat: 10g
- Trans Fat: 0g
- Carbohydrates: 45g
- Fiber: 1g
- Protein: 6g
- Cholesterol: 100mg
Keywords: Biscoff, Caramel, Cookie Butter, Cheesecake, Dessert


