There’s something magical about making spring rolls at home, isn’t there? The way the wrappers crisp up perfectly, giving way to a vibrant, fresh filling is a joy that never gets old. Every time I roll them up, I can’t help but feel a rush of excitement. These little bundles of goodness are not just delicious; they’re also a canvas for creativity! My favorite ingredients are the colorful bell peppers and crunchy bean sprouts, which bring a delightful crunch and freshness to each bite. I love experimenting with different vegetable combinations, and you can even sneak in some herbs for a fragrant twist. Plus, the satisfaction of biting into a freshly fried spring roll — that glorious, crispy texture paired with the savory filling — is truly unbeatable! Trust me, once you try this recipe, you’ll be hooked on making your own crispy spring rolls at home.
Ingredients List
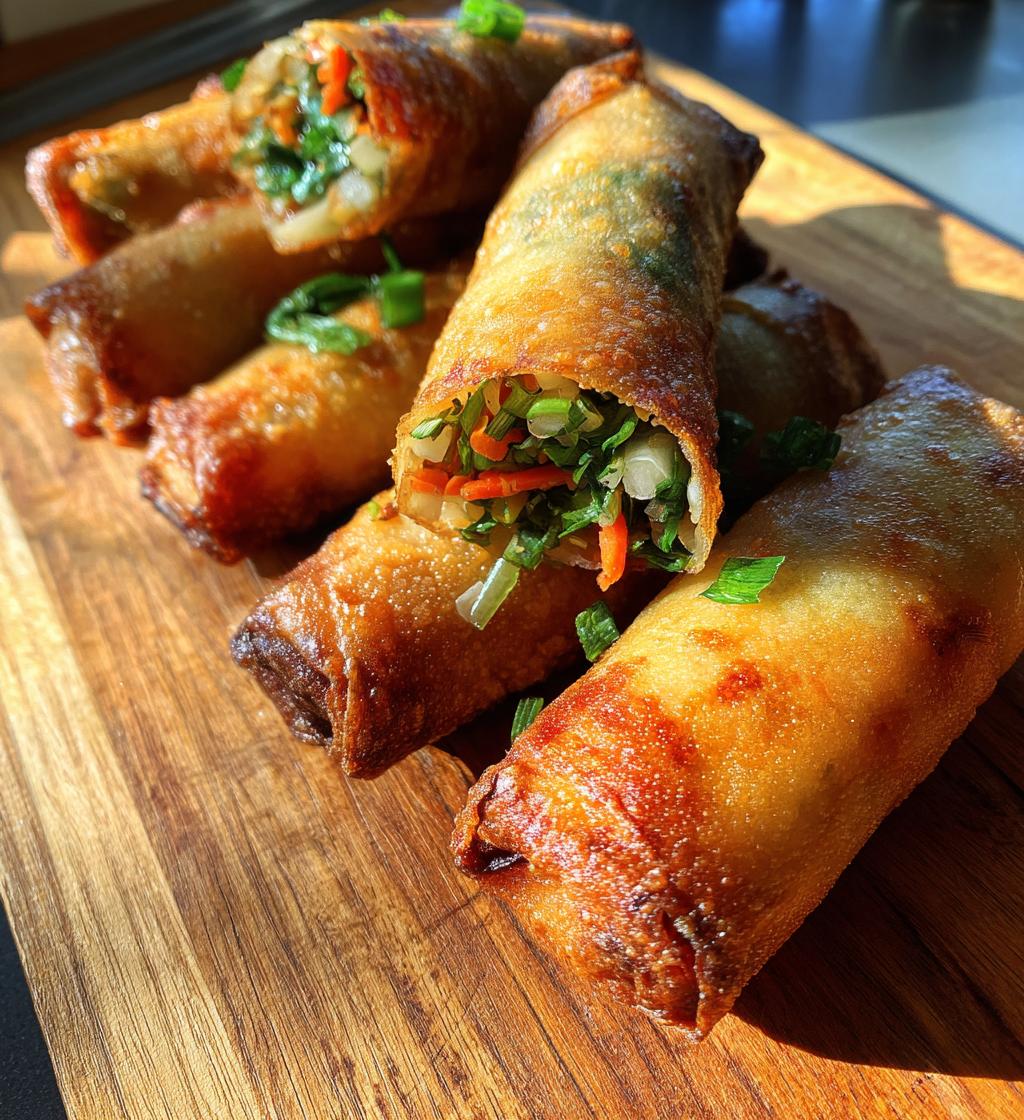
Gathering your ingredients is the first step to creating these scrumptious spring rolls! Here’s what you’ll need:
- 1 cup shredded cabbage – This adds a wonderful crunch and a mild sweetness to the filling.
- 1 cup julienned carrots – Freshly cut for the perfect bite, they bring color and a bit of sweetness.
- 1 cup sliced bell peppers – Use a mix of colors for visual appeal; they add a sweet, juicy flavor.
- 1 cup bean sprouts – These little crunchy gems bring a delightful texture that contrasts beautifully with the other veggies.
- 2 green onions, chopped – They add a fresh, zesty flavor to the mix.
- 1 tablespoon soy sauce – This savory ingredient ties all the flavors together, giving the filling a nice depth.
- 1 teaspoon sesame oil – A drizzle of this fragrant oil adds a nutty richness that’s simply irresistible.
- 20 spring roll wrappers – You can find these in the refrigerated section of your grocery store; they’re the perfect casing for your fillings.
- Oil for frying – Choose a neutral oil like vegetable or canola oil for frying. It should be hot and ready for that crispy finish!
Make sure to have everything prepped and ready to go before you start rolling. It makes the process so much smoother, and trust me, you’ll want to keep the momentum going once you get started!
How to Prepare Instructions
Now that we’ve got all our ingredients ready, it’s time to dive into the fun part: making those mouthwatering spring rolls! Follow these steps, and you’ll be on your way to a crispy delight that’s sure to impress.
Preparing the Filling
First things first, let’s mix the filling! In a large bowl, combine the shredded cabbage, julienned carrots, sliced bell peppers, bean sprouts, and chopped green onions. Give it a gentle toss to combine all those vibrant veggies. Now, here’s where the magic happens: drizzle in the soy sauce and sesame oil. Make sure to toss everything together well so that each piece of veggie gets coated. This step is crucial because it ensures that every bite is bursting with flavor. You want that savory goodness evenly distributed throughout!
Rolling the Spring Rolls
Now, let’s roll! Grab a spring roll wrapper and lay it flat on a clean surface, with one corner pointing toward you. Spoon a generous amount of your veggie mix onto the center—don’t overfill, or you’ll have a messy situation on your hands! Fold the bottom corner over the filling, then fold in the sides. The key here is to roll it tightly, so it holds together nicely. Once you reach the top corner, use a dab of water to seal the edge. This little trick helps keep everything intact while frying. If you find it tricky, don’t worry! It takes a little practice, and soon you’ll be a pro at rolling these beauties!
Frying the Spring Rolls
Alright, let’s get these spring rolls sizzling! In a large frying pan, heat your oil over medium heat. You’ll want enough oil to submerge the spring rolls partially—about 1 to 2 inches should do the trick. To test if the oil is ready, drop in a small piece of wrapper; if it sizzles right away, you’re good to go! Carefully place a few spring rolls in the hot oil, making sure not to overcrowd the pan. Fry them for about 3 to 4 minutes on each side until they turn that gorgeous golden-brown color. This is where the crispiness comes from, so keep an eye on them! Once they’re done, transfer them to a plate lined with paper towels to drain the excess oil. And voilà! You’ve just made crispy, delicious spring rolls that are ready to be devoured.
FAQ Section
Got questions about making these delightful spring rolls? Don’t worry, I’ve got you covered! Here are some common queries that pop up, along with my trusty answers.
Can I substitute any of the vegetables?
Absolutely! One of the best things about spring rolls is their versatility. If you’re not a fan of cabbage, try using spinach or kale instead. You can also mix in other veggies like zucchini, mushrooms, or even avocado for a creamier filling. The key is to keep the texture in mind — crunchy veggies work best!
What can I serve with spring rolls?
Spring rolls are fantastic on their own, but they really shine with a dipping sauce! Consider serving them with a classic sweet chili sauce, soy sauce, or even a homemade peanut sauce for a fun twist. Fresh herbs like cilantro or mint can also elevate the flavors beautifully.
How should I store leftover spring rolls?
If you have any spring rolls left (which is rare, but it happens!), store them in an airtight container in the fridge. They’ll stay fresh for up to 2 days. To reheat, I recommend popping them in the oven at 350°F (175°C) for about 10 minutes to regain that crispy texture. No one likes a soggy spring roll, right?
Remember, the joy of cooking is experimenting, so feel free to make these spring rolls your own!
Why You’ll Love This Recipe
- Quick to Make: With just 30 minutes from start to finish, you’ll have a delicious appetizer ready in no time!
- Easy to Customize: Feel free to play around with the fillings. Add your favorite veggies or proteins to make it your own!
- Flavorful and Fresh: The combination of vibrant vegetables and savory seasonings creates a delightful explosion of taste in every bite.
- Healthy Option: Packed with fresh veggies, these spring rolls are a wholesome treat that won’t weigh you down.
- Perfect for Sharing: These crispy bites are great for parties, gatherings, or just a cozy night in. Everyone will love them!
Tips for Success
Ready to take your spring rolls to the next level? Here are some pro tips that will help you perfect these crispy delights!
Use Fresh Ingredients
Always opt for the freshest vegetables possible. Crisp, vibrant veggies not only taste better but also give your spring rolls that appealing crunch. If you can, visit your local farmers’ market for the best picks.
Don’t Overfill
This is a common mistake! It’s tempting to pack in as much filling as possible, but trust me, less is more. A spoonful of filling is just right. Overfilling can lead to bursting wrappers, and nobody wants that!
Practice Your Rolling Technique
If your first few rolls don’t look perfect, don’t fret! It takes some practice to master the art of rolling. Just remember to keep it tight but not too tight—like a cozy hug for your filling. And don’t skip the water sealing step; it’s crucial for keeping everything together.
Temperature Matters
When frying, make sure your oil is at the right temperature. Too cold, and your spring rolls will soak up oil and become greasy; too hot, and they’ll burn before cooking through. A good rule of thumb is to maintain the oil temperature around 350°F (175°C). If you’re unsure, drop a small piece of wrapper in—if it sizzles, you’re ready!
Experiment with Flavors
Feel free to get creative with your filling! You can add herbs like basil or cilantro, or throw in some cooked shrimp or chicken if you’re looking for a protein boost. Even a dash of chili flakes can add a nice kick! This recipe is all about making it your own.
Fry in Batches
Avoid overcrowding the pan while frying. Give each spring roll enough space so they can crisp up nicely. Fry them in small batches, and keep the finished ones warm in a low oven while you finish the rest.
With these tips, you’ll be well on your way to creating the most irresistible spring rolls! Happy cooking!
Nutritional Information Section
Let’s talk numbers! Each delightful spring roll comes in at approximately 150 calories. Here’s a quick breakdown of the nutritional content per serving:
- Calories: 150
- Fat: 7g
- Saturated Fat: 1g
- Unsaturated Fat: 5g
- Trans Fat: 0g
- Carbohydrates: 20g
- Fiber: 2g
- Protein: 3g
- Sugar: 2g
- Sodium: 250mg
- Cholesterol: 0mg
These values are approximate and can vary based on the specific ingredients you use. Enjoy these crispy treats guilt-free, knowing they’re packed with fresh veggies and flavor!
Serving Suggestions
These crispy spring rolls are fantastic on their own, but pairing them with the right dishes or dips can elevate your meal to a whole new level! Here are some of my favorite suggestions:
- Sweet Chili Sauce: This is a classic! The sweet and tangy flavors complement the savory filling perfectly.
- Peanut Sauce: A creamy peanut sauce adds a rich, nutty flavor that makes every bite even more delightful. You can whip up a quick version by mixing peanut butter, soy sauce, lime juice, and a touch of honey.
- Soy Sauce with a Twist: Mix soy sauce with a bit of sesame oil and chopped green onions for a simple yet tasty dip that enhances the spring rolls’ flavors.
- Fresh Herb Salad: Serve your spring rolls with a side of fresh herbs like cilantro, mint, and basil. This adds a burst of freshness and can be used as a garnish or a wrap.
- Asian Noodle Salad: Pairing your spring rolls with a light, colorful noodle salad can round out the meal beautifully. Think rice noodles tossed with veggies, a zingy dressing, and a sprinkle of sesame seeds.
With these suggestions, you’re all set for a delightful dining experience that’ll impress family and friends alike! Enjoy your spring rolls with any of these tasty companions, and watch them disappear in no time.
Storage & Reheating Instructions
Got some leftover spring rolls? No problem! To keep them fresh, store your spring rolls in an airtight container in the refrigerator. Just make sure they’re completely cooled before sealing them up. They’ll stay tasty for up to 2 days, but trust me, they might not last that long!
When it’s time to enjoy them again, reheating is key to regaining that glorious crispiness. I recommend preheating your oven to 350°F (175°C). Place the spring rolls on a baking sheet lined with parchment paper and bake for about 10 minutes. This method helps maintain their crunch without turning them soggy.
If you’re short on time, you can use an air fryer at 350°F for about 5 minutes for a quick reheat that still keeps them crispy! Just be sure to keep an eye on them so they don’t overcook. Enjoy those delicious bites again, fresh and crispy!
Print
spring roll recipes: 5 Ways to Make Them Crispy and Irresistible
- Total Time: 30 minutes
- Yield: 20 spring rolls 1x
- Diet: Vegetarian
Description
A delicious and crispy spring roll recipe filled with fresh vegetables.
Ingredients
- 1 cup cabbage, shredded
- 1 cup carrots, julienned
- 1 cup bell peppers, sliced
- 1 cup bean sprouts
- 2 green onions, chopped
- 1 tablespoon soy sauce
- 1 teaspoon sesame oil
- 20 spring roll wrappers
- Oil for frying
Instructions
- Mix all vegetables in a bowl.
- Add soy sauce and sesame oil, and toss to combine.
- Place a wrapper on a flat surface and add a spoonful of the filling.
- Roll the wrapper tightly, folding in the sides.
- Seal the edge with water.
- Heat oil in a pan over medium heat.
- Fry spring rolls until golden brown.
- Drain on paper towels and serve hot.
Notes
- Serve with dipping sauce.
- For a healthier option, bake instead of frying.
- You can add proteins like shrimp or chicken if desired.
- Prep Time: 20 minutes
- Cook Time: 10 minutes
- Category: Appetizer
- Method: Frying
- Cuisine: Asian
Nutrition
- Serving Size: 1 spring roll
- Calories: 150
- Sugar: 2g
- Sodium: 250mg
- Fat: 7g
- Saturated Fat: 1g
- Unsaturated Fat: 5g
- Trans Fat: 0g
- Carbohydrates: 20g
- Fiber: 2g
- Protein: 3g
- Cholesterol: 0mg
Keywords: spring roll recipes, vegetarian spring rolls, crispy spring rolls


