There’s something magical about creating your own sourdough starter recipe. It’s like harnessing a little bit of science and a whole lot of love right in your kitchen! When I first ventured into the world of sourdough, I didn’t just see it as a way to bake bread; it became a delightful journey of patience and nurturing. Watching my starter bubble and grow was like having a little pet that needed care and attention.
Now, why is a sourdough starter so important in baking? Well, it’s your very own leavening agent, transforming simple ingredients into the most beautiful, airy loaves. The flavor it develops over time can’t be matched by any store-bought yeast. Trust me, once you’ve tasted bread made with your homemade starter, you’ll never want to go back!
So, let’s dive into this simple sourdough starter recipe that will not only bring you joy but also elevate your baking game to a whole new level. Are you ready? Let’s get started!
Ingredients for Sourdough Starter Recipe
Creating your own sourdough starter is incredibly simple, and it only takes a couple of ingredients that you probably already have in your kitchen! Here’s what you need:
- 1 cup all-purpose flour: This is the backbone of your starter. I love using all-purpose flour because it provides the perfect balance of protein and gluten to help your starter rise beautifully. You can also experiment with whole wheat flour later on for a different flavor profile!
- 1/2 cup water: It’s best to use filtered water if you can. Tap water can contain chlorine and other chemicals that might inhibit fermentation. The water should be at room temperature to encourage those little yeasties from the flour to get to work!
That’s it! Just two simple ingredients to start your sourdough adventure. Let’s get mixing!
How to Prepare Sourdough Starter Recipe
Getting your sourdough starter going is such an exciting process! Once you have your ingredients ready, it’s all about following a few simple steps. Don’t worry; I’ll guide you through every part of it!
Step 1: Mixing Ingredients
First things first, grab a clean jar—this is where the magic begins! In that jar, combine your 1 cup of all-purpose flour with 1/2 cup of room temperature water. Now, mix them together until you have a smooth, thick paste. I like to use a fork or a whisk for this because it really helps break up any lumps. It should feel a bit like pancake batter but thicker. Trust me, the smoother it is, the happier your starter will be!
Step 2: Covering the Jar
Now it’s time to cover your jar, but here’s the key: you want to do it loosely! You can use a clean cloth, a coffee filter, or even the jar lid, but make sure it’s not airtight. This allows the wild yeasts from the air to mingle with your mixture, which is essential for fermentation. If you seal it tightly, you might stifle those little yeasties, and we don’t want that!
Step 3: Initial Fermentation
Once your jar is covered, it’s time to let it sit at room temperature for 24 hours. Choose a warm spot in your kitchen; the yeast loves warmth! During this time, the mixture will start to bubble and rise as those wild yeasts begin to work. It’s like watching a little science experiment unfold right before your eyes!
Step 4: Daily Feeding Routine
After the first 24 hours, it’s feeding time! Each day, you’ll add 1 cup of all-purpose flour and 1/2 cup of water to your starter. Gently mix it in until you have a smooth consistency again. This feeding process is crucial because it keeps the yeast happy and healthy. You’ll want to repeat this for about 5-7 days. Just think of it as nurturing your little sourdough pet!
Step 5: Monitoring Progress
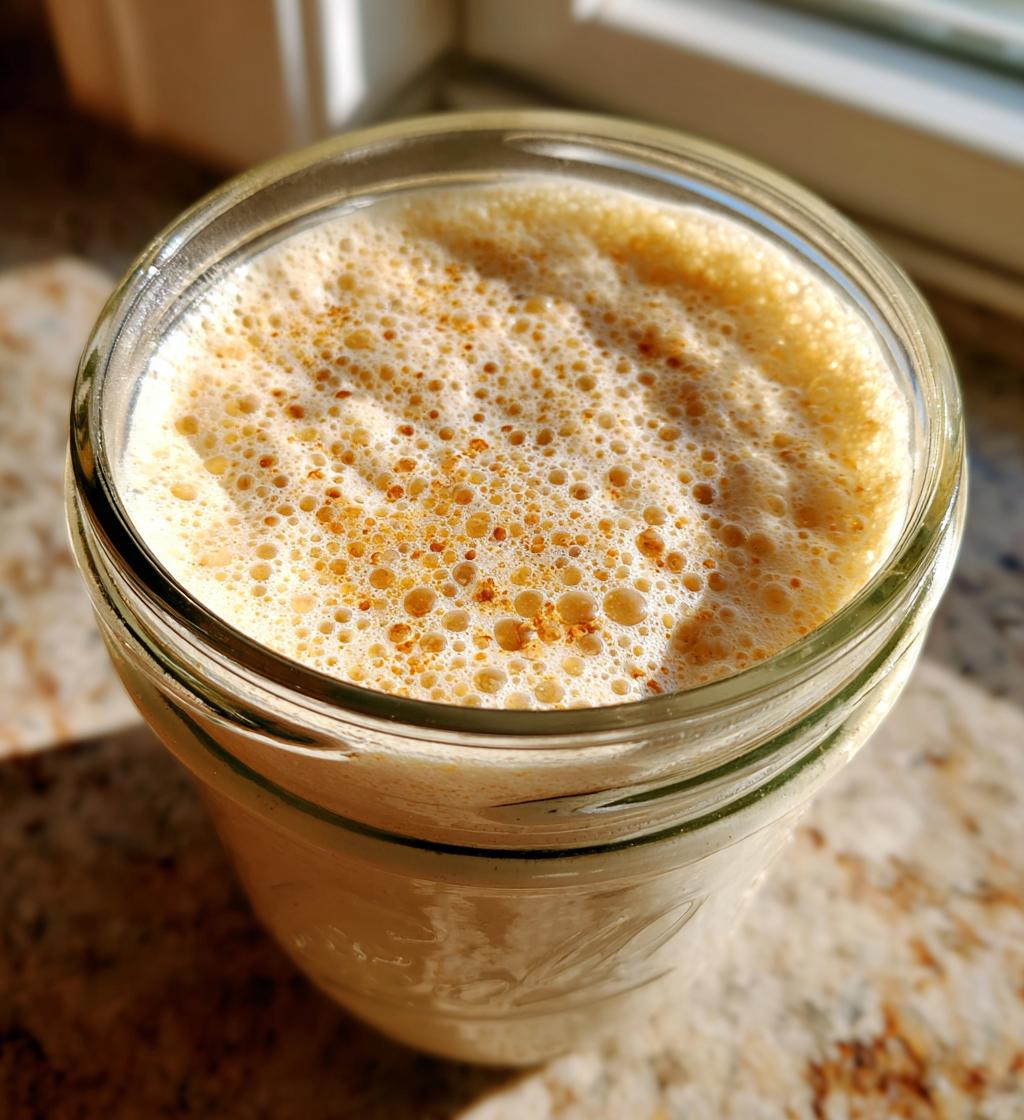
Now, keep an eye on your starter! You’ll know it’s ready when it’s bubbly, has risen noticeably, and has a pleasant sour smell. This usually happens around day 5 or 7. Look for those telltale bubbles and a nice domed top. Once you see that, you’re ready to bake some delicious sourdough bread!
Tips for Success with Your Sourdough Starter Recipe
Now that you’re on your way to creating your very own sourdough starter, let me share some of my top tips for keeping it healthy and thriving! A little extra care can make a world of difference, trust me!
Temperature Matters
First off, the temperature of your starter is critical. Sourdough loves warmth, so keep it in a cozy spot, ideally between 70°F and 80°F (21°C to 27°C). If your kitchen tends to be on the cooler side, try placing the jar on top of the refrigerator or near a warm oven. Just be cautious of direct heat; you don’t want to cook your starter!
Stir Daily
Remember to stir your starter daily! This is not just a chore; it’s essential for incorporating air into the mixture, which helps those yeast and bacteria thrive. A simple stir with a clean spoon will do the trick. You’ll start to notice those lovely bubbles forming more rapidly as you keep the air flowing.
Use the Right Container
I highly recommend using a glass jar for your starter. Not only can you see the progress, but glass also doesn’t react with the acids in the sourdough. Plus, you can easily clean it between feedings! Just make sure it’s large enough to give your starter plenty of room to rise and expand.
Be Patient
Patience is key in this process. Some starters take off quicker than others, so don’t get discouraged if yours seems slow at first. Keep feeding it consistently, and soon enough, you’ll see that bubbly goodness. It’s all worth the wait, I promise!
Don’t Skip the Feeding
Feeding your starter consistently is crucial for its health. If you happen to miss a day, don’t panic! Just resume your regular feeding schedule. If you find you’re not using your starter often, you can slow it down by storing it in the fridge. Just remember to bring it back to room temperature and feed it a day or two before you plan to bake.
Following these tips will set you on the path to sourdough success! With a little love and attention, you’ll have a vibrant starter that’s ready to help you bake some of the best bread you’ve ever tasted!
Nutritional Information for Sourdough Starter Recipe
Now, let’s talk about the nutritional side of your homemade sourdough starter! Just a heads-up, the information can vary based on the specific ingredients and brands you use, so take it with a grain of salt (or maybe a pinch, since we’re baking!). Here’s a quick overview:
- Serving Size: 1 tablespoon
- Calories: 30
- Sugar: 0 g
- Sodium: 0 mg
- Fat: 0 g
- Saturated Fat: 0 g
- Unsaturated Fat: 0 g
- Trans Fat: 0 g
- Carbohydrates: 6 g
- Fiber: 0 g
- Protein: 1 g
- Cholesterol: 0 mg
Remember, your sourdough starter is just the beginning! Once you start incorporating it into your baking, the nutritional profile will change depending on what you’re making. Happy baking!
FAQ About Sourdough Starter Recipe
As you embark on your sourdough starter journey, you might have a few questions popping up along the way. Don’t worry; I’ve got you covered! Here are some of the most common questions I hear, along with my answers to help you navigate this fun process.
How do I know my starter is ready?
Ah, the moment of truth! You’ll know your starter is ready when it’s bubbly, has noticeably risen, and gives off a pleasant sour smell. Typically, this happens around day 5 to 7. Look for those lovely bubbles on the surface and a nice domed top. If you give it a little poke, it should spring back, showing that it’s full of life and ready to help you bake!
Can I use tap water?
While you *can* use tap water, I recommend sticking to filtered water if possible. Tap water often contains chlorine and other additives that can hinder the fermentation process. Using filtered or spring water ensures that your little yeasties have the best chance to thrive. Your starter deserves the best, right?
What if my starter isn’t bubbling?
No need to panic! If your starter isn’t bubbling as expected, it could be a temperature issue or perhaps it just needs a little more time. Make sure it’s in a warm spot, and keep feeding it daily. Sometimes starters take longer to develop, so patience is key. Just keep nurturing it, and those bubbles will come!
How often do I need to feed my starter?
Great question! You should feed your starter every day while it’s developing. This means adding 1 cup of flour and 1/2 cup of water to it daily. Once it’s established, you can switch to feeding it every 1-2 weeks if you keep it in the fridge. Just remember to give it a good feeding and let it come to room temperature a day or two before you plan to bake!
Can I use whole wheat flour instead of all-purpose flour?
Absolutely! Whole wheat flour can add a lovely depth of flavor to your sourdough starter. It’s a little denser, so you might notice a slight difference in the texture, but it works beautifully. You can even mix it with all-purpose flour if you’d like to create a blend that suits your taste. Experimenting is part of the fun!
Why You’ll Love This Sourdough Starter Recipe
Let me tell you, this sourdough starter recipe is a game-changer! Here are just a few reasons why you’ll fall in love with it:
- Simple and Straightforward: With just two ingredients and a little time, you can create your very own starter. It’s such a rewarding process!
- Cost-Effective: Making your own sourdough starter saves you money compared to store-bought options. Plus, you’re using basic pantry staples!
- Flavorful Bread: Your homemade starter elevates your baking, giving your bread that delicious, tangy flavor only sourdough can provide. You’ll impress your friends and family with each loaf!
- Versatile: Once you have your starter, the possibilities are endless! You can use it for bread, pancakes, waffles, and even pizza dough. It’s a fantastic addition to any recipe!
- A Fun Project: Nurturing your starter becomes a delightful hobby. You’ll find yourself excitedly checking on its progress and enjoying the little victories along the way.
- Connection to Tradition: Creating your own sourdough starter connects you to a centuries-old baking tradition. You’ll feel like a part of something special, carrying on a timeless craft!
Trust me, once you start this journey, you won’t want to look back. Your kitchen will be filled with the wonderful aroma of fresh-baked sourdough, and you’ll be the proud parent of a bubbly, thriving starter!
Print
Sourdough Starter Recipe: 5 Steps to Baking Bliss
- Total Time: 7 days
- Yield: 1 jar of sourdough starter 1x
- Diet: Vegetarian
Description
This is a simple sourdough starter recipe to create your own leavening agent.
Ingredients
- 1 cup all-purpose flour
- 1/2 cup water
Instructions
- In a clean jar, mix flour and water until smooth.
- Cover the jar loosely with a lid or cloth.
- Let it sit at room temperature for 24 hours.
- Each day, feed the starter with 1 cup of flour and 1/2 cup of water.
- Repeat this process for 5-7 days until bubbly and risen.
Notes
- Use filtered water if possible.
- Keep the starter in a warm place.
- Stir daily to incorporate air.
- Prep Time: 5 minutes
- Cook Time: 0 minutes
- Category: Baking
- Method: Fermentation
- Cuisine: Bread
Nutrition
- Serving Size: 1 tablespoon
- Calories: 30
- Sugar: 0 g
- Sodium: 0 mg
- Fat: 0 g
- Saturated Fat: 0 g
- Unsaturated Fat: 0 g
- Trans Fat: 0 g
- Carbohydrates: 6 g
- Fiber: 0 g
- Protein: 1 g
- Cholesterol: 0 mg
Keywords: sourdough starter recipe


