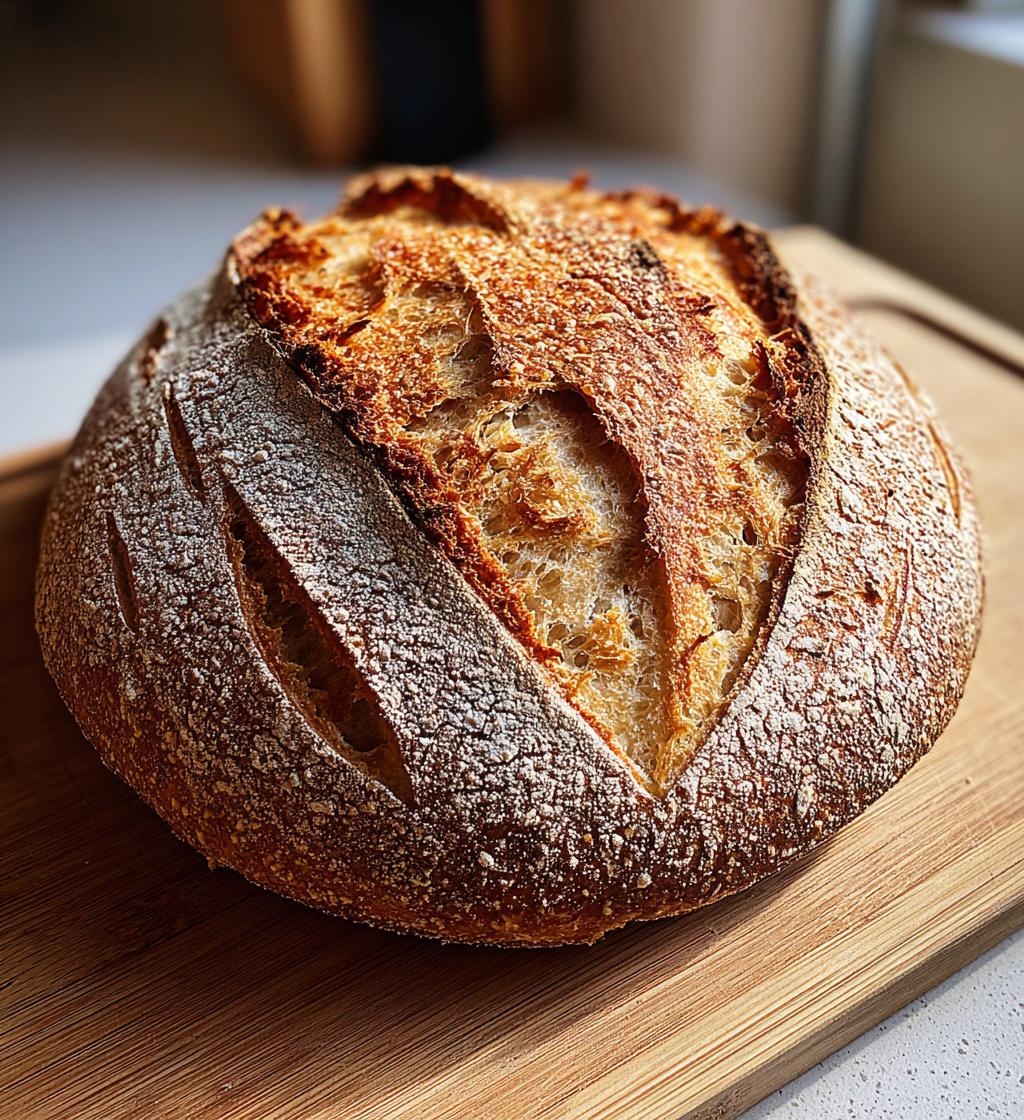
When it comes to baking sourdough bread, the art of sourdough scoring is essential. It not only enhances the bread’s appearance but also plays a crucial role in its texture. I remember the first time I scored a loaf; I was nervous but excited, and the moment I saw those beautiful patterns emerge in the oven, I knew I had unlocked a whole new level of baking magic. Scoring allows the dough to expand properly while baking, creating those gorgeous, rustic crusts we all love. Plus, it’s like giving your bread a little personality! You can create simple lines, intricate designs, or even a fun monogram—whatever suits your mood. I’ve found that the right scoring technique can elevate your sourdough from just bread to a stunning centerpiece. Trust me, once you get the hang of it, you’ll feel like a true artisan baker. So, let’s dive into the wonderful world of sourdough scoring and make your loaves shine like never before!
Ingredients List
To create a beautiful loaf of sourdough bread with stunning scoring, you only need one main ingredient! Here’s what you’ll need:
- 1 loaf sourdough bread: Make sure your loaf is fully proofed and ready for scoring. You can either bake your own or pick up a freshly baked loaf from your favorite bakery. The texture should be soft yet firm enough to hold its shape while you create those lovely cuts.
It’s all about quality here! A well-made sourdough loaf will give you the best results for scoring. The crust should have a nice sheen, and the interior should be airy with those delightful holes. Don’t skimp on this key ingredient; it’s the foundation of your scoring adventure!
How to Prepare Instructions
Step 1: Preheat the Oven
The first step in our sourdough scoring adventure is preheating the oven to 450°F (232°C). This is super important! A hot oven is going to help that dough spring up beautifully, creating that amazing oven spring we all crave. So, don’t skip this step! While the oven heats, you’ll have time to prepare your loaf.
Step 2: Prepare the Loaf
Now that your oven is warming up, it’s time to get your loaf ready for scoring. Place your fully proofed sourdough loaf on a clean cutting board. Make sure it’s centered and stable; you don’t want it wobbling around while you score! Take a moment to gently pat the surface of the loaf with your hands. This helps you check the texture and ensures it’s just right—soft, yet firm enough to hold its shape. If you notice any areas that seem too sticky, don’t worry; that’s normal. Just make sure the dough feels elastic and ready to take those beautiful cuts!
Step 3: Scoring the Bread
Now, the moment you’ve been waiting for—scoring! Grab a sharp razor blade or a bread lame, whichever you prefer. I can’t stress this enough: keep those cuts shallow! You want to make about a ¼-inch deep cut at most. If you cut too deep, it could deflate your lovely loaf. Think of scoring as giving your bread a haircut, not a buzz cut!
As for the design, let your creativity flow! You can create simple lines, crosshatches, or even a lovely leaf pattern if you’re feeling fancy. Just remember, the score lines will open up during baking, so give them room to breathe! Don’t stress too much about perfection; it’s all about enjoying the process and letting your bread show off its personality.
Step 4: Baking the Bread
Once you’ve scored your loaf, it’s time to bake! Carefully transfer the loaf into your preheated oven. Bake for about 30 minutes, and I promise, the aroma will fill your kitchen and make your mouth water! To achieve that perfect crust, I like to place a pan of water on the bottom rack of the oven. This creates steam, which helps the crust crisp up beautifully.
Keep an eye on your bread during the last few minutes of baking. You want it to be a gorgeous golden brown. If you’re unsure about doneness, give it a gentle tap on the bottom—if it sounds hollow, it’s ready! Once baked, let your loaf cool on a wire rack for at least 30 minutes before slicing. Patience is key here; I know it’s tempting, but trust me, it’s worth the wait!
Why You’ll Love This Recipe
There are so many reasons to embrace the art of sourdough scoring! Here are just a few that make it a must-try:
- Enhanced Appearance: Scoring your bread transforms it into a beautiful work of art, turning a simple loaf into a showstopper.
- Improved Texture: The cuts allow for better expansion in the oven, resulting in a crust that’s perfectly crispy on the outside and soft inside.
- Easy to Follow: With just a few simple steps, scoring becomes a fun and rewarding part of your baking routine.
- Quick Preparation Time: You can score your bread in just minutes, making it a swift addition to your baking process.
- Creative Expression: The ability to design your own patterns makes each loaf uniquely yours—let your imagination run wild!
Trust me, once you start scoring, you’ll never look at a loaf of sourdough the same way again!
Tips for Success
To really nail your sourdough scoring and take your bread to the next level, I’ve got some expert tips that I swear by!
- Use the Right Tool: A sharp razor blade or a dedicated bread lame is essential. The sharper the tool, the cleaner your cuts will be, which helps develop a beautiful crust.
- Practice Your Patterns: Don’t be afraid to experiment with different designs! I often sketch my ideas on paper first. Simple lines, swirls, or even initials can add a personal touch to your loaf.
- Score Right Before Baking: Timing is key! Score your bread just before it goes into the oven to ensure the dough maintains its structure and the cuts open up properly during baking.
- Stay Shallow: Remember, less is more! Keeping your cuts shallow—around ¼ inch deep—will prevent deflation and allow the bread to rise beautifully.
- Don’t Stress Perfection: Every loaf is a learning experience. Embrace any imperfections; they add character and charm to your baked goods!
With these tips in your back pocket, you’ll soon feel like a sourdough scoring pro! Happy baking!
Nutritional Information Section
Understanding the nutritional content of your sourdough bread can help you enjoy it even more! Here’s a breakdown of typical values per serving (1 slice):
- Calories: 80
- Fat: 0g
- Saturated Fat: 0g
- Unsaturated Fat: 0g
- Trans Fat: 0g
- Carbohydrates: 15g
- Fiber: 1g
- Protein: 3g
- Sodium: 160mg
- Cholesterol: 0mg
- Sugar: 0g
This loaf is not only delicious but also provides a satisfying source of carbs and protein, making it a great addition to your meal. Enjoy your sourdough in moderation, and savor every bite!
FAQ Section
Got questions about sourdough scoring? Don’t worry, I’ve got answers to some common queries that can help you on your baking journey!
Q1: Why is scoring important for sourdough bread?
Scoring is crucial because it allows the bread to expand properly during baking. Without those cuts, the dough might burst in unexpected places, leading to an uneven shape. Plus, it enhances the crust’s appearance, making your loaf look like a work of art!
Q2: Can I score my bread too deep?
Absolutely! It’s important to keep your cuts shallow—around ¼ inch deep. Scoring too deep can deflate the dough and ruin the lovely rise you worked so hard for. Think of it as giving your loaf a gentle touch rather than a deep slice!
Q3: What patterns can I create while scoring?
The sky’s the limit! You can create simple lines, hash marks, or more intricate designs like leaves or hearts. Just let your creativity flow! Remember, the cuts will open up during baking, so give them enough space to breathe.
Q4: When should I score my sourdough?
It’s best to score your loaf just before placing it in the oven. This ensures that the dough maintains its structure while also allowing the cuts to open up beautifully during baking. Timing is key, so don’t wait too long!
Q5: What if I don’t have a razor blade or bread lame?
No worries! You can use a very sharp knife in a pinch. Just make sure it’s clean and sharp to ensure a smooth cut. The goal is to create a swift and confident scoring action, so whatever tool you use, make sure it gives you that control!
With these tips in mind, you’ll be ready to tackle sourdough scoring like a pro. Happy baking!
Storage & Reheating Instructions
Storing your leftover sourdough bread properly will help maintain its delightful texture and flavor. Once your loaf has completely cooled, wrap it in a clean kitchen towel or place it in a paper bag. This keeps the crust nice and crispy while preventing it from getting too soft or stale. If you plan to keep it for more than a couple of days, consider slicing the bread and freezing it in an airtight container or freezer bag. It can last up to three months in the freezer!
When you’re ready to enjoy your bread again, simply remove the slices you need and let them thaw at room temperature for about 30 minutes. For that fresh-baked taste, pop them in a preheated oven at 350°F (175°C) for about 5-10 minutes. This will help revive the crust’s crunchiness and warmth, making it feel like you just baked it! Enjoy your sourdough to the fullest!
Serving Suggestions
Now that you’ve mastered the art of sourdough scoring, let’s talk about how to enjoy your beautiful loaf! Sourdough bread is incredibly versatile and pairs wonderfully with a variety of delicious options. For a classic combination, slather on some creamy butter and sprinkle a touch of sea salt for a simple yet delightful treat.
If you’re feeling a bit fancy, try topping your sourdough with a slice of aged cheese like cheddar or brie, accompanied by a dollop of fig jam or honey. It creates a perfect balance of savory and sweet that’s sure to impress your guests! For a heartier meal, serve your sourdough alongside a comforting bowl of homemade soup—think tomato basil or a rich butternut squash. The crusty texture of the bread is perfect for dipping!
And of course, don’t forget to make some delicious sandwiches! Whether it’s a classic turkey and cheese or a veggie delight, sourdough adds a unique flavor that elevates any filling. Enjoy experimenting with your sourdough, and let your taste buds guide you!
Print
Sourdough Scoring: 5 Tips for Stunning Loaves Every Time
- Total Time: 40 minutes
- Yield: 1 loaf 1x
- Diet: Vegetarian
Description
Sourdough scoring enhances the appearance and texture of your bread.
Ingredients
- 1 loaf sourdough bread
Instructions
- Preheat your oven to 450°F (232°C).
- Place the loaf on a cutting board.
- Use a sharp razor blade or bread lame to make shallow cuts on the surface.
- Create a pattern or design of your choice.
- Bake the bread in the preheated oven.
Notes
- Score just before baking.
- Keep the cuts shallow to avoid deflating the dough.
- Prep Time: 10 minutes
- Cook Time: 30 minutes
- Category: Baking
- Method: Baking
- Cuisine: American
Nutrition
- Serving Size: 1 slice
- Calories: 80
- Sugar: 0g
- Sodium: 160mg
- Fat: 0g
- Saturated Fat: 0g
- Unsaturated Fat: 0g
- Trans Fat: 0g
- Carbohydrates: 15g
- Fiber: 1g
- Protein: 3g
- Cholesterol: 0mg
Keywords: sourdough scoring, bread scoring, baking techniques


