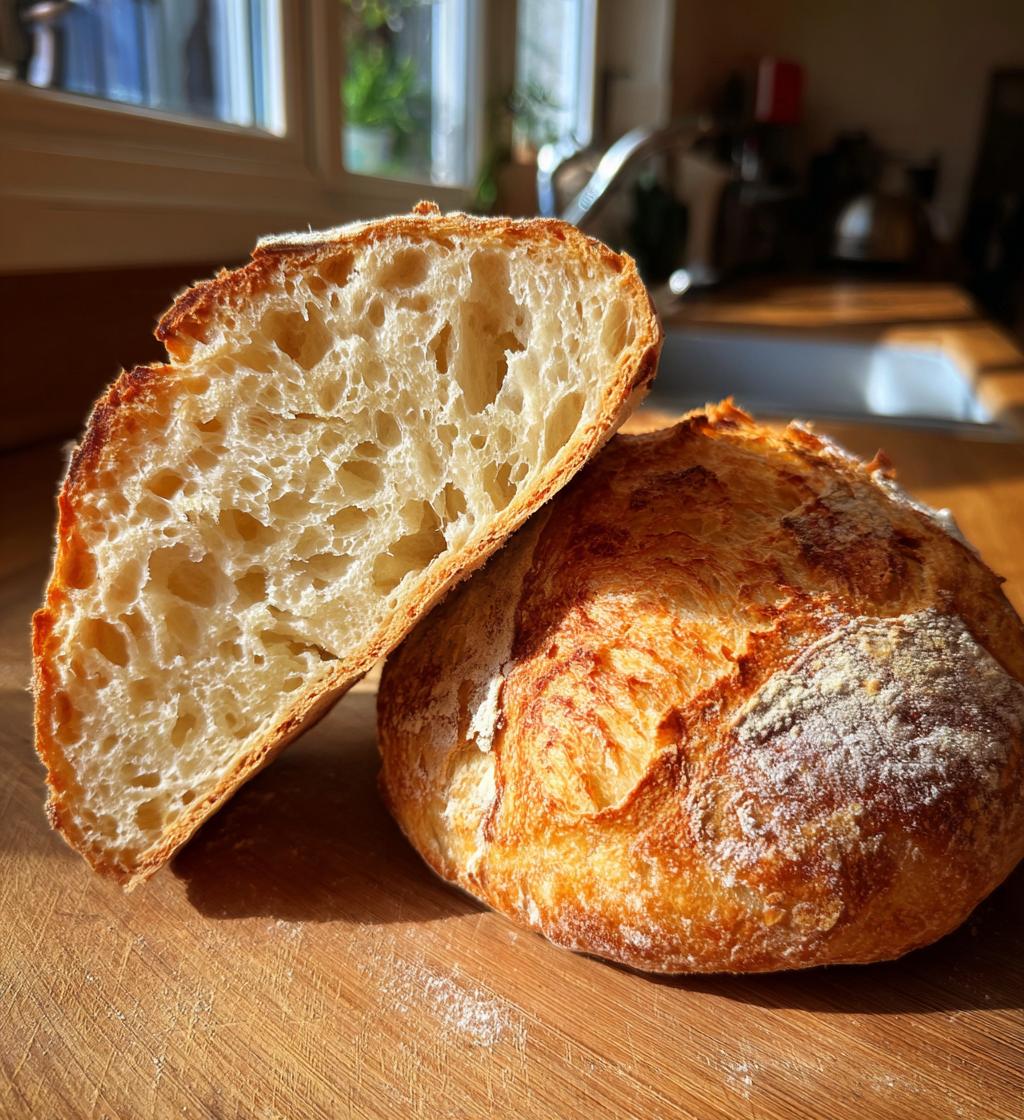
Ah, sourdough baking! It’s like a magical journey that transforms simple ingredients into a crusty, golden loaf that’s bursting with flavor. I remember the first time I made sourdough bread—it was a bit chaotic, but the aroma that filled my kitchen was nothing short of enchanting! Sourdough recipes are unique because they rely on natural fermentation, which not only gives the bread a delightful tang but also makes it incredibly satisfying to eat. Plus, the process of nurturing your sourdough starter teaches you patience and creativity in the kitchen. With each loaf, you’ll discover how the texture and flavor evolve, and trust me, the satisfaction of pulling a warm loaf from the oven is unmatched. So, let’s dive into this delightful world of sourdough, where each bake becomes an adventure!
Ingredients List
Here’s what you’ll need to create this mouthwatering sourdough bread. Each ingredient plays a crucial role in building flavor and texture, so let’s get into the details:
- 500g bread flour: This is your foundation. Look for high-protein bread flour to give your loaf that perfect structure and chew.
- 350ml water: Use warm water to help activate the sourdough starter. You can adjust this based on the flour absorption, but start here for a good balance.
- 100g sourdough starter: Make sure it’s mature and bubbly! This is the magic ingredient that brings your bread to life with that unique tangy flavor.
- 10g salt: Don’t skimp on this! Salt enhances the overall flavor and helps control fermentation, making sure your loaf rises beautifully.
Gather these ingredients, and you’ll be well on your way to baking a crusty, soft loaf that will impress everyone around your table!
How to Prepare Sourdough Recipes
Now, let’s get our hands a little messy and dive into the step-by-step process of making this delightful sourdough bread. Each step is essential, and trust me, the results will be worth it! Ready? Let’s go!
Mixing the Dough
First things first, grab a large mixing bowl. You’ll want to combine the 500g of bread flour and 350ml of warm water. Stir them together until no dry flour remains—this is super important! The water needs to embrace every bit of flour, creating the foundation for your dough. I like to use a wooden spoon or even my hands to really feel the texture. Just make sure it’s well combined; don’t worry about perfection here!
Adding Key Ingredients
Once your dough is mixed, it’s time to add the magic—your 100g of sourdough starter and 10g of salt. It’s crucial to mix these in thoroughly. You want the starter to be evenly distributed throughout the dough, as it’s what gives your bread that signature tangy flavor. This part can get a little sticky, but don’t shy away! Just dig in and mix until everything is well incorporated.
Resting the Dough
Now that everything’s in the bowl, cover it with a clean kitchen towel or plastic wrap and let it rest for 30 minutes. This resting period is where the magic begins—allowing the flour to hydrate fully and the gluten to relax. It’s like giving the dough a little nap before the real workout starts!
Stretching and Folding Technique
After your dough has rested, we’re going to develop that lovely gluten structure through a process known as stretching and folding. Every 30 minutes for the next 3 hours, you’ll gently pull one side of the dough up and fold it over itself. Rotate the bowl and repeat this process until you’ve gone around the entire dough. This technique helps build strength without the need for kneading. You’ll notice the dough becoming smoother and more elastic with each stretch. It’s such a satisfying process!
Shaping and Proofing
Once your dough has had its workout, it’s time to shape it! Lightly flour your work surface and turn the dough out. With gentle hands, shape it into a round or oval shape, depending on your preference. Then, place it seam side up in a proofing basket (or bowl lined with a floured kitchen towel). Cover it again and let it proof for about 2-4 hours at room temperature or pop it in the fridge overnight for a slower fermentation. Both methods will enhance the flavor, so choose what fits your schedule!
Baking the Bread
Finally, the moment we’ve all been waiting for! Preheat your oven to 230°C (450°F) with a Dutch oven inside to heat up. When it’s nice and hot, carefully transfer your dough into the Dutch oven. Don’t forget to score the top with a sharp knife or a lame—this helps the bread expand beautifully while baking. Cover with the lid and bake for 30 minutes, then remove the lid and bake for an additional 15 minutes to achieve that gorgeous golden crust. Once it’s done, let it cool on a wire rack before slicing into it. The smell will be absolutely heavenly!
Nutritional Information
Understanding the nutritional content of your homemade sourdough bread can help you appreciate its wholesome goodness! For a typical serving size of one slice, here’s what you can expect:
- Calories: 150
- Fat: 1g
- Saturated Fat: 0g
- Unsaturated Fat: 0g
- Trans Fat: 0g
- Sodium: 200mg
- Carbohydrates: 30g
- Fiber: 2g
- Protein: 5g
- Cholesterol: 0mg
- Sugar: 0g
This bread not only nourishes your body but also gives you the satisfaction of knowing you’re enjoying something made from scratch. The balance of healthy carbohydrates and protein makes it perfect for any meal of the day. Plus, with the added benefits of fermentation, it’s easier to digest and can be a delightful part of a balanced diet!
FAQ Section
Got questions about sourdough recipes? You’re not alone! Here are some of the most common queries I hear, along with my answers to help you on your sourdough journey.
What can I do if my sourdough starter isn’t bubbling?
First, don’t panic! A sluggish starter might just need a little extra love. Make sure you’re feeding it regularly with equal parts flour and water. If it’s been in the fridge, give it a few feedings at room temperature to wake it up. It should become bubbly and active again! Remember, a healthy starter is the key to great sourdough bread!
How can I tell if my dough has risen enough?
Great question! You’re looking for your dough to double in size and feel puffy to the touch. A quick poke test can help—gently press your finger into the dough. If the indentation springs back slowly, it’s ready to bake. If it collapses, it might need a bit more time. Keep an eye on it, and trust your instincts!
Can I use whole wheat flour in this sourdough recipe?
Absolutely! Whole wheat flour can add a lovely nutty flavor and extra nutrition to your sourdough bread. Just keep in mind that whole wheat absorbs more water than white flour, so you may need to adjust the water amount slightly. Start with a mix of half bread flour and half whole wheat for a great balance!
What’s the best way to store leftover sourdough bread?
To keep your sourdough bread fresh, wrap it in a clean kitchen towel or place it in a paper bag. This helps maintain its crust while keeping the inside soft. If you won’t eat it within a few days, slice it and freeze the pieces in an airtight container. To enjoy, just toast or reheat in the oven for that fresh-baked taste!
Can I make sourdough bread without a Dutch oven?
You sure can! While a Dutch oven is fantastic for creating steam, you can use a baking stone or a sheet pan instead. Just preheat your oven with a pan on the bottom. When you put your bread in, pour hot water into the pan to create steam. This helps develop that beautiful crust we all love!
Why You’ll Love This Recipe
- Incredible Flavor: This sourdough bread boasts a delightful tanginess from the natural fermentation process. Each bite delivers a complex flavor profile that’s far superior to store-bought bread!
- Simple Ingredients: With just four basic ingredients—flour, water, sourdough starter, and salt—you can create something extraordinary. No preservatives or additives here, just wholesome goodness!
- Health Benefits: Thanks to the fermentation, sourdough bread is easier to digest and has a lower glycemic index compared to regular bread. Plus, it’s packed with nutrients and probiotics that are great for gut health!
- Flexibility and Creativity: This recipe is a fantastic base! Feel free to experiment with different flours or add-ins like seeds, herbs, or even dried fruits to create your own signature loaf.
- Fun and Rewarding Process: Baking sourdough is not just about the end result; it’s a relaxing and fulfilling journey! Watching the dough rise and transform into a beautiful loaf is truly satisfying.
Tips for Success
Ready to elevate your sourdough game? Here are my top tips that will help you achieve that perfect loaf every time. Trust me, these little nuggets of wisdom can make all the difference!
Pay Attention to Your Starter
Your sourdough starter is the heart of this recipe. Always make sure it’s active and bubbly before using it. A mature starter will give your bread the best rise and flavor. If you’re unsure, give it a little test by feeding it and watching how quickly it doubles in size. If it takes longer than a few hours, it might need some extra care!
Temperature Matters
Keep an eye on the temperature of your dough and your kitchen. Sourdough loves warmth! If your kitchen is too cool, it will slow fermentation down, leading to dense bread. Aim for around 75°F (24°C) for optimal fermentation. If it’s chilly, try placing your dough in a turned-off oven with the light on or near a warm spot in your home.
Don’t Skip the Stretch and Fold
This technique is crucial for developing gluten without intensive kneading. Be consistent with your stretch and fold routine every 30 minutes, as this helps build strength and structure in the dough. It’s amazing to feel the dough transform over those three hours, and it’s so worth the effort!
Be Patient with Proofing
Proofing times can vary based on your dough and environment. If you’re not sure when it’s ready, do the poke test! If the dough springs back slowly, it’s ready to bake. If it springs back too quickly, give it a bit more time. Patience is key here—trust me, the wait will pay off with a beautifully airy loaf!
Use Steam for a Crusty Loaf
Creating steam in the oven helps your bread develop that crispy crust we all crave. If you don’t have a Dutch oven, you can achieve this by placing a shallow pan on the bottom rack of your oven while preheating. Just toss in some hot water when you put your bread in to create steam. Voila! Perfect crust, here you come!
Cool Before Slicing
It might be tempting to slice into that warm loaf right out of the oven, but resist the urge! Let it cool on a wire rack for at least an hour before cutting. This allows the crumb to set properly and enhances the flavor. Plus, it gives you a moment to enjoy the delightful aroma filling your kitchen!
With these tips in your back pocket, I’m confident you’ll be able to bake a sourdough loaf that not only impresses your friends and family but fills your home with that irresistible, warm bread smell. Happy baking!
Storage & Reheating Instructions
Now that you’ve baked this beautiful sourdough bread, let’s talk about how to keep it fresh and delicious! Proper storage is key to maintaining that crusty exterior and soft interior we all love.
Storing Leftover Sourdough Bread
To store your leftover sourdough bread, wrap it in a clean kitchen towel or place it in a paper bag. This method allows the bread to breathe while preventing it from getting too soft. Avoid plastic bags, as they can trap moisture and make the crust soggy. If you think you won’t finish it within a few days, slicing the loaf and freezing the pieces is a great option!
Freezing for Longer Storage
To freeze your sourdough bread, slice it first (if you haven’t already) and place the slices in an airtight container or a freezer bag. Make sure to label it with the date so you can keep track. When you’re ready to enjoy it again, simply take out the slices you need and let them thaw at room temperature. For an extra touch, pop them in the toaster or the oven for a few minutes to bring back that freshly baked taste!
Reheating Sourdough Bread
If you have a whole loaf that you want to reheat, preheat your oven to 180°C (350°F). Wrap the loaf in aluminum foil to prevent it from getting too crusty. Heat it in the oven for about 10-15 minutes, or until it’s warmed through. This method helps revive the crust while keeping the inside soft and delightful.
Enjoying Your Bread at Its Best
Remember, the best way to enjoy sourdough bread is fresh. Try to consume it within a few days for the best flavor and texture. But with these storage and reheating tips, you’ll be able to savor your homemade sourdough bread long after it comes out of the oven! Happy munching!
Print
Sourdough Recipes: 5 Secrets to Perfectly Delicious Loaves
- Total Time: 1 hour 15 minutes
- Yield: 1 loaf 1x
- Diet: Vegetarian
Description
A simple sourdough bread recipe that yields a crusty loaf with a soft interior.
Ingredients
- 500g bread flour
- 350ml water
- 100g sourdough starter
- 10g salt
Instructions
- Mix the flour and water in a bowl until no dry flour remains.
- Add the sourdough starter and salt, and mix until well combined.
- Cover the bowl and let it rest for 30 minutes.
- Stretch and fold the dough every 30 minutes for 3 hours.
- Shape the dough and place it in a proofing basket.
- Let it proof for 2-4 hours at room temperature or overnight in the fridge.
- Preheat the oven to 230°C (450°F) with a Dutch oven inside.
- Carefully transfer the dough to the Dutch oven and score the top.
- Bake for 30 minutes with the lid on, then 15 minutes with the lid off.
- Cool on a wire rack before slicing.
Notes
- Use a mature sourdough starter for best results.
- Adjust water based on flour absorption.
- Experiment with different flours for varied flavors.
- Prep Time: 30 minutes
- Cook Time: 45 minutes
- Category: Bread
- Method: Baking
- Cuisine: Global
Nutrition
- Serving Size: 1 slice
- Calories: 150
- Sugar: 0g
- Sodium: 200mg
- Fat: 1g
- Saturated Fat: 0g
- Unsaturated Fat: 0g
- Trans Fat: 0g
- Carbohydrates: 30g
- Fiber: 2g
- Protein: 5g
- Cholesterol: 0mg
Keywords: sourdough, sourdough bread, baking


