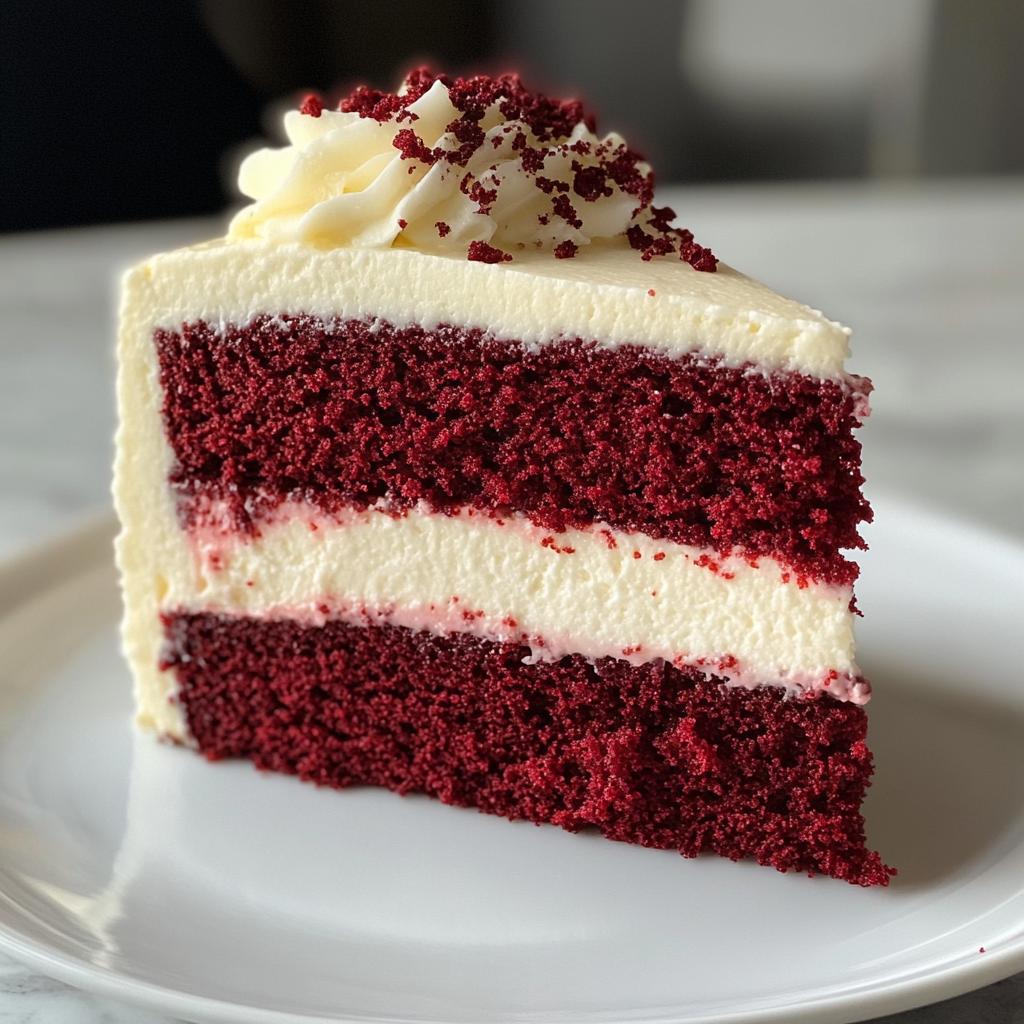
Oh my stars, let me tell you about my love affair with Red Velvet Cheesecake Cake! It all started when I accidentally brought this showstopper to a potluck instead of my usual vanilla sheet cake. The moment that first slice revealed those dramatic red layers hugging creamy cheesecake filling, I knew I’d created something magical. This isn’t just dessert—it’s velvet-soft cake meets tangy cheesecake in one unforgettable bite. My neighbor still texts me every Valentine’s Day begging for “that red cake.” Trust me, once you taste this beauty with its signature crimson crumb and luscious cream cheese layers, you’ll understand why it disappears faster than you can say “second slice.”
Why You’ll Love This Red Velvet Cheesecake Cake
This cake isn’t just a dessert—it’s an experience. Here’s why it’s a total game-changer:
- Decadent and dreamy: The rich red velvet layers paired with creamy cheesecake filling create a flavor combo that’s pure bliss.
- Stunning centerpiece: Its vibrant red layers and smooth frosting make it the star of any table—perfect for birthdays, holidays, or just because.
- Easy to wow: Even if you’re not a pro baker, this recipe walks you through every step for a flawless result.
- Crowd-pleaser: Seriously, I’ve never met anyone who didn’t go back for seconds (or thirds).
Ingredients for Red Velvet Cheesecake Cake
Gathering the right ingredients is half the battle with this showstopper cake. I learned the hard way that substitutions can lead to cake disasters (RIP, my purple velvet cake of 2018). Here’s exactly what you’ll need, divided into two dream teams:
For the Red Velvet Cake
- 2 cups all-purpose flour – spooned and leveled, please! Packing flour leads to dry cake.
- 1 1/2 cups granulated sugar – the sweet foundation of our red velvet layers.
- 1 tsp baking soda + 1 tsp salt – these workhorses make the cake rise beautifully.
- 1 tsp cocoa powder – just enough to deepen the color without making it chocolatey.
- 2 large eggs – room temperature is non-negotiable for even mixing.
- 1 1/2 cups vegetable oil – gives that signature velvety texture.
- 1 cup buttermilk – if you’re out, make your own with 1 tbsp vinegar + milk to equal 1 cup.
- 2 tbsp red food coloring – gel works best for vibrant color without thinning the batter.
- 1 tsp vanilla extract – pure vanilla makes all the difference.
- 1 tsp white vinegar – the secret weapon that reacts with baking soda for lift.
For the Cheesecake Filling
- 16 oz cream cheese – full-fat only, softened to room temperature (no shortcuts!).
- 1/2 cup powdered sugar – sifted to avoid lumps in your creamy filling.
- 1 tsp lemon juice – just a kiss of acidity to balance the sweetness.
Pro tip: Set everything out about an hour before baking. Cold ingredients just don’t play nice in this recipe!
Equipment You’ll Need
You don’t need fancy gadgets for this beauty, but here’s what I always grab:
- Two 9-inch cake pans – trust me, springform ones make layering cheesecake filling WAY easier
- Electric mixer – hand mixers work, but stand mixers save your arms during creaming
- Mixing bowls – one for dry ingredients, one for wet (Grandma’s golden rule!)
- Rubber spatula – crucial for scraping down every last bit of that gorgeous red batter
That’s it! Now let’s make some magic.
How to Make Red Velvet Cheesecake Cake
Alright, let’s dive into the fun part! I’ll walk you through each step like we’re baking side by side in my flour-dusted kitchen. Just follow along, and you’ll have a showstopper cake that’ll make everyone think you trained at a fancy bakery.
Preparing the Red Velvet Cake Layers
First things first – preheat that oven to 350°F (175°C). While it’s heating up, let’s make magic happen:
- Whisk dry ingredients: In a large bowl, combine flour, sugar, baking soda, cocoa powder, and salt. I like to sift them together to prevent any lumps – it makes for the smoothest batter.
- Mix wet ingredients: In another bowl, whisk eggs, oil, buttermilk, food coloring, vanilla, and vinegar until fully blended. That vinegar might smell strong now, but it’s the secret to that perfect rise!
- Combine carefully: Pour the wet into the dry ingredients and mix just until combined. Overmixing = tough cake, and we want cloud-soft layers.
- Bake with love: Divide batter evenly between two greased 9-inch pans. Bake for 25-28 minutes until a toothpick comes out clean. Let them cool completely in the pans – rushing this leads to crumbly disasters!
Making the Cheesecake Filling
While the cakes cool, let’s whip up that dreamy filling:
- Beat cream cheese in a clean bowl until completely smooth. No lumps allowed! Scrape down the sides often.
- Add powdered sugar gradually, mixing well after each addition. This prevents that dreaded sugar cloud explosion.
- Finish with lemon juice and beat just until incorporated. Taste it (chef’s privilege!) – it should be tangy-sweet perfection.
Assembling the Cake
Here’s where the magic really happens:
- Level the cakes if needed – a serrated knife works wonders for trimming domed tops.
- First layer: Place one cake on your serving plate. Spread all the cheesecake filling evenly over it, leaving a small border.
- Top it off: Gently place the second cake layer. Press lightly to secure (but don’t squish that filling out!).
- Chill time: Refrigerate for at least 2 hours before frosting. I know it’s hard to wait, but this sets the filling so you get clean slices.
Now step back and admire your masterpiece! Those vibrant red layers peeking through are worth every minute of effort.
Tips for Perfect Red Velvet Cheesecake Cake
After making this cake more times than I can count (and surviving a few kitchen disasters), here are my must-know secrets for success:
- Gel food coloring is your BFF: Liquid makes batter runny – gel gives that iconic deep red without altering texture.
- Room temp is non-negotiable: Cold ingredients don’t blend smoothly. Plan ahead!
- Level those layers: A cake leveler or serrated knife ensures your cheesecake filling stays put.
- Patience pays off: Let cakes cool completely before assembling – warm cakes melt the filling into a mess.
- Chill before slicing: That 2-hour wait? It’s the difference between pretty slices and red velvet pudding.
Trust me, these small steps make all the difference between good and “OMG-what’s-your-recipe?!”
Variations of Red Velvet Cheesecake Cake
Once you’ve mastered the classic version, try these fun twists!
- Nutty delight: Fold chopped pecans or walnuts into the cake batter for crunch.
- Chocolate lover’s dream: Drizzle warm ganache over the frosted cake.
- Berry boost: Add a raspberry jam layer between cake and cheesecake filling.
- Coconut craze: Toast coconut flakes and press them onto the cake sides.
The possibilities are endless – make it your own!
Serving and Storing Red Velvet Cheesecake Cake
This beauty must stay refrigerated—that cheesecake filling demands it! For picture-perfect slices, run your knife under hot water and wipe dry between cuts. Leftovers (ha!) keep beautifully covered for 3-4 days. Pro tip: Bring slices to room temp for 10 minutes before serving—it makes all the flavors sing!
Red Velvet Cheesecake Cake FAQs
I’ve gotten SO many questions about this cake over the years—here are the ones that pop up most often:
Can I freeze Red Velvet Cheesecake Cake?
Absolutely! Wrap unfrosted cake layers tightly in plastic, then foil, and freeze for up to 2 months. Thaw overnight in the fridge before assembling. The cheesecake filling freezes beautifully too—just whisk gently after thawing.
How long does it last?
In the fridge, this cake stays divine for 3-4 days if you can resist it that long! Cover it with a cake dome or overturned bowl to prevent drying out. The flavors actually deepen by day two—if it lasts that long.
Can I make cupcakes instead?
You bet! Fill liners halfway, bake at 350°F for 18-20 minutes, then pipe the cheesecake filling inside using a piping tip. Top with cream cheese frosting—instant crowd-pleasers!
Why did my cake turn out dry?
Overbaking is usually the culprit. Ovens vary, so start checking at 22 minutes. Also, measure flour correctly (spoon and level!)—packed flour sucks up moisture like a sponge.
Can I use natural food coloring?
For sure, but expect a softer pink hue. Beet powder works wonders—use 2-3 tbsp dissolved in warm water. The flavor stays perfect!
Nutritional Information
Now, I’m no nutritionist, but let’s be real—this is a celebration cake, not a health food! While I don’t have lab-tested numbers (who has time for that when there’s cake to eat?), here’s the general scoop:
Each glorious slice packs that perfect balance of rich, creamy, and sweet that makes it worth every calorie. The exact nutrition varies based on your specific ingredients—like whether you use full-fat cream cheese or swap in lower-fat options (though I don’t recommend it—live a little!).
If you’re tracking macros, just know this beauty contains all the good stuff: carbs from that tender cake, protein from the cheesecake layer, and enough happiness to brighten any day. My philosophy? Enjoy a sensible slice, savor every bite, and maybe take an extra walk tomorrow!
I’d Love to Hear How Your Cake Turned Out!
Did you make this showstopper? Tag me in your photos or leave a comment below—I live for your baking triumphs (and even the funny kitchen mishaps!). Your feedback makes my day brighter than that red velvet crumb.
Print
Irresistible 2-Layer Red Velvet Cheesecake Cake Recipe
- Total Time: 45 minutes
- Yield: 12 servings 1x
- Diet: Vegetarian
Description
A layered cake combining red velvet and cheesecake for a rich dessert.
Ingredients
- 2 cups all-purpose flour
- 1 1/2 cups sugar
- 1 tsp baking soda
- 1 tsp cocoa powder
- 1 tsp salt
- 2 eggs
- 1 1/2 cups vegetable oil
- 1 cup buttermilk
- 2 tbsp red food coloring
- 1 tsp vanilla extract
- 1 tsp white vinegar
- 16 oz cream cheese
- 1/2 cup powdered sugar
- 1 tsp lemon juice
Instructions
- Preheat oven to 350°F.
- Mix dry ingredients in a bowl.
- Add wet ingredients and mix until smooth.
- Pour batter into greased pans and bake for 25 minutes.
- Beat cream cheese, powdered sugar, and lemon juice until creamy.
- Layer cooled cake with cheesecake filling.
- Frost the assembled cake.
Notes
- Use room temperature ingredients.
- Cool cake completely before assembling.
- Store refrigerated.
- Prep Time: 20 minutes
- Cook Time: 25 minutes
- Category: Dessert
- Method: Baking
- Cuisine: American
Nutrition
- Serving Size: 1 slice
- Calories: 450
- Sugar: 30g
- Sodium: 300mg
- Fat: 25g
- Saturated Fat: 8g
- Unsaturated Fat: 15g
- Trans Fat: 0g
- Carbohydrates: 50g
- Fiber: 1g
- Protein: 6g
- Cholesterol: 80mg
Keywords: red velvet cheesecake cake, layered cake, dessert recipe


