I can still remember the first time I made peanut butter blossoms with my mom – flour everywhere, chocolate kisses mysteriously disappearing, and that incredible smell filling the kitchen. These cookies aren’t just treats; they’re little edible memories. There’s something magical about that perfect peanut butter cookie base hugging a melty chocolate kiss. Every December, my kitchen becomes a peanut butter blossom factory because, let’s be honest, one batch is never enough. Friends and family start dropping hints (“Are you making those cookies soon?”) as soon as the holiday decorations go up. And who can blame them? That sweet-salty combo with the chocolate surprise in the center is pure happiness in cookie form.
Why You’ll Love These Peanut Butter Blossoms
Oh, where do I even start? These little gems check ALL the boxes for the perfect cookie:
- Impossible to mess up – Even my disaster-prone nephew can make these (and he once confused salt for sugar!)
- Crowds go wild – I bring them to every potluck and watch them disappear before the main dishes
- Nostalgia in every bite – That chocolate-peanut butter combo instantly transports people back to childhood
- Holiday magic makers – They look so festive with that chocolate center, like edible decorations
- Secret weapon – Need to bribe kids? Impress the in-laws? These are your edible golden ticket
Ingredients for Peanut Butter Blossoms
Okay, let’s talk ingredients – and I mean the good stuff! You’ll want to gather:
- 1/2 cup granulated sugar (plus extra for rolling – trust me, that sparkly coating makes all the difference)
- 1/2 cup packed brown sugar (pack it in there like you’re mad at it – we want that molasses richness)
- 1/2 cup creamy peanut butter (I’m loyal to Jif, but use whatever makes your heart happy)
- 1/2 cup unsalted butter, softened (leave it out for an hour – no cheating with the microwave!)
- 1 large egg (room temp helps everything play nice together)
- 1 tsp vanilla extract (the real stuff – no imitation here)
- 1 3/4 cups all-purpose flour (fluff it before measuring – no dense flour bricks!)
- 1 tsp baking soda (check it’s fresh – mine lives in the freezer to stay active)
- 1/2 tsp salt (balances all that sweetness perfectly)
- 48 milk chocolate kisses (unwrapped – this is the fun part where helpers “disappear” a few)
See? Nothing fancy – just pantry staples transformed into magic!
Equipment You’ll Need
Don’t worry – you won’t need any fancy gadgets for these peanut butter blossoms! Just grab:
- A trusty mixing bowl (the one with the little spout is my favorite for cookie dough)
- A hand mixer or strong arm muscles (grandma’s wooden spoon works in a pinch!)
- Baking sheets (no need to grease them – these cookies like to slide right off)
- A spatula (for scraping every last bit of that delicious dough)
- Measuring cups and spoons (eyeballing it never works with baking – trust me!)
That’s it! Now let’s make some cookie magic.
How to Make Peanut Butter Blossoms
Alright, let’s get baking! These peanut butter blossoms come together faster than you can say “chocolate kiss,” but there are a few key steps that make all the difference. Follow along – I’ll walk you through each one!
Step 1: Cream the Wet Ingredients
First things first – preheat that oven to 375°F (190°C). While it’s heating up, grab your mixing bowl and let’s cream together the good stuff. Beat the softened butter, both sugars, and peanut butter until it’s light and fluffy – about 2 minutes with a mixer. You’ll know it’s ready when the mixture looks like smooth caramel and there are no butter lumps left. Then beat in the egg and vanilla until everything’s happily combined. (Pro tip: Scrape down the sides of the bowl halfway through – those sneaky bits love to hide!)
Step 2: Mix the Dry Ingredients
In another bowl, whisk together the flour, baking soda, and salt. Now here’s the secret – add the dry ingredients to the wet mixture in three batches, mixing just until combined after each addition. Don’t overmix! We want tender cookies, not hockey pucks. The dough should be soft but not sticky – if it clings to your fingers, add a tablespoon more flour.
Step 3: Shape and Bake
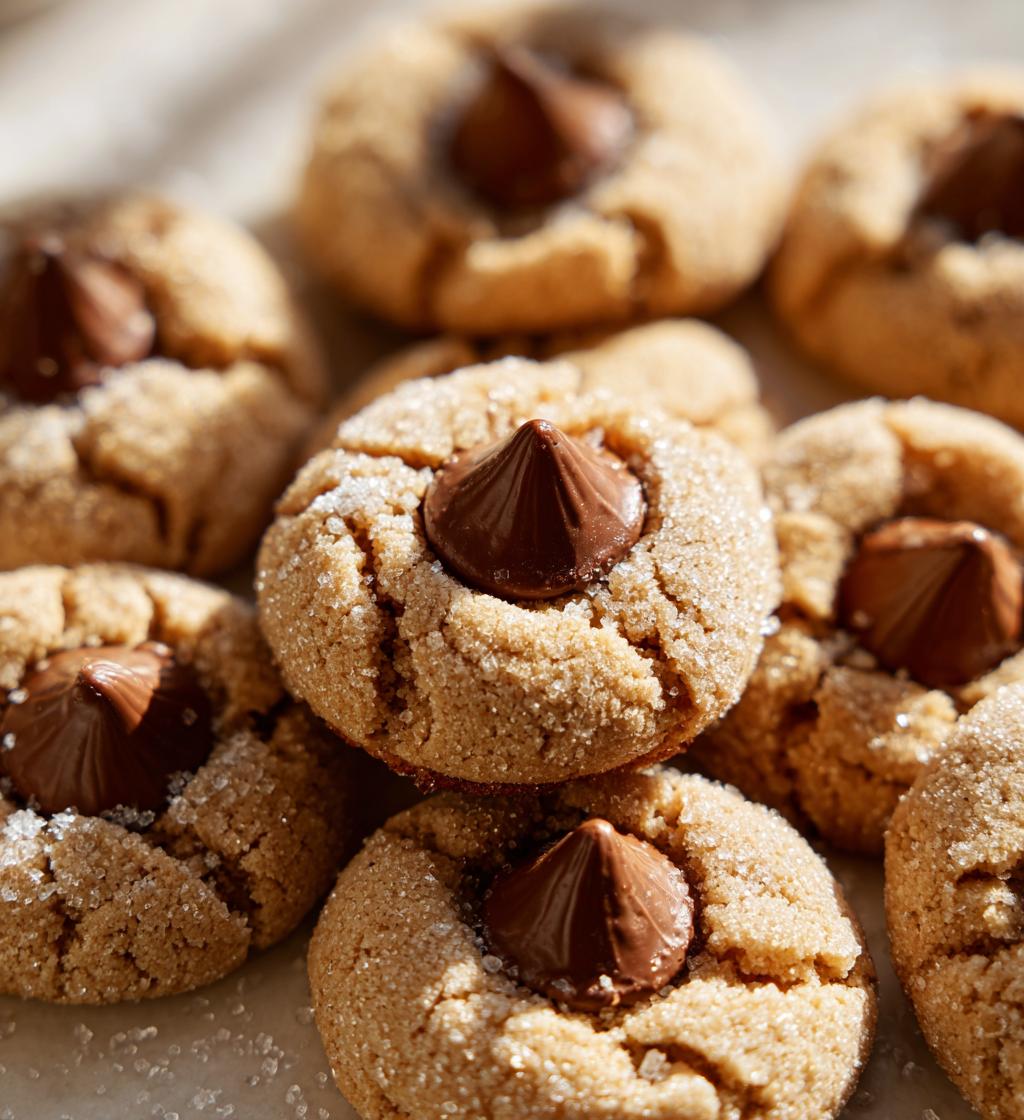
Time for the fun part! Roll tablespoon-sized portions of dough between your palms into smooth 1-inch balls. Roll each ball in granulated sugar (this gives them that magical sparkle) and place them about 2 inches apart on ungreased baking sheets. Bake for 8-10 minutes – they’re done when the edges just start turning golden but the centers still look slightly underbaked. They’ll firm up as they cool!
Step 4: Add the Chocolate Kisses
Here’s where the magic happens – immediately after pulling the cookies from the oven (I mean within 30 seconds!), gently press a chocolate kiss into the center of each cookie. The heat will soften the chocolate just enough to make it stick, but not so much that it melts completely. Let them cool on the baking sheet for 2 minutes before transferring to wire racks. Warning: The smell will make resisting them impossible!
Tips for Perfect Peanut Butter Blossoms
After years of baking these cookies (and eating the “test batches”), I’ve picked up some foolproof tricks:
- Fresh peanut butter is key – That dusty jar from last Christmas won’t cut it
- Watch the clock! Pull them out when they look almost done – they’ll keep cooking on the hot pan
- Chill the dough if it’s sticky – 30 minutes in the fridge makes rolling so much easier
- Keep kisses cold – Store them in the fridge so they hold their shape when pressed in
- Double the batch – Because “I’ll just have one” is the biggest baking lie we tell ourselves
Variations for Peanut Butter Blossoms
Want to mix things up? Oh honey, we’ve got options! Swap milk chocolate kisses for dark chocolate or even peanut butter-filled ones for extra decadence. Feeling fancy? Roll the dough balls in crushed peanuts instead of sugar for crunch. My wild-child niece adds mini M&Ms to the dough – total game changer! The best part? These cookies forgive all sorts of creative tinkering.
Storing and Freezing Peanut Butter Blossoms
Here’s the beautiful truth – these cookies practically store themselves! Keep them in an airtight container at room temp for up to 5 days (if they last that long). Want to freeze them? Just pop cooled cookies in a freezer bag – they’ll stay perfect for 3 months. Thaw at room temp when the cookie craving strikes. The chocolate might lose its shine, but the taste? Still absolutely magical!
Nutritional Information
Now, I’m no nutritionist (just a cookie enthusiast!), but here’s what you should know about these peanut butter blossoms. They’re definitely a treat – that perfect balance of sweet peanut butter cookie hugging a creamy chocolate kiss. The exact nutrition varies depending on your specific ingredients (like which peanut butter brand you swear by or whether you use salted butter).
Each cookie gives you a nice little energy boost from the peanut butter’s protein, but let’s be real – we’re not eating these for their health benefits! If you’re watching portions, try making smaller cookies (just adjust the baking time down a minute or two). And remember – calories don’t count when shared with friends… at least that’s what I tell myself when I “accidentally” eat three in a row!
As with any homemade goodies, your mileage may vary based on ingredient brands and exact measurements. But honestly? When that chocolate-peanut butter combo hits your tastebuds, you won’t be thinking about numbers – just pure cookie joy!
Frequently Asked Questions
Can I use crunchy peanut butter instead of creamy?
Absolutely! Crunchy peanut butter adds wonderful texture – just know your cookies will have little peanut bits throughout. My aunt swears by this version!
Why do my chocolate kisses melt completely?
You’re pressing them in too late! The cookies need to be piping hot when you add the kisses – I literally keep them unwrapped and ready to go before the cookies come out of the oven.
Can I make the dough ahead of time?
You bet! The dough keeps beautifully in the fridge for 3 days (wrap it tight). Just let it soften slightly at room temp before rolling.
Help! My cookies spread too much!
Ah, the butter was probably too soft. Next time, chill your shaped dough balls for 15 minutes before baking – this helps them hold their perfect round shape.
Can I use other chocolate candies?
Get creative! I’ve used Rolos, mini Reese’s cups, even caramel-filled kisses. Just adjust baking time if your substitute is larger than standard kisses.
Share Your Peanut Butter Blossoms
Did you make these? I’d love to see your creations! Snap a photo of your peanut butter blossoms (especially if they’re slightly imperfect – those taste best!) and tag me. Nothing makes me happier than seeing these cookies spreading joy in other kitchens!
Print
Irresistible Peanut Butter Blossoms Bake in Just 10 Minutes
- Total Time: 25 minutes
- Yield: 48 cookies 1x
- Diet: Vegetarian
Description
Peanut butter blossoms are classic cookies with a peanut butter base and a chocolate kiss in the center.
Ingredients
- 1/2 cup granulated sugar
- 1/2 cup packed brown sugar
- 1/2 cup creamy peanut butter
- 1/2 cup unsalted butter, softened
- 1 large egg
- 1 tsp vanilla extract
- 1 3/4 cups all-purpose flour
- 1 tsp baking soda
- 1/2 tsp salt
- Additional granulated sugar for rolling
- 48 milk chocolate kisses, unwrapped
Instructions
- Preheat oven to 375°F (190°C).
- Cream together sugars, peanut butter, and butter.
- Beat in egg and vanilla.
- Mix flour, baking soda, and salt, then gradually add to wet ingredients.
- Shape dough into 1-inch balls and roll in sugar.
- Place on ungreased baking sheets and bake for 8-10 minutes.
- Immediately press a chocolate kiss into each cookie.
- Cool on wire racks.
Notes
- Use room-temperature butter for easier mixing.
- Don’t overbake—cookies should be lightly golden.
- Store in an airtight container for up to 5 days.
- Prep Time: 15 minutes
- Cook Time: 10 minutes
- Category: Dessert
- Method: Baking
- Cuisine: American
Nutrition
- Serving Size: 1 cookie
- Calories: 95
- Sugar: 8g
- Sodium: 65mg
- Fat: 5g
- Saturated Fat: 2g
- Unsaturated Fat: 2g
- Trans Fat: 0g
- Carbohydrates: 11g
- Fiber: 0g
- Protein: 2g
- Cholesterol: 10mg
Keywords: peanut butter blossoms, cookies, holiday baking, chocolate kiss cookies


