Halloween is my favorite time of year—not just for the costumes and spooky decorations, but for the desserts! Every October, my kitchen turns into a mini haunted bakery, and this Oreo Halloween Cake Recipe has become a family tradition. It’s no-bake, which means no oven stress, and it’s so easy that even the kids can help. Trust me, this cake is a total crowd-pleaser for parties or just a fun after-dinner treat.
I remember the first time I made this with my niece. She was so excited to crush the Oreos and mix the filling. Her little hands were covered in cream cheese and sprinkles by the end, but the look on her face when we decorated the cake was priceless. That’s the magic of this recipe—it’s not just delicious, it’s a memory-maker.
If you’re looking for a dessert that’s quick, festive, and absolutely delicious, this Oreo Halloween Cake Recipe is your answer. And guess what? You can even download the easy PDF version to keep it handy for your next spooky celebration. Let’s get baking—or rather, no-baking!
Ingredients for Oreo Halloween Cake Recipe
Let me tell you—the beauty of this recipe is how simple the ingredients are! You probably have most of them in your pantry right now. Here’s exactly what you’ll need:
- 24 Oreo cookies – The classic kind, though you could get creative with flavors!
- 1/2 cup unsalted butter, melted – I microwave mine in a heatproof bowl for about 30 seconds
- 8 oz cream cheese, softened – This means left out for an hour until it spreads easily
- 1/4 cup granulated sugar – Adjust to taste if you prefer less sweet
- 2 cups heavy whipping cream – Must be cold straight from the fridge
- 1 tsp vanilla extract – Pure vanilla makes all the difference
- Orange food coloring (optional) – Gel colors work best for vibrant hues
- Halloween-themed sprinkles or decorations – Go wild with bats, ghosts or candy eyes!
See? Nothing fancy—just good quality ingredients that come together magically!
Equipment Needed for Oreo Halloween Cake
You won’t need any fancy gadgets for this recipe—just a few basic kitchen tools that you probably already own. Here’s what I grab from my cabinets every time I make this cake:
- 9-inch springform pan – The removable sides make serving a breeze
- Food processor or rolling pin – For crushing those Oreos to perfection
- Mixing bowls – One large, one medium should do the trick
- Electric mixer – A hand mixer works great for whipping the cream
- Spatula – For scraping every last bit of that delicious filling
That’s it! No special equipment required—just simple tools for a spectacular Halloween treat.
How to Make Oreo Halloween Cake Recipe
Alright, let’s get to the fun part—making this spooky delicious cake! The best thing? You don’t even need to turn on your oven. Just follow these simple steps, and in no time, you’ll have a Halloween showstopper that’ll disappear faster than a ghost in the night!
Step 1: Prepare the Oreo Crust
First, take those 24 Oreos and crush them into fine crumbs. I usually throw them in my food processor and pulse until they look like dark sand—easy peasy! If you don’t have a food processor, no worries. Just pop the cookies in a ziplock bag and go at them with a rolling pin. My kids love helping with this part—just be prepared for some enthusiastic banging!
Next, mix the crumbs with the melted butter until it looks like wet sand. Press this mixture firmly into the bottom of your springform pan—I use the bottom of a measuring cup to really pack it in. Pop it in the fridge for 10 minutes while you make the filling. This chilling time helps the crust set so it won’t crumble when you slice the cake later.
Step 2: Make the Cream Cheese Filling
Now for the creamy dreamy part! Beat the softened cream cheese and sugar together until they’re completely smooth—no lumps allowed! I usually do this for about 2 minutes with my hand mixer. Meanwhile, in another bowl, whip that heavy cream and vanilla until you get stiff peaks. This takes about 3-4 minutes, and when you lift the beaters, the cream should stand up straight like little mountains.
Gently fold the whipped cream into the cream cheese mixture. If you’re going for that perfect Halloween orange, now’s the time to add a few drops of food coloring. I like to use gel color because it gives such vibrant results without thinning the mixture. Fold until everything is evenly combined, but don’t overmix—we want to keep all that airy lightness!
Step 3: Assemble and Decorate
Take your chilled crust out of the fridge and pour in the creamy filling. Smooth the top with a spatula—it doesn’t have to be perfect because we’re covering it with fun decorations anyway! Now comes the hardest part—waiting. You’ll need to chill this beauty for at least 4 hours, though overnight is even better. If you’re in a hurry, an hour in the freezer will give you a firmer texture.
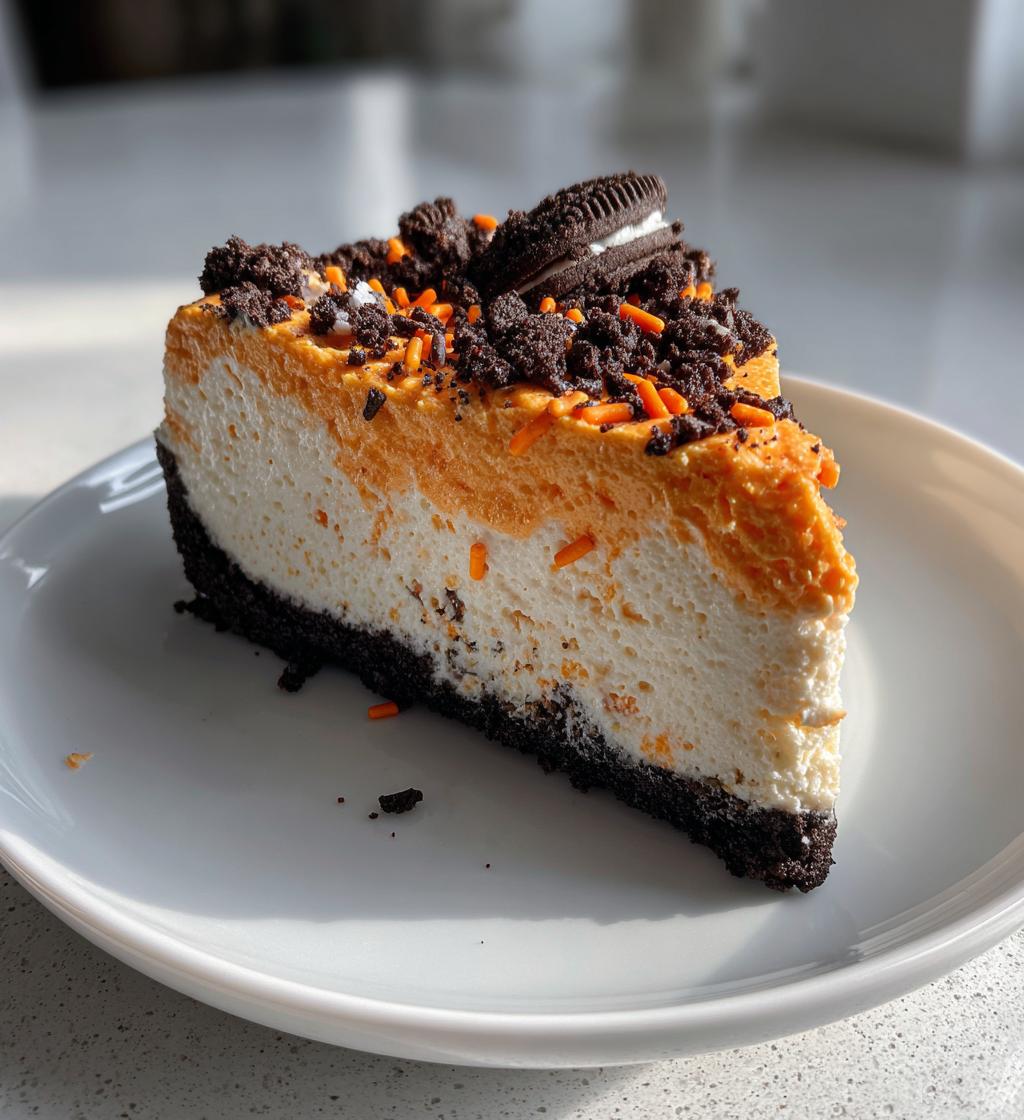
When you’re ready to serve, release the springform pan and go wild with the decorations! I love using Halloween sprinkles, candy eyes, or even crushed Oreos on top. The kids can help decorate—just be prepared for creative (and sometimes messy) results! Slice, serve, and watch everyone’s faces light up with spooky delight.
Tips for the Best Oreo Halloween Cake
Want to make sure your Oreo Halloween cake turns out perfect every time? Here are my go-to tips for spooky success:
- Use gluten-free Oreos if you’re baking for someone with dietary restrictions—they work just as well!
- Adjust the sugar to your taste. I sometimes cut it down to 2 tablespoons for a less sweet version.
- Freeze the cake for 1 hour before serving if you prefer a firmer, ice cream-like texture.
- Gel food coloring gives the best vibrant orange without thinning the filling.
- Decorate just before serving to keep sprinkles and decorations fresh and colorful.
With these tips, your cake will be the star of any Halloween party—guaranteed!
Oreo Halloween Cake Variations
One of my favorite things about this recipe is how easy it is to customize! Here are some fun twists we’ve tried over the years that always get screams of delight:
- Candy eyes pressed into the filling make it look like a monster cake—the kids go wild for this version!
- Purple or green food coloring instead of orange for a witchy or Frankenstein vibe
- Crushed candy corn mixed into the crust for extra Halloween crunch
- Mint Oreos with green filling for a creepy-cool peppermint twist
- Chocolate drizzle on top with spiderweb designs—just melt some chocolate chips!
The possibilities are endless—let your Halloween creativity run free!
Serving and Storing Oreo Halloween Cake
Here’s the best way to enjoy your spooky creation—serve it chilled straight from the fridge! I like to decorate mine right before serving so the sprinkles stay bright and crunchy. If you’ve got leftovers (though that’s rare in my house!), just cover the cake tightly with plastic wrap. It keeps beautifully in the fridge for up to 3 days—if it lasts that long!
Oreo Halloween Cake Recipe Nutritional Information
Just so you know—these numbers are estimates based on standard ingredients. Your actual nutrition facts might vary depending on brands or substitutions. Here’s the breakdown per slice (assuming you get 8 servings from this beauty):
- Calories: 420
- Sugar: 25g
- Sodium: 220mg
- Fat: 32g (18g saturated)
- Carbohydrates: 35g
- Protein: 4g
It’s Halloween—live a little! This spooky treat is totally worth every delicious bite.
FAQs About Oreo Halloween Cake Recipe
I get asked about this recipe all the time—here are the questions that pop up most often from fellow Halloween bakers!
Can I use other cookies instead of Oreos?
Absolutely! Any sandwich cookie will work—try Golden Oreos for a lighter crust or mint cookies for a spooky twist. Just make sure to use about the same amount (24 cookies). The filling pairs beautifully with almost any cookie base.
How long does the cake need to chill?
At least 4 hours is ideal, but overnight is even better. The chilling time lets everything set properly so you get clean slices. If you’re in a rush, pop it in the freezer for an hour—just don’t forget about it!
Can I make this ahead for a party?
You bet! This cake actually tastes better the next day as the flavors meld together. Make it up to 2 days in advance, then just decorate right before serving. It’s the perfect stress-free party dessert!
Why is my filling too runny?
This usually happens if the cream wasn’t whipped enough or the cream cheese wasn’t fully softened. Make sure your whipped cream forms stiff peaks, and beat the cream cheese until completely smooth before combining.
Can kids help make this?
Oh my gosh, yes! Crushing cookies, mixing ingredients, decorating—this recipe is practically designed for little helpers. Just be prepared for some creative (and messy) decorating choices!
Download the Easy Oreo Halloween Cake Recipe PDF
Love this recipe as much as I do? Save it for your next spooky celebration with my free PDF download! It’s perfect for keeping in your recipe binder or sharing with friends. Just imagine—next Halloween, you’ll have this crowd-pleasing treat at your fingertips with no searching required. Click below to get your copy and start making delicious memories today!
Print
Spooky Oreo Halloween Cake Recipe in 4 Easy Steps
- Total Time: 4 hours 20 minutes
- Yield: 8 servings 1x
- Diet: Vegetarian
Description
A fun and easy Oreo Halloween cake recipe perfect for spooky celebrations. This no-bake dessert is quick to make and delicious.
Ingredients
- 24 Oreo cookies
- 1/2 cup unsalted butter, melted
- 8 oz cream cheese, softened
- 1/4 cup granulated sugar
- 2 cups heavy whipping cream
- 1 tsp vanilla extract
- Orange food coloring (optional)
- Halloween-themed sprinkles or decorations
Instructions
- Crush the Oreo cookies into fine crumbs using a food processor or rolling pin.
- Mix the Oreo crumbs with melted butter and press into the bottom of a 9-inch springform pan to form the crust. Chill for 10 minutes.
- In a large bowl, beat the cream cheese and sugar until smooth.
- In another bowl, whip the heavy cream and vanilla until stiff peaks form.
- Fold the whipped cream into the cream cheese mixture until well combined. Add orange food coloring if desired.
- Spread the filling over the Oreo crust and smooth the top.
- Chill the cake for at least 4 hours or overnight.
- Decorate with Halloween-themed sprinkles before serving.
Notes
- Use gluten-free Oreos for a gluten-free version.
- For a firmer texture, freeze the cake for 1 hour before serving.
- Adjust sugar to taste.
- Prep Time: 20 minutes
- Cook Time: 0 minutes
- Category: Dessert
- Method: No-Bake
- Cuisine: American
Nutrition
- Serving Size: 1 slice
- Calories: 420
- Sugar: 25g
- Sodium: 220mg
- Fat: 32g
- Saturated Fat: 18g
- Unsaturated Fat: 10g
- Trans Fat: 0g
- Carbohydrates: 35g
- Fiber: 2g
- Protein: 4g
- Cholesterol: 80mg
Keywords: Oreo Halloween cake, no-bake dessert, Halloween recipe, easy cake, Oreo dessert


