
If you’ve ever stood in the grocery store aisle staring at granola bars, wondering if they’re actually healthy or just cleverly packaged sugar bombs, I’ve got good news for you—making your own homemade granola bars is way easier than you think. Trust me, I’ve been there. A few years ago, I got tired of squinting at ingredient lists filled with unpronounceable words, so I decided to take matters into my own hands. What started as a kitchen experiment turned into my go-to snack recipe.
These homemade granola bars are ridiculously simple to make, and the best part? You know exactly what’s in them. No mystery additives, no unnecessary sugar—just wholesome ingredients like rolled oats, peanut butter, honey, and your favorite mix-ins. Plus, they’re super versatile. Need a quick breakfast on busy mornings? Grab one. Craving a midday pick-me-up? These bars have your back. And if you’ve got kids, they’ll love helping you mix and press the ingredients—it’s like a fun little kitchen project.
Once you try making your own, I promise you’ll never go back to store-bought. They’re chewy, slightly crunchy, and packed with flavor. Whether you’re packing them for hiking trips, school lunches, or just keeping them on hand for those “I need a snack right now” moments, these homemade granola bars are a game-changer. Let’s get started!
Why You’ll Love These Homemade Granola Bars
Oh, where do I even start? These bars are my kitchen superheroes, and here’s why:
- Crazy easy to make – No fancy skills needed. If you can stir and press, you’re golden.
- Totally customizable – Swap in whatever nuts, seeds, or dried fruit you love (or whatever’s lurking in your pantry).
- Actually good for you – No weird preservatives or sneaky sugars, just real ingredients you can pronounce.
- Perfect for grab-and-go – Toss one in your bag for those “hangry” emergencies (we’ve all been there).
- Kid-approved – My little ones beg to “help” make these (read: sneak chocolate chips when I’m not looking).
Seriously, once you taste that first chewy-crunchy bite, you’ll wonder why you ever bought the packaged stuff.
Ingredients for Homemade Granola Bars
Okay, let’s talk ingredients—the real stars of these homemade granola bars! Here’s what you’ll need (and yes, I’ve learned a few hard lessons about substitutions, so I’ll share those too):
- 2 cups old-fashioned rolled oats – Not quick oats! Those turn to mush. Trust me on this.
- ½ cup honey – The glue that holds everything together. Maple syrup works if you’re in a pinch, but honey gives that perfect chew.
- ½ cup peanut butter – Creamy or crunchy, your call. Almond butter? Also delicious.
- ¼ cup chopped nuts – I’m partial to almonds, but walnuts or pecans add great crunch.
- ¼ cup dried fruit – Raisins, cranberries, chopped apricots—whatever’s in your snack drawer.
- ¼ cup chocolate chips – Because life’s too short for granola bars without chocolate (but hey, skip ’em if you’re feeling virtuous).
- 1 tsp vanilla extract – The secret whisper of flavor.
- ¼ tsp salt – Just a pinch to balance the sweetness.
See? Nothing weird or hard-to-find. And feel free to riff—sunflower seeds instead of nuts, coconut flakes instead of fruit… you do you!
How to Make Homemade Granola Bars
Ready to whip up these delicious bars? Let’s get straight to it—here’s the step-by-step breakdown to make sure your homemade granola bars turn out perfectly every time.
- Preheat your oven to 350°F (175°C). Line an 8×8-inch baking dish with parchment paper—trust me, this makes cleanup a breeze.
- Toast the oats and nuts (more on that below). Spread them on a baking sheet and pop them in the oven for about 10 minutes. Keep an eye on them—no one likes burnt oats!
- Warm the honey and peanut butter in a saucepan over low heat. Stir until smooth and combined. Remove from heat and mix in the vanilla and salt.
- Combine everything in a large bowl. Add the toasted oats, nuts, dried fruit, and chocolate chips. Pour the honey mixture over the top and stir until everything’s evenly coated. The mixture should stick together when pressed—if it’s too dry, add a bit more honey or peanut butter.
- Press it all into the baking dish. Firmly press the mixture down with your hands or the back of a spoon. The harder you press, the less likely your bars will crumble.
- Chill in the fridge for at least 2 hours. This step is non-negotiable—it’s what sets the bars and makes them easy to slice.
- Cut into bars and enjoy! Store leftovers in an airtight container for up to a week (if they last that long).
Toasting the Oats and Nuts
Don’t skip this step! Toasting the oats and nuts brings out their natural nuttiness and adds a deeper flavor to your bars. Spread them in an even layer on a baking sheet and toast for about 10 minutes. Shake the pan halfway through to avoid burning. You’ll know they’re done when they smell amazing and turn a light golden brown.
Mixing and Pressing the Bars
Here’s the secret to bars that hold together: pressing, pressing, pressing! Once your mixture is combined, transfer it to the baking dish and press it down as firmly as you can. Use the back of a spoon or your hands—I like to cover the mixture with parchment paper and press with my palms. The harder you press, the less likely your bars will fall apart when you cut them.
Tips for Perfect Homemade Granola Bars
After making these homemade granola bars more times than I can count (and yes, learning from a few disasters), here are my absolute must-know tips:
- Line your pan well – I swear by parchment paper with a little overhang. It’s the easiest way to lift out your bars without crumbling.
- Taste your mix before pressing – Want sweeter bars? Add an extra drizzle of honey. Prefer less sweet? Cut back slightly.
- Press HARD – Seriously, put some muscle into it! Weak pressing equals crumbly bars.
- Chill thoroughly – That 2-hour wait kills me too, but it’s what gives you clean slices.
- Add seeds for crunch – A handful of sunflower or chia seeds takes texture to the next level.
Follow these, and you’ll get picture-perfect bars every single time!
Variations for Homemade Granola Bars
Oh, the fun part—playing mix-and-match with flavors! Here are my favorite ways to shake up these homemade granola bars:
- Nut butter swap – Almond butter or sunflower seed butter work beautifully (great for nut-free lunches!).
- Tropical twist – Use coconut flakes instead of dried fruit, and add a sprinkle of lime zest for zing.
- Chocolate overload – Replace half the dried fruit with extra chocolate chips (no judgment here).
- Seed power – Pepitas, sunflower seeds, or chia seeds add awesome crunch and nutrition.
- Spice it up – A dash of cinnamon or cardamom makes these feel extra cozy.
The possibilities are endless—make them your own!
Storing and Serving Homemade Granola Bars
Here’s the beautiful thing about these homemade granola bars—they’re just as good on day five as they are fresh! I stash mine in an airtight container at room temperature (if they last more than a day, that is). For longer storage, wrap them individually in parchment and freeze for up to 3 months—perfect for grabbing straight from the freezer on rushed mornings.
My favorite way to serve them? Pair a bar with creamy Greek yogurt and fresh berries for breakfast, or crumble one over vanilla ice cream—trust me, it’s life-changing. They’re also fantastic with a glass of cold almond milk after workouts. Basically, these bars make everything better!
Nutritional Information for Homemade Granola Bars
Now, let’s talk numbers—but remember, these are rough estimates since your homemade granola bars might have slightly different ingredients than mine (maybe you went heavy on the chocolate chips… I don’t blame you!). Per bar, you’re looking at:
- 180 calories – Perfect for a satisfying snack
- 5g protein – Thanks to those oats and nut butter
- 12g sugar – Mostly from the honey and fruit (way better than store-bought!)
- 3g fiber – Keeping things moving smoothly
- 8g fat – The good kind from nuts and seeds
Of course, swap an ingredient and these numbers change—but that’s the beauty of making them yourself! You control exactly what goes in.
Common Questions About Homemade Granola Bars
I get tons of questions about these homemade granola bars—here are the ones that pop up most often from friends (and my own kitchen fails!):
- “Can I use maple syrup instead of honey?” Absolutely! Maple syrup works great—just know your bars might be slightly less sticky. Agave nectar works too in a pinch.
- “How do I make these gluten-free?” Easy! Just use certified gluten-free oats. Everything else in the recipe is naturally GF (but check labels on dried fruit and chocolate chips to be safe).
- “Why are my bars crumbling?” Either you didn’t press hard enough (put some elbow grease into it next time!) or your mixture needed more “glue”—try adding an extra tablespoon of peanut butter or honey.
- “Can I skip the chilling time?” I know, waiting is torture—but no. That fridge time is what makes them sliceable. Think of it as flavor-melding magic!
- “What if I don’t have parchment paper?” A well-greased pan works, but really—parchment is a game-changer here. Buy the pre-cut sheets and thank me later.
Still stumped? Toss your question my way—I’ve made every mistake so you don’t have to!
Ready to Make Your Own Homemade Granola Bars?
What are you waiting for? Grab those oats and that honey—your kitchen adventure starts now! I’d love to hear how your bars turn out (or what crazy mix-ins you try). Tag me if you share pics—nothing makes me happier than seeing your homemade granola bar creations. Happy snacking!
Print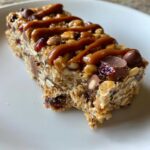
Homemade Granola Bars: 180-Calorie Snacks Full of Love
- Total Time: 25 mins
- Yield: 10 bars 1x
- Diet: Vegetarian
Description
Make your own homemade granola bars with simple ingredients. These bars are perfect for a quick snack or breakfast on the go.
Ingredients
- 2 cups rolled oats
- 1/2 cup honey
- 1/2 cup peanut butter
- 1/4 cup chopped nuts (almonds, walnuts, or pecans)
- 1/4 cup dried fruit (raisins, cranberries, or apricots)
- 1/4 cup chocolate chips
- 1 tsp vanilla extract
- 1/4 tsp salt
Instructions
- Preheat oven to 350°F (175°C). Line a baking dish with parchment paper.
- Spread oats and chopped nuts on a baking sheet. Toast in the oven for 10 minutes.
- In a saucepan, warm honey and peanut butter over low heat until smooth.
- Remove from heat and stir in vanilla and salt.
- In a bowl, combine toasted oats, nuts, dried fruit, and chocolate chips.
- Pour the honey mixture over the dry ingredients and mix well.
- Press the mixture firmly into the prepared baking dish.
- Chill in the fridge for 2 hours, then cut into bars.
Notes
- Store in an airtight container for up to one week.
- Substitute any nuts or dried fruits based on preference.
- For a firmer texture, freeze the bars for 30 minutes before cutting.
- Prep Time: 15 mins
- Cook Time: 10 mins
- Category: Snack
- Method: Baking
- Cuisine: American
Nutrition
- Serving Size: 1 bar
- Calories: 180
- Sugar: 12g
- Sodium: 60mg
- Fat: 8g
- Saturated Fat: 2g
- Unsaturated Fat: 5g
- Trans Fat: 0g
- Carbohydrates: 25g
- Fiber: 3g
- Protein: 5g
- Cholesterol: 0mg
Keywords: homemade granola bars, easy snack, healthy granola bars


