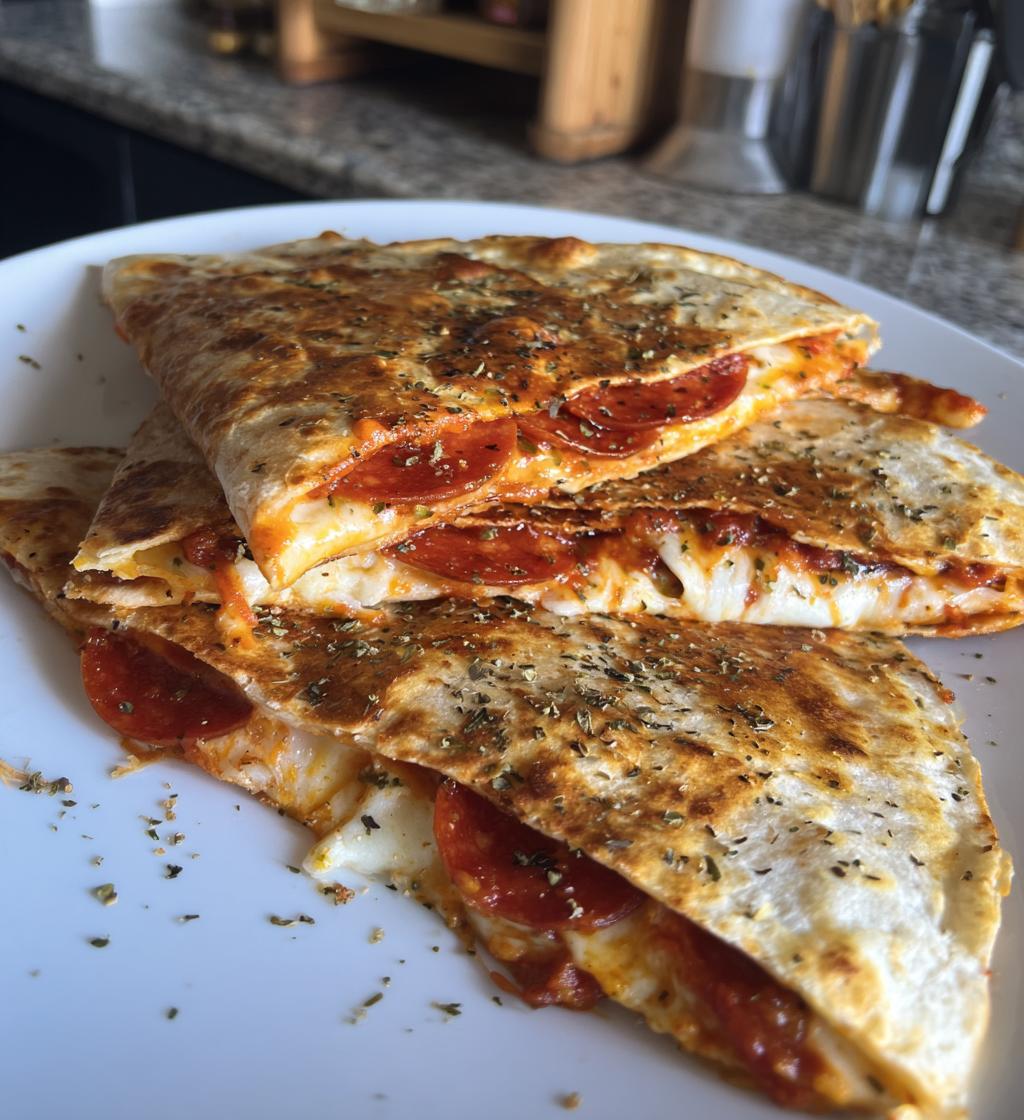
You know those nights when you’re craving pizza but don’t want to wait for delivery? That’s exactly how my Crispy Italian-Style Pizza Quesadillas were born! I was rummaging through my fridge one lazy evening – tortillas, leftover pizza sauce, and a mountain of mozzarella staring back at me. What started as a “what the heck” experiment turned into my family’s new favorite quick meal. The magic happens when crispy tortillas meet melty cheese and all those classic pizza flavors. Best part? You’re just 15 minutes away from gooey, golden perfection. Trust me, once you try this mashup, regular pizza nights just got a serious upgrade.
Why You’ll Love These Crispy Italian-Style Pizza Quesadillas
Oh my gosh, where do I even start? These little flavor bombs check ALL the boxes:
- Lightning fast – Seriously, from fridge to plate in under 15 minutes (perfect for those “I’m starving NOW” moments)
- Best of both worlds – That magical combo of crispy tortilla crunch meets ooey-gooey pizza cheese pull
- Kid-approved – My picky eaters gobble these up faster than I can make them
- Crispy perfection – That golden-brown exterior with melty cheese inside? Pure happiness in every bite
Honestly, I make these at least twice a week now – they’re that good!
Ingredients for Crispy Italian-Style Pizza Quesadillas
Okay, let’s talk ingredients – because the magic is in the details! I’ve made these quesadillas about a hundred different ways, and this combo gives you that perfect crispy-cheesy balance every time. Here’s exactly what you’ll need:
- 2 large flour tortillas (10-inch size) – The bigger ones give you room to work (and fold!) without cheese explosions
- ½ cup shredded mozzarella cheese (packed) – Pack it in there – we want serious cheese pulls!
- ¼ cup grated Parmesan cheese – This is my secret weapon for that extra savory kick
- ¼ cup pizza sauce – Homemade or store-bought both work (I won’t judge!)
- 10 slices pepperoni – The classic little rounds fit perfectly
- ¼ teaspoon dried oregano – That authentic Italian pizza flavor
- ¼ teaspoon garlic powder – Because everything’s better with garlic
- 1 tablespoon olive oil – For brushing – this is what gives us that gorgeous golden crisp
Pro tip from my many (many) test batches: measure your cheese generously – I always eyeball a little extra because melty cheese is life. Also, don’t skip the olive oil brush – it makes ALL the difference in getting that perfect crispy texture we’re after!
How to Make Crispy Italian-Style Pizza Quesadillas
Alright, let’s get cooking! I’ve made enough of these pizza quesadillas to know exactly how to nail that perfect crispy-cheesy balance every single time. Follow these steps and you’ll be biting into golden perfection before you know it!
Step 1: Prep the Quesadilla
First things first – lay one tortilla flat on your cutting board (this is your edible canvas!). Spread that glorious pizza sauce evenly across the surface, leaving about a half-inch border around the edge – trust me, you’ll thank me later when the cheese stays put instead of oozing out!
Now comes the fun part – the CHEESE! Sprinkle your mozzarella evenly over the sauce – I like to pretend I’m sprinkling fairy dust because honestly, melted cheese is pretty magical. Follow up with the Parmesan (our secret flavor booster!), then arrange those pepperoni slices like little edible polka dots. Finish with a shower of oregano and garlic powder – this is where your kitchen starts smelling like your favorite pizzeria!
Step 2: Cook to Crispy Perfection
Here’s where the magic happens! Heat your skillet over medium heat – not too hot or you’ll burn the tortilla before the cheese melts. While it’s heating, gently place your second tortilla on top and lightly press down – just enough to make everything cozy together.
Now grab your olive oil and brush the top tortilla generously – this is our golden crispy ticket! Carefully slide your quesadilla into the pan (I use a spatula to help guide it). Set a timer for 3 minutes – resist the urge to peek too early!
When you see the edges turning golden and hear that satisfying sizzle, it’s flip time! Here’s my pro tip: Slide a spatula underneath to loosen, then place a plate over the top. Flip the pan upside down so the quesadilla lands on the plate, then slide it back into the pan to cook the other side. Brush this side with more olive oil too – we want crispy all around!
Step 3: Serve and Enjoy
Once both sides are beautifully golden (about another 3-4 minutes), transfer your masterpiece to a cutting board. Let it rest for just a minute – I know it’s hard to wait, but this helps the cheese set so you get cleaner cuts.
Use a pizza cutter or sharp knife to slice into wedges – I usually go for six pieces because they’re the perfect handheld size. Serve immediately with extra pizza sauce or ranch for dipping (no judgment here!). Watch out though – these disappear FAST!
Pro tip: If you’re making multiple quesadillas, keep finished ones warm in a 200°F oven while you cook the rest. Just don’t stack them or they’ll lose that precious crispiness we worked so hard for!
Tips for the Best Crispy Italian-Style Pizza Quesadillas
After making these quesadillas more times than I can count (seriously, my family won’t let me stop!), I’ve picked up some game-changing tricks. These little nuggets of wisdom will take your pizza quesadillas from good to “oh my gosh, how did you make these so perfect?” status.
Heat is your best friend
That skillet needs to be nice and hot before your quesadilla hits it – I usually let mine heat for about 2 minutes over medium heat. Here’s how I test: flick a few drops of water on the surface – if they dance and evaporate instantly, you’re golden (literally!). Too cold, and your tortilla turns into a sad, soggy mess instead of getting that beautiful crisp we crave.
The Goldilocks principle of filling
Oh, I’ve learned this the hard way! Too little filling and you’ve got a sad, empty quesadilla. Too much, and you’ll have a cheesy volcano erupting all over your stovetop (not cute). Aim for about 1/2 cup total cheese and toppings – just enough to peek out when you press down lightly with your spatula. Leave that 1/2-inch border I mentioned earlier – it’s your safety zone against cheese leaks!
The secret flip technique
This was my biggest struggle when I first started making these. My early attempts looked more like abstract art than actual food! Here’s what works best: slide your spatula all the way under before flipping, and do it with confidence. If you hesitate, everything slides around. And that plate trick I mentioned earlier? Total game-changer for perfect flips every time.
Press lightly, not heavily
I used to smash my quesadillas down like I was putting out a fire – big mistake! A gentle press with the spatula is all you need. Too much pressure squeezes out all the delicious fillings (I may have cried over lost cheese a time or two). Just enough to help the layers bond together without becoming one with your skillet.
One last pro tip from my many delicious experiments: if you’re making a batch for friends, keep cooked quesadillas on a wire rack in a warm oven. This prevents the bottom from getting soggy while you finish cooking the rest. Because let’s be real – nobody wants a limp quesadilla!
Variations for Crispy Italian-Style Pizza Quesadillas
One of my favorite things about this recipe is how crazy versatile it is! I’ve probably made at least two dozen different versions of these pizza quesadillas, depending on what’s in my fridge or who I’m cooking for. Here are some of my absolute favorite twists that always hit the spot:
- Veggie Lover’s Dream – Swap the pepperoni for sautéed mushrooms and bell peppers (my personal favorite combo). Sometimes I’ll throw in some thinly sliced red onions too if I’m feeling fancy
- Breakfast Special – Scrambled eggs and crispy bacon with cheddar instead of mozzarella (don’t knock it till you try it – it’s life-changing!)
- Spicy Fiesta – Add some diced jalapeños to the pepperoni and use pepper jack cheese for an extra kick
- Mediterranean Twist – Kalamata olives, artichoke hearts, and feta cheese with a sprinkle of Italian seasoning
- Gluten-Free Option – Use your favorite gluten-free tortillas (I’ve had great luck with almond flour ones that get super crispy)
- Meat Lover’s Paradise – Pepperoni, sausage crumbles, and diced ham all hanging out together in cheesy harmony
- White Pizza Version – Skip the red sauce and use ricotta mixed with garlic and herbs instead
Pro tip from my many kitchen experiments: No matter which variation you try, keep the cheese-to-filling ratio about the same for best results. Too many dry toppings and you’ll miss that glorious cheese pull we all love. And remember – the crispier the tortilla, the better, so don’t skip that olive oil brush no matter what fillings you choose!
Serving Suggestions
Now that you’ve got these gorgeous golden quesadillas ready to devour, let’s talk about how to serve them up right! I’ve found that presentation is half the fun – and the right accompaniments take these from snack to full-on meal status.
- The Classic Combo: A simple arugula salad with lemon vinaigrette cuts through the richness perfectly. The peppery greens are my go-to!
- Dip It Good: Little bowls of warm pizza sauce and cool ranch dressing for dipping? Yes please! My kids love making “swimming pools” for their quesadilla wedges.
- Soup Pairing: On chilly nights, I’ll serve these with a mug of tomato basil soup – like grown-up grilled cheese night!
- Game Day Spread: Cut into smaller triangles and arrange on a platter with other finger foods for the ultimate snack table.
Pro tip: For parties, I keep toppings separate and let everyone build their own mini quesadillas – it’s interactive and fun! Just set out small tortillas and bowls of fillings, then let guests take turns at the skillet. The laughter and delicious smells are totally worth the extra dishes!
Storage and Reheating
Okay, let’s talk leftovers – because let’s be real, sometimes you miraculously end up with extra quesadillas (it’s rare in my house, but it happens!). Here’s how I keep them tasting just as crispy and delicious as when they first came off the skillet:
- Fridge Storage: Let your quesadilla cool completely (about 15 minutes), then pop it in an airtight container with parchment paper between layers if stacking. They’ll stay fresh for 2-3 days – any longer and the tortillas start getting sad.
- Freezer Hack: For longer storage, wrap individual wedges in foil and freeze for up to a month. Perfect for emergency snack attacks!
- Reheating Magic: The stovetop is your best friend here! Just heat a dry skillet over medium and warm each side for 1-2 minutes. That direct heat brings back that beautiful crispiness.
- Oven Option: If you’re reheating a bunch, place them on a baking sheet at 375°F for 5-7 minutes. No microwave unless you want soggy disappointment!
Pro tip from my many reheating experiments: If your quesadilla seems dry, brush a tiny bit of olive oil on the tortilla before reheating. It works like magic to revive that perfect crispy texture we love so much!
Nutritional Information
Now, I’m no nutritionist, but I know some of you like keeping track of what you’re eating (unlike me when I’m face-deep in melted cheese!). Here’s the scoop on what’s in these crispy delights – but remember, these are just estimates because we all know I always add “just a little extra” cheese!
- Calories: About 320 per serving (but totally worth every single one)
- Protein: 14g – not bad for something that tastes this indulgent!
- Carbs: 28g (less if you use low-carb tortillas)
- Fat: 18g (hey, good fat from olive oil and cheese!)
Important note: These nutritional values are estimates and will vary based on the exact ingredients you use. Did you go heavy on the cheese like I usually do? Maybe swap in turkey pepperoni? Your numbers might be different – and that’s okay! This is real food for real life, not a science experiment.
My philosophy? Everything in moderation – including moderation! These quesadillas are perfect for when you want something delicious without spending hours in the kitchen. Now go enjoy that cheesy goodness without an ounce of guilt!
Frequently Asked Questions
Can I make these ahead of time?
You bet! I often prep everything in advance when hosting game nights. Just assemble your quesadillas with all the fillings (minus the olive oil brush), stack them between parchment paper, and refrigerate for up to 4 hours. But here’s the key – cook them fresh when ready to serve! That way you’ll still get that perfect crispy texture we love. Trust me, the extra few minutes of cooking are totally worth it.
Can I use corn tortillas?
Oh honey, I’ve tried – and learned my lesson! Corn tortillas tend to crack instead of getting beautifully crispy. Flour tortillas are definitely your best bet here. They have just the right amount of flexibility to flip without breaking and crisp up like a dream. If you’re gluten-free, look for specially formulated GF flour-style tortillas – they’ll give you much better results than corn!
How do I prevent sogginess?
After many soggy disasters (we’ve all been there!), here’s what I’ve found works best: First, go light on the sauce – just enough to barely coat the tortilla. Second, make sure your skillet is properly preheated before adding the quesadilla. And third, resist the urge to flip too soon! Let that first side get properly golden before turning. Oh, and don’t cover it while cooking – that steam is soggy quesadilla’s best friend!
Can I bake these instead of cooking on the stove?
Absolutely! When I’m making a big batch for parties, I’ll bake them at 425°F for about 8-10 minutes per side on a parchment-lined sheet. Just brush both sides with olive oil first and flip halfway through. They won’t get quite as crispy as stovetop version, but still delicious! Pro tip: Use the broiler for the last minute if you want extra browning.
What’s the best way to cut them?
After many messy attempts (hot cheese burns, ouch!), here’s my foolproof method: Let your quesadilla rest for exactly 1 minute – no more, no less. Then use a sharp pizza wheel or chef’s knife in one confident motion. Wipe the blade between cuts if things get too cheesy. Cutting into six wedges gives you the perfect handheld size for dipping!
Ready to Try These Crispy Italian-Style Pizza Quesadillas?
I can’t wait for you to experience these crispy, cheesy wonders in your own kitchen! There’s nothing quite like that first bite of golden tortilla giving way to melty pizza goodness. I’d love to hear how your creation turns out – did you stick with classic pepperoni or try one of the fun variations?
Snap a pic of your masterpiece and tag me on social media – I live for seeing your kitchen successes! Use #PizzaQuesadillaMagic so I can cheer you on. And hey, if you’ve got your own twist on this recipe, share it in the comments below! We’re all in this delicious adventure together.
Now go forth and get that skillet sizzling – your next favorite snack is just minutes away from becoming reality. Happy cooking, friends!
Print
Crispy Italian-Style Pizza Quesadillas Recipe in Just 15 Minutes
- Total Time: 13 minutes
- Yield: 2 servings 1x
- Diet: Vegetarian
Description
A quick and easy twist on classic pizza flavors, combining crispy tortillas with melty cheese and Italian toppings.
Ingredients
- 2 large flour tortillas
- 1/2 cup shredded mozzarella cheese
- 1/4 cup grated Parmesan cheese
- 1/4 cup pizza sauce
- 10 slices pepperoni
- 1/4 teaspoon dried oregano
- 1/4 teaspoon garlic powder
- 1 tablespoon olive oil
Instructions
- Heat a skillet over medium heat.
- Spread pizza sauce on one tortilla.
- Sprinkle mozzarella and Parmesan cheeses evenly over the sauce.
- Add pepperoni slices and sprinkle with oregano and garlic powder.
- Top with the second tortilla.
- Brush the top tortilla with olive oil.
- Carefully transfer the quesadilla to the skillet.
- Cook for 3-4 minutes until golden brown.
- Flip and cook the other side for 3-4 minutes.
- Remove from heat, slice, and serve.
Notes
- Use whole wheat tortillas for a healthier option.
- Add sliced bell peppers or mushrooms for extra veggies.
- Serve with extra pizza sauce for dipping.
- Prep Time: 5 minutes
- Cook Time: 8 minutes
- Category: Appetizer
- Method: Stovetop
- Cuisine: Italian-Mexican Fusion
Nutrition
- Serving Size: 1/2 quesadilla
- Calories: 320
- Sugar: 2g
- Sodium: 680mg
- Fat: 18g
- Saturated Fat: 7g
- Unsaturated Fat: 9g
- Trans Fat: 0g
- Carbohydrates: 28g
- Fiber: 2g
- Protein: 14g
- Cholesterol: 35mg
Keywords: pizza quesadilla, Italian-Mexican fusion, quick snack, cheesy appetizer


