Ah, Valentine’s Day – the perfect excuse to unleash your creativity and whip up some delightful sweets! There’s something incredibly joyful about crafting Valentine’s sweets decorated ideas that not only taste fantastic but also look like little works of art. Trust me, the moment those treats hit the table, everyone’s eyes light up with excitement! With just a few simple techniques, you can transform ordinary desserts into stunning displays of love and affection.
Whether it’s a drizzle of melted chocolate, a sprinkle of vibrant edible glitter, or the delicate touch of royal icing, these decoration methods will elevate your desserts from basic to breathtaking. And best of all, it’s a no-bake process, making it super easy to involve the whole family in the fun. Imagine laughter, sticky fingers, and the sweet aroma filling your kitchen as you create beautiful treats together. So, let’s dive into these fun and easy decorating ideas for Valentine’s sweets that will make your heart skip a beat and impress everyone you share them with!
Ingredients List
Here’s everything you’ll need to create those stunning Valentine’s sweets! Each ingredient plays a vital role in the beauty and flavor of your decorated treats. Gather these goodies, and let’s get started!
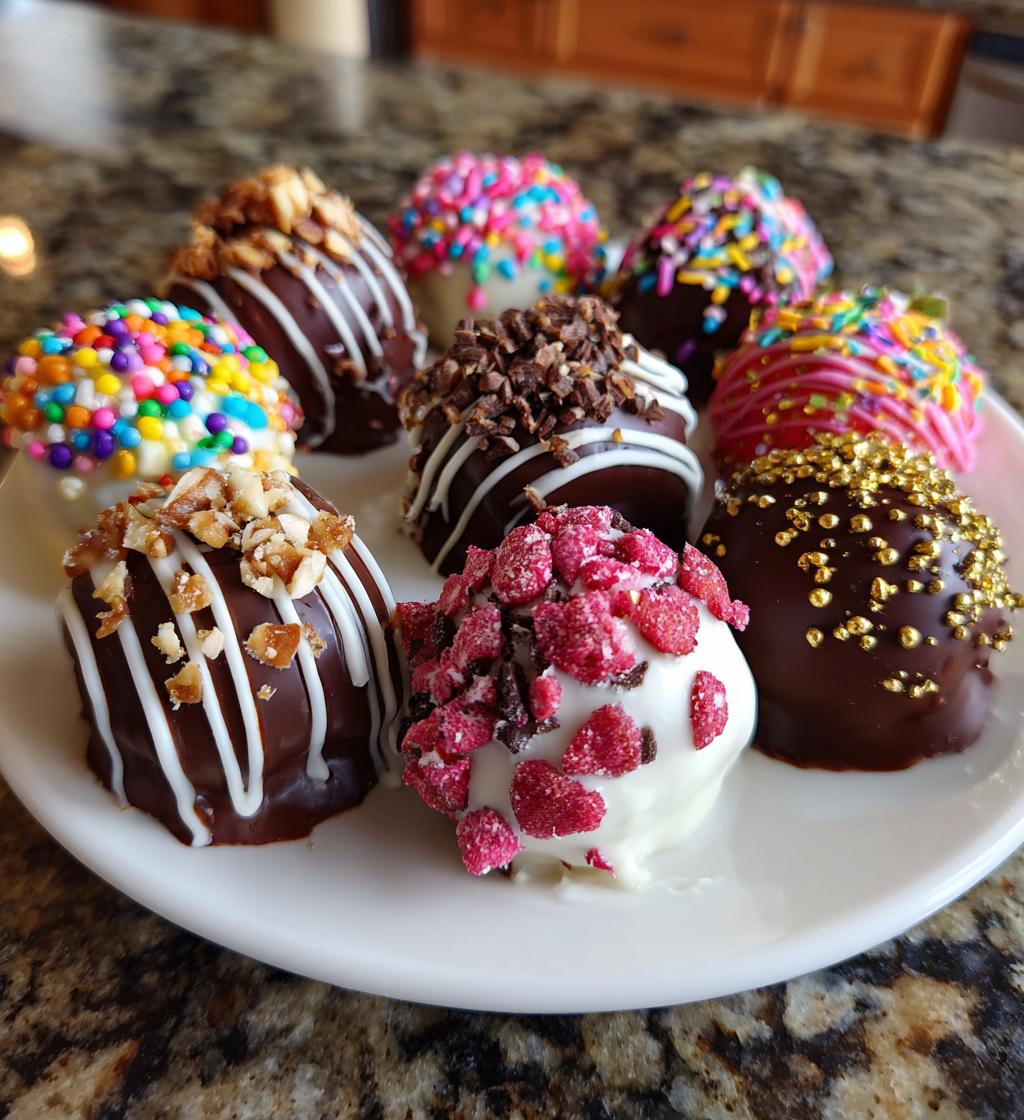
- Chocolate: Use high-quality chocolate for melting – dark, milk, or white, depending on your taste preference.
- Sprinkles: Choose your favorite colors and shapes to add a playful touch. Heart-shaped sprinkles are perfect for Valentine’s Day!
- Royal icing: This icing is great for creating intricate designs. You can easily make it at home with powdered sugar, egg whites, and a splash of lemon juice.
- Fondant: Soft and pliable, fondant lets you create beautiful shapes and decorations. You can buy it pre-made or whip up your own!
- Edible glitter: A sprinkle of this magical dust will add a touch of sparkle to your sweets. Remember, a little goes a long way!
- Fruit toppings: Fresh fruits like strawberries, raspberries, or even sliced kiwi add a burst of color and freshness to your creations.
- Nuts: Chopped nuts like almonds or walnuts give a delightful crunch and a flavor contrast to the sweetness.
How to Prepare Instructions
Now that you’ve gathered all your ingredients, it’s time to unleash your inner artist! This step-by-step guide will walk you through each part of the process for creating those beautiful Valentine’s sweets. Just follow along, and you’ll have stunning treats in no time!
Step 1: Melt the Chocolate
First things first, let’s melt that chocolate! You can do this either in a microwave or using a double boiler. If you’re using a microwave, chop your chocolate into small, even pieces and place them in a microwave-safe bowl. Heat in 30-second intervals, stirring gently in between, until it’s smooth and melted. Be super careful not to overheat it, as burnt chocolate is a sad sight! If you’re going the double boiler route, fill a saucepan with water and bring it to a simmer. Place a heatproof bowl on top (make sure it doesn’t touch the water) and add your chocolate. Stir until melted. Either method works perfectly, so choose what feels right for you!
Step 2: Dip the Sweets
Next up, it’s time to dip! Take your sweets (like marshmallows, pretzels, or even fruits) and gently dip them into the melted chocolate. I like to use a fork or a skewer to help with this – it keeps my hands clean and lets me get an even coat. Make sure to let excess chocolate drip off before placing them on a baking sheet lined with parchment paper. Don’t worry if they aren’t perfect; a little rustic charm adds to the love!
Step 3: Add Toppings
While the chocolate is still warm and melty, go wild with your toppings! I love using sprinkles, crushed nuts, or even a drizzle of white chocolate for contrast. Just sprinkle them on immediately after dipping, so they stick well. For a clean look, you can also dip half of the sweet in chocolate, then add toppings to just that half. It creates a lovely visual effect!
Step 4: Create Designs with Royal Icing
Now for some fancy decoration! Grab your royal icing and a piping bag (or a plastic bag with a small corner snipped off). You can create swirls, hearts, or even write sweet messages! Make sure the icing is the right consistency – thick enough to hold its shape but fluid enough to pipe easily. If it’s too thick, just add a drop of water. Let your designs set for a bit – they’ll harden nicely and look stunning!
Step 5: Roll Out Fondant
If you’re feeling adventurous, let’s roll out some fondant! Dust your work surface with a little powdered sugar to prevent sticking. Take a piece of fondant and knead it until it’s soft and pliable. Then, roll it out to about 1/8 inch thick. Use cookie cutters to create fun shapes, or you can even mold it into little decorations by hand! Don’t forget to keep your fondant covered while you’re working to prevent it from drying out.
Step 6: Use Edible Glitter
What’s a sweet without a little sparkle? Once your treats are decorated, grab that edible glitter! A light dusting over your sweets will make them shine like stars. I like to apply it right after the icing or chocolate sets but before it completely hardens. This way, the glitter sticks beautifully, and you get that gorgeous glimmer!
Step 7: Incorporate Fruit and Nuts
Finally, let’s add some fresh fruit and nuts for that extra pop! Slices of strawberries or scattered raspberries not only look gorgeous but also provide a fruity burst of flavor. If you’re adding nuts, chop them up and sprinkle them on top or even mix them into your chocolate before dipping. The crunch from the nuts complements the sweet softness of the chocolate, making every bite a delightful experience!
Why You’ll Love This Recipe
This Valentine’s sweets decorated ideas recipe is not just about making treats; it’s about creating joyful moments and delicious memories. Here’s why you’ll absolutely adore it:
- Quick Preparation Time: With just 30 minutes of prep and only 10 minutes of melting time, you can whip up stunning sweets in no time!
- Endless Creativity: The decorating possibilities are limitless! From colorful sprinkles to intricate royal icing designs, you can personalize each sweet to match your style or mood.
- No-Bake Fun: This recipe is perfect for those who prefer not to heat up the oven. It’s a fun, mess-free way to get everyone involved in the kitchen.
- Perfect for All Ages: Kids and adults will love decorating together. It’s a delightful way to bond while unleashing your inner artist!
- Customizable Decorations: You can mix and match toppings, flavors, and colors to create unique treats that suit your tastes and dietary needs.
- Impressive Results: The finished products look so gorgeous, they’ll impress your friends and family, making you the star of any gathering!
Trust me, once you dive into this creative process, you’ll find yourself making these delightful decorated sweets for every occasion, not just Valentine’s Day!
Tips for Success
Want to take your Valentine’s sweets decorated ideas to the next level? Here are some pro tips that will help you create stunning and delicious treats every time. Trust me, these little nuggets of wisdom will make all the difference in your decorating game!
- Choose Quality Ingredients: Always opt for high-quality chocolate and fresh toppings. The better the ingredients, the more delicious your sweets will be. Don’t skimp on flavor – it truly shines through!
- Experiment with Flavors: Mix things up by adding flavored extracts to your chocolate or icing. A splash of raspberry or almond extract can elevate your sweets and surprise your taste buds!
- Keep It Cool: If you’re working with chocolate, make sure the kitchen isn’t too warm. Chocolate can melt quickly, so keep it cool to ensure a smooth dipping experience.
- Get Creative with Colors: When choosing sprinkles and edible glitter, think about creating a color theme. Pastels are lovely for Valentine’s, but vibrant colors can add a fun twist! Pick colors that complement your chosen fruits.
- Practice Royal Icing Consistency: Finding the right consistency for your royal icing is crucial. It should hold its shape but still flow easily. If you’re unsure, practice on a piece of parchment paper before decorating your sweets!
- Layer Your Decorations: Don’t be afraid to layer! For instance, dip in chocolate, then sprinkle with nuts, and finally drizzle with white chocolate. Layering adds depth and visual interest to your treats.
- Have Fun with Shapes: When rolling out fondant, use a variety of cookie cutters to make different shapes – hearts, stars, and even circles. This variety makes your treats more playful and exciting!
- Set Aside Time for Creativity: Make decorating a fun activity! Gather friends or family, put on some music, and let everyone express their creativity. The more relaxed and joyful the atmosphere, the better the results!
With these tips in your back pocket, you’re well on your way to creating the most enchanting Valentine’s sweets that everyone will adore. Enjoy the process, and don’t forget to taste-test along the way – that’s the best part!
Storage & Reheating Instructions
Now that you’ve created your stunning Valentine’s sweets, let’s talk about how to keep them fresh and enjoyable! Proper storage is key to maintaining their delightful taste and beautiful appearance. Here’s how I do it:
For storing your decorated sweets, make sure they’re completely set and dry before placing them in a container. I recommend using an airtight container to prevent moisture from affecting the chocolate and toppings. Layer the sweets with parchment paper in between to avoid sticking. This little trick keeps everything looking lovely and intact!
Store the sweets at room temperature in a cool, dry place, away from direct sunlight. If your kitchen tends to be warm, you might want to keep them in the fridge, but keep in mind that cold temperatures can sometimes cause chocolate to bloom (that’s the white powdery look). Just be sure to let them come back to room temperature before serving to restore that beautiful sheen!
If you happen to have leftovers (which is rare, trust me!), they can last for up to a week stored properly. Just make sure to check for any changes in texture or flavor before indulging again.
As for reheating, generally, I wouldn’t recommend it. These sweets are best enjoyed fresh! However, if you’ve made chocolate-covered fruits and need to refresh them, you can briefly microwave them for just a few seconds to soften the chocolate. But be super careful – you don’t want it to melt again completely! Just enough to get that lovely glossy finish back.
So there you have it! With these storage and reheating tips, your Valentine’s sweets will stay as delightful as the day you made them, ready to impress whenever you’re ready to share the love!
Nutritional Information Section
Now that we’ve whipped up some delicious Valentine’s sweets, let’s take a moment to talk about the nutritional side of things. Understanding the makeup of our treats can help us enjoy them even more, especially when sharing with loved ones!
Here’s a typical breakdown of the nutritional values for one decorated sweet:
- Calories: Approximately 150
- Fat: 7g
- Saturated Fat: 4g
- Unsaturated Fat: 2g
- Trans Fat: 0g
- Cholesterol: 10mg
- Sodium: 50mg
- Carbohydrates: 20g
- Fiber: 1g
- Sugar: 10g
- Protein: 2g
Keep in mind that these values can vary based on the specific ingredients you choose to use. For instance, if you opt for dark chocolate instead of milk chocolate, or if you add more fruit toppings, the nutritional content will change accordingly. So, feel free to adjust and experiment, knowing that you can still enjoy sweet treats while being mindful of what goes into them!
FAQ Section
Got questions about making these fabulous Valentine’s sweets decorated ideas? Don’t worry, I’ve got you covered! Here are some common queries I hear, along with my answers to help you along the way:
How long do the decorated sweets last?
When stored properly in an airtight container, your decorated sweets can last for up to a week. Just make sure they’re completely set before storing to keep that beautiful appearance intact. If you notice any changes in texture or flavor, it’s best to enjoy them right away!
Can I use different types of chocolate?
Absolutely! This recipe is incredibly versatile. You can use dark, milk, or white chocolate based on your preference. Each type will give your sweets a unique flavor profile, so feel free to mix and match to find your favorite combination!
What are some alternatives to fondant?
If fondant isn’t your thing, no worries! You can use marzipan, which offers a sweet almond flavor and is easy to mold. Another alternative is using chocolate decorations or even whipped cream for a softer, creamier look. Just get creative with what you have on hand!
Can I make the royal icing ahead of time?
Yes! You can prepare royal icing a day or two in advance. Just store it in an airtight container at room temperature, and give it a good stir before using. If it thickens, add a few drops of water to get it back to the right consistency.
What’s the best way to get my kids involved in decorating?
Let them unleash their creativity! Set up a decorating station with all the toppings laid out, and encourage them to mix and match. You can even have a little contest to see who can come up with the most unique design! Just keep it fun and light-hearted.
Can I make these sweets in advance for an event?
Definitely! You can prepare your decorated sweets a day before your event. Just store them properly to keep them fresh. They’ll be ready to impress when it’s time to celebrate!
Feel free to reach out if you have any more questions or need tips along the way. Happy decorating!
Print
Valentines sweets decorated ideas to ignite your creativity
- Total Time: 40 minutes
- Yield: 12 servings
- Diet: Vegetarian
Description
Creative ideas for decorating Valentine’s sweets.
Ingredients
- Chocolate
- Sprinkles
- Royal icing
- Fondant
- Edible glitter
- Fruit toppings
- Nuts
Instructions
- Melt the chocolate in a microwave or double boiler.
- Dip the sweets in melted chocolate.
- Sprinkle with your choice of toppings.
- Use royal icing to create designs.
- Roll out fondant and cut into shapes.
- Decorate with edible glitter for sparkle.
- Add fruit or nuts for texture.
Notes
- Let chocolate set before serving.
- Use seasonal fruits for a fresh touch.
- Experiment with different flavor combinations.
- Prep Time: 30 minutes
- Cook Time: 10 minutes
- Category: Dessert
- Method: No-bake
- Cuisine: American
Nutrition
- Serving Size: 1 sweet
- Calories: 150
- Sugar: 10g
- Sodium: 50mg
- Fat: 7g
- Saturated Fat: 4g
- Unsaturated Fat: 2g
- Trans Fat: 0g
- Carbohydrates: 20g
- Fiber: 1g
- Protein: 2g
- Cholesterol: 10mg
Keywords: Valentines sweets, decorated sweets, dessert ideas


