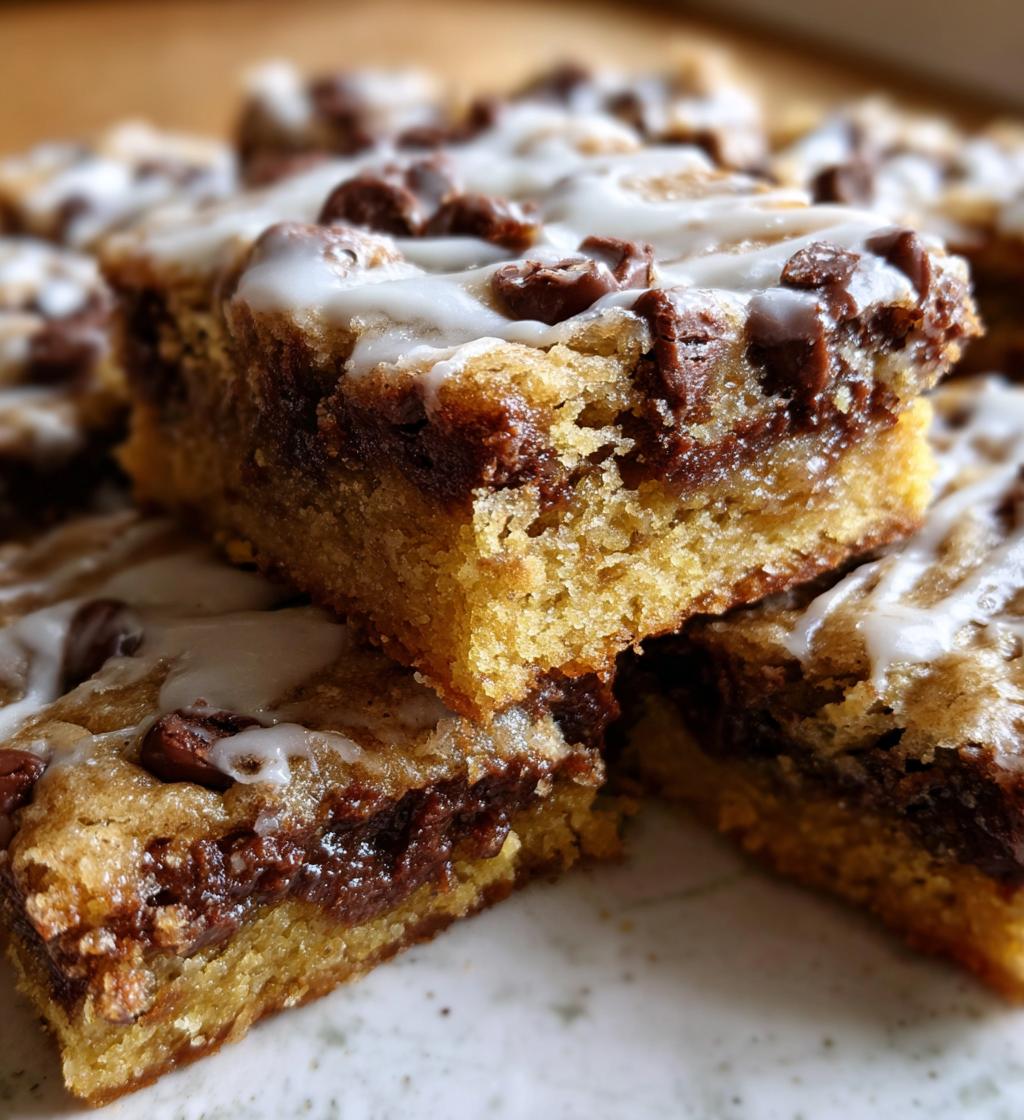
Valentine’s Day is just around the corner, and there’s nothing quite like the joy of baking to celebrate love! I remember the first time I decided to whip up a batch of treats for my partner. The kitchen was a delightful mess, flour dust everywhere, and the sweet aroma of chocolate wafting through the air made everything feel magical. These *valentines baked goods* are the perfect way to show your affection, whether it’s for a partner, friends, or family. They’re easy to make, delicious, and oh-so-satisfying to share. Plus, who can resist the combination of rich chocolate and buttery goodness? Trust me, when you bring these delightful squares to the table, you’ll be greeted with smiles and happy sighs. They’re perfect for a cozy night in or as a sweet surprise for that special someone. So, let’s get baking and create some love-filled memories this Valentine’s Day!
Ingredients List
- 2 cups all-purpose flour
- 1 cup granulated sugar
- 1/2 cup unsalted butter, softened
- 1 cup chocolate chips
- 2 large eggs
- 1 tsp baking powder
- 1 tsp vanilla extract
- 1/2 tsp salt
How to Prepare Valentines Baked Goods
Step-by-Step Instructions
Get ready to fill your kitchen with love and the sweet scent of chocolate! Here’s how to prepare these delightful valentines baked goods step by step:
- Preheat your oven: Start by preheating your oven to 350°F (175°C). This is an essential step, so don’t skip it—trust me, you want everything just right when it goes in!
- Cream the butter and sugar: In a large mixing bowl, cream together the softened unsalted butter and granulated sugar until it’s light and fluffy. I usually use a hand mixer for about 2-3 minutes. You want it to look pale and airy—this is where the magic begins!
- Add the eggs and vanilla: Crack in the two large eggs and pour in the vanilla extract, mixing well until everything is combined. The batter will get even creamier at this stage, and oh, the smell is heavenly!
- Combine the dry ingredients: In another bowl, whisk together the all-purpose flour, baking powder, and salt. This helps ensure even distribution of the leavening agent, which is crucial for that perfect rise.
- Mix it all together: Gradually add the dry ingredients to the wet mixture. I like to do this in three parts, alternating between the flour mixture and the wet ingredients. Stir gently until just combined—don’t overmix, or the baked goods will be dense!
- Fold in the chocolate chips: Now, fold in those luscious chocolate chips. This is my favorite part! Ensure they’re evenly distributed throughout the batter for that perfect chocolaty goodness in every bite.
- Prepare your baking dish: Pour the batter into a greased baking dish. I usually use a 9×13-inch pan, but feel free to use whatever you have on hand. Just make sure to spread it out evenly!
- Bake to perfection: Place the baking dish in the preheated oven and bake for 25-30 minutes. Keep an eye on it! You’ll know they’re done when a toothpick inserted in the center comes out clean with a few moist crumbs attached. It’s the ultimate test!
- Cool before cutting: Once baked, let the goodies cool in the pan for about 10-15 minutes. This is super important—if you cut them too soon, they might fall apart! Trust me, they’ll hold their shape better if you’re patient.
And there you have it! Follow these steps, and you’ll have a batch of delicious valentines baked goods that are sure to impress anyone you share them with. Enjoy the process, and don’t forget to sneak a little taste along the way!
Why You’ll Love This Recipe
These *valentines baked goods* are guaranteed to make your heart sing for several reasons! Here’s why you’ll fall head over heels for this recipe:
- Quick Preparation: With just 15 minutes of prep time, you can whip up these delightful treats in no time. Perfect for a last-minute surprise!
- Delicious Chocolate Flavor: The rich chocolate chips bring an irresistible sweetness that will have everyone coming back for seconds.
- Perfect for Sharing: Whether it’s a cozy night in or a gathering with friends, these treats are made to be shared. Spread the love and watch the smiles grow!
- Customizable: Feel free to get creative! Add nuts, swap in different chocolate types, or even throw in some sprinkles for that festive touch.
- Great for Any Occasion: While they’re perfect for Valentine’s Day, these baked goods are delightful any time of year. Birthdays, holidays, or just because—everyone deserves a treat!
- Easy Cleanup: One bowl and a few utensils mean you won’t be stuck with a mountain of dishes after enjoying these delicious bites.
Trust me, once you bake these *valentines baked goods*, you’ll understand why they hold such a special place in my heart—and why they’ll surely become a favorite in your home too!
Tips for Success
Getting these *valentines baked goods* just right is all about a few key tips that I’ve learned over the years. Trust me, following these will elevate your baking game and ensure every bite is as delicious as it can be!
- Use Room Temperature Ingredients: Make sure your butter and eggs are at room temperature before you start. This helps them blend together more smoothly, creating that lovely, fluffy texture in your batter.
- Quality Ingredients Matter: Don’t skimp on the quality of your chocolate chips. Opt for semi-sweet or dark chocolate for a richer flavor that’ll make your baked goods truly irresistible.
- Measure Accurately: Baking is a science, so measuring your ingredients correctly is crucial! Use the spoon-and-level method for flour—spoon it into your measuring cup and level it off with a knife. This prevents packing and ensures you don’t end up with a dry result.
- Don’t Overmix: When combining your wet and dry ingredients, mix until just combined. Overmixing can lead to tough, dense baked goods, and we want these to be light and soft!
- Check for Doneness Early: Ovens can vary, so start checking your baked goods a few minutes before the timer goes off. That way, you can catch them at just the right moment, ensuring they’re perfectly baked without drying out.
- Let Them Cool Properly: Resist the urge to cut into your baked goods right away. Allowing them to cool in the pan for a bit helps them set and keeps them from falling apart when you slice them.
- Have Fun with Toppings: Once cooled, feel free to get creative with your decorations! A simple drizzle of icing or a sprinkle of powdered sugar can add that extra flair that makes these treats feel extra special.
With these tips in your back pocket, you’ll be well on your way to making the perfect *valentines baked goods* that everyone will rave about. Happy baking!
Nutritional Information
When you’re whipping up these delightful valentines baked goods, it’s always good to know what you’re indulging in! Here’s a breakdown of the estimated nutritional values per serving (1 piece):
- Calories: 200
- Fat: 8g
- Saturated Fat: 5g
- Unsaturated Fat: 2g
- Trans Fat: 0g
- Cholesterol: 30mg
- Sodium: 150mg
- Carbohydrates: 30g
- Fiber: 2g
- Protein: 3g
- Sugar: 15g
Keep in mind that these values are just estimates and can vary based on ingredient brands and specific measurements. Enjoy your baking, and don’t forget to savor every delicious bite!
FAQ Section
Can I use different types of chocolate chips?
Absolutely! One of the best things about these *valentines baked goods* is how versatile they are. You can swap out semi-sweet chocolate chips for dark chocolate if you’re craving a richer flavor. Milk chocolate is a great option too if you prefer something sweeter. Feeling adventurous? Try adding white chocolate chips or even peanut butter chips for a fun twist! You can also mix different types for a delightful surprise in every bite. Just remember to adjust the quantity slightly if you’re using larger or denser chips!
How can I make these baked goods healthier?
Great question! There are plenty of ways to give these *valentines baked goods* a healthier spin without compromising on taste. For starters, you can substitute half of the all-purpose flour with whole wheat flour for added fiber. You could also reduce the sugar slightly or use a natural sweetener like honey or maple syrup—just remember to adjust the wet ingredients accordingly. If you’re looking to cut down on fat, you can replace some of the butter with unsweetened applesauce or Greek yogurt. They’ll keep the moisture while lightening things up. Small adjustments can make a big difference, so feel free to experiment!
Can I freeze the baked goods?
You bet! Freezing these *valentines baked goods* is a fantastic way to enjoy them later. Once they’ve completely cooled, cut them into squares and wrap each piece tightly in plastic wrap or aluminum foil. Place them in an airtight container or a freezer bag to prevent freezer burn. They can last in the freezer for up to three months! When you’re ready to enjoy, simply take them out and let them thaw at room temperature or pop them in the microwave for a few seconds for that fresh-baked warmth. Trust me, they’ll still taste amazing!
Storage & Reheating Instructions
Once you’ve baked these delicious valentines baked goods, you’ll want to make sure they stay fresh and tasty for as long as possible! Here’s how to store any leftovers and the best ways to reheat them:
Storing Leftovers: Allow your baked goods to cool completely in the pan before transferring them to an airtight container. This will help prevent excess moisture from making them soggy. If you prefer, you can also wrap individual pieces in plastic wrap and then place them in the container. They’ll stay fresh for up to a week at room temperature. If you want to keep them longer, freezing is a great option, as I mentioned before!
Freezing Tips: To freeze, make sure they’re fully cooled, then cut them into squares. Wrap each piece tightly in plastic wrap or foil, and place them in a freezer-safe bag or container. Label with the date, and they’ll be good for up to three months. When you’re ready to enjoy, just take out what you need and let them thaw in the fridge or at room temperature. You can even pop them in the microwave for a quick warm-up!
Reheating: If you want that freshly baked taste again, here’s what I recommend: microwave individual pieces for about 10-15 seconds. This warms them up perfectly without drying them out. Alternatively, you can place them in a preheated oven at 350°F (175°C) for about 5-10 minutes to get that lovely, soft texture back. Just keep an eye on them so they don’t get too hot!
With these storage and reheating tips, you can savor your *valentines baked goods* long after baking day, keeping those sweet memories alive with every bite!
Serving Suggestions
When it comes to enjoying these scrumptious valentines baked goods, pairing them with the right treats and drinks can elevate the whole experience! Here are some delightful suggestions that will make your dessert spread even more special:
- Love in a Cup: A warm cup of coffee or a rich hot chocolate is a classic choice! The bitterness of coffee beautifully complements the sweetness of the chocolate in the baked goods, while hot chocolate adds a cozy and comforting element. You could even sprinkle some mini marshmallows on top for that extra touch of romance!
- Sweeten the Deal: Serve these treats alongside a scoop of vanilla ice cream or whipped cream. The creamy texture and cold temperature create a wonderful contrast with the warm, fudgy baked goods. You can drizzle a bit of chocolate sauce or caramel on top to really impress!
- Fruit Frenzy: Fresh strawberries or raspberries are a lovely addition. Their natural tartness balances the rich chocolate and adds a pop of color to your plate. You can even toss them in a bit of sugar and let them sit for a few minutes to enhance their sweetness!
- Cheese Please: For something a little different, consider pairing your baked goods with a slice of creamy brie or a tangy goat cheese. The contrast of flavors can be surprisingly delightful, creating a sweet and savory experience.
- Fancy Mocktails: Mix up a refreshing mocktail with sparkling water, a splash of cranberry juice, and a squeeze of lime. It’s light, bubbly, and adds a festive flair to your dessert table. You could even garnish with fresh mint leaves for an aromatic touch!
- More Sweets: If you want to create a dessert platter, consider adding some chocolate-covered strawberries or a small fruit tart. These can really impress your guests and enhance the romantic vibe of your gathering.
So, whether you’re celebrating with a partner or sharing with friends, these serving suggestions will make your *valentines baked goods* even more memorable. Enjoy the sweetness and love in every bite!
Print
Valentines Baked Goods: 7 Delightful Treats to Cherish
- Total Time: 45 minutes
- Yield: 12 servings 1x
- Diet: Vegetarian
Description
Delicious baked goods perfect for Valentine’s Day.
Ingredients
- 2 cups all-purpose flour
- 1 cup granulated sugar
- 1/2 cup unsalted butter, softened
- 1 cup chocolate chips
- 2 large eggs
- 1 tsp baking powder
- 1 tsp vanilla extract
- 1/2 tsp salt
Instructions
- Preheat your oven to 350°F (175°C).
- In a bowl, cream together the butter and sugar.
- Add eggs and vanilla extract, mixing well.
- In another bowl, combine flour, baking powder, and salt.
- Gradually add dry ingredients to the wet mixture.
- Fold in chocolate chips.
- Pour batter into a greased baking dish.
- Bake for 25-30 minutes or until a toothpick comes out clean.
Notes
- Let cool before cutting into squares.
- Decorate with icing for a festive touch.
- Store in an airtight container.
- Prep Time: 15 minutes
- Cook Time: 30 minutes
- Category: Dessert
- Method: Baking
- Cuisine: American
Nutrition
- Serving Size: 1 piece
- Calories: 200
- Sugar: 15g
- Sodium: 150mg
- Fat: 8g
- Saturated Fat: 5g
- Unsaturated Fat: 2g
- Trans Fat: 0g
- Carbohydrates: 30g
- Fiber: 2g
- Protein: 3g
- Cholesterol: 30mg
Keywords: valentines baked goods, chocolate desserts, romantic treats


