Oh, St. Patrick’s Day! It’s one of those holidays that just brings out the joy in everyone, doesn’t it? I mean, who doesn’t love a day filled with festivities, laughter, and of course, delicious food? For me, it’s all about gathering around the kitchen with family and friends, whipping up some fabulous *St. Patrick’s Day food* that not only celebrates the spirit of the day but also fills our hearts with warmth. The vibrant greens, the delightful aromas, and the sweet treats just make everything feel special. Let’s be honest – there’s something magical about sharing a festive dessert that’s not only tasty but also bursting with color! I can’t help but smile when I see everyone’s faces light up as they take that first bite. So, roll up your sleeves, grab your mixing bowls, and let’s dive into a recipe that will surely become a favorite for all your St. Patrick’s Day celebrations!
Ingredients List
- 2 cups all-purpose flour
- 1 cup sugar
- 1 cup unsalted butter (softened)
- 4 large eggs
- 1 teaspoon baking powder
- 1/2 teaspoon salt
- 1 teaspoon vanilla extract
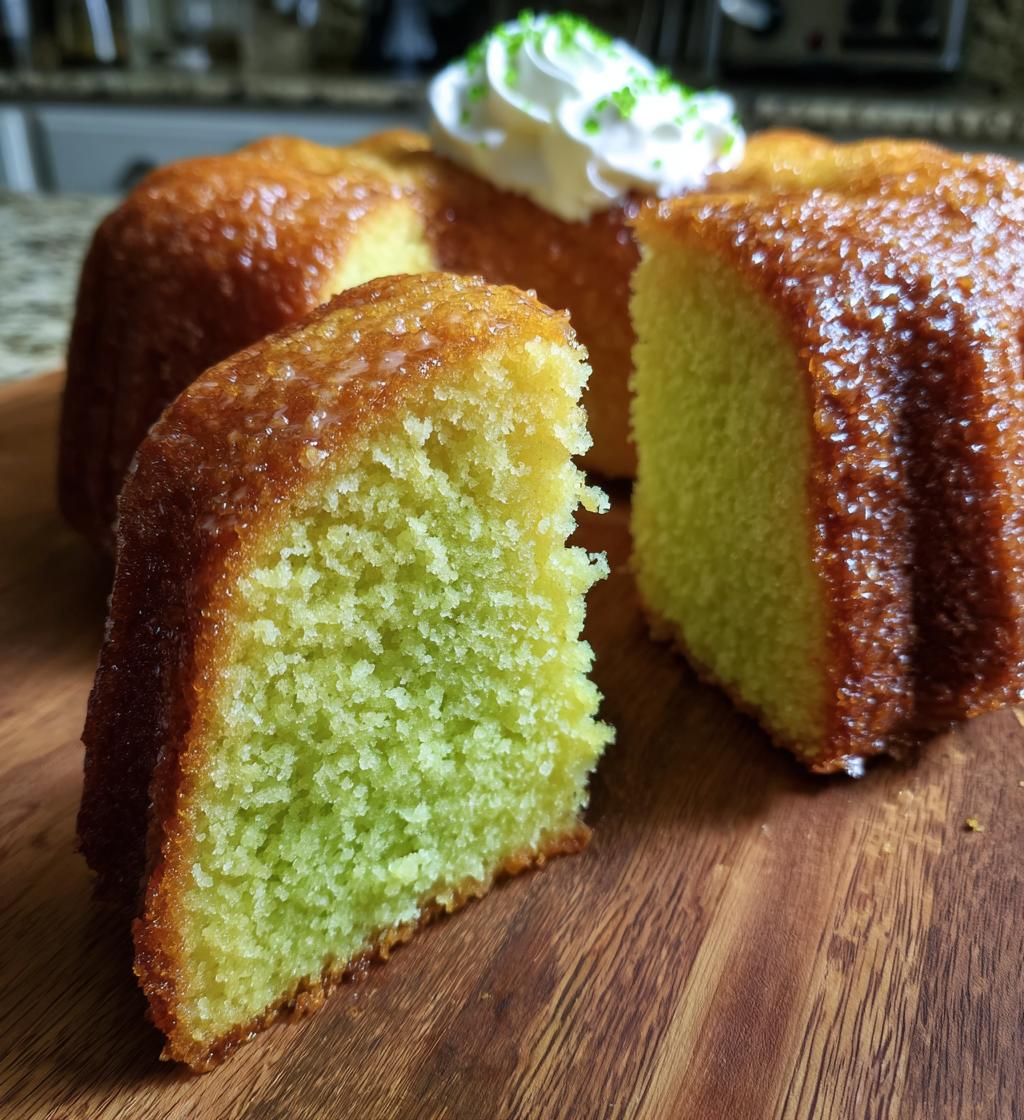
- Green food coloring (amount as desired for hue)
How to Prepare Instructions
Preheating and Mixing
First things first, let’s get that oven preheated to 350°F (175°C). This step is super important because you want your cake to bake evenly from the get-go. While that’s warming up, grab a large mixing bowl and start creaming together the unsalted butter and sugar. Trust me, this is where the magic begins! You want to beat them together until the mixture looks light and fluffy—think whipped honey. This texture is crucial because it helps trap air, which will make your cake light and airy. So, don’t rush this step; give it a good 2-3 minutes of love!
Adding Ingredients
Next up, it’s time to add the eggs! Crack them in one at a time, mixing well after each addition. This helps incorporate them smoothly into the batter. I love to add a splash of vanilla extract at this stage; it really boosts the flavor! And of course, don’t forget the green food coloring! Start with a few drops and mix until you get that lovely vibrant hue. It’s like painting with cake batter—so fun! Just remember, you can always add more if you want a deeper green, but start small and build it up.
Combining Dry Ingredients
Now, let’s tackle the dry ingredients! In a separate bowl, whisk together the all-purpose flour, baking powder, and salt. This helps to evenly distribute the baking powder throughout the flour, which is key for a good rise. Once that’s done, gradually mix the dry ingredients into the wet mixture. I like to add them in three parts, alternating with a splash of milk if you want, to keep the batter nice and smooth. Just mix until you don’t see any more flour—over-mixing can make the cake dense, and we want it fluffy!
Baking the Dessert
Now it’s time for the fun part! Pour your colorful batter into a greased baking pan, spreading it out evenly. Bake that beauty in the preheated oven for about 30-35 minutes. Here’s a little tip: check for doneness by inserting a toothpick in the center. If it comes out clean, you’re golden! Once baked, let it cool in the pan for about 10 minutes before transferring it to a wire rack. Resist the urge to dive in right away—allowing it to cool a bit makes serving a breeze!
Why You’ll Love This Recipe
- Easy to make: With simple steps and common ingredients, this recipe is perfect for bakers of any skill level!
- Festive and colorful: The vibrant green hue makes it a standout dessert that captures the spirit of St. Patrick’s Day.
- Perfect for celebrations: Whether it’s a family gathering or a festive party, this dessert adds a delightful touch to any occasion.
- Delicious taste: The blend of sweet, buttery cake with a hint of vanilla will have everyone coming back for seconds.
- Great for sharing: This recipe yields enough servings to celebrate with friends and family, spreading joy and happiness with every slice!
Tips for Success
Now that you’re ready to whip up this delightful St. Patrick’s Day dessert, here are some pro tips to ensure it turns out perfectly every time!
- Adjust the green coloring: Don’t be shy with the green food coloring! Start with a few drops and gradually add more until you achieve your desired hue. Remember, it’s all about that festive vibe, so have fun with it!
- Serve with whipped cream: For an extra touch of indulgence, serve your cake slices with a dollop of whipped cream. It adds a lovely creamy texture that beautifully complements the sweetness of the cake. Plus, it looks so inviting!
- Check your oven temperature: Oven temperatures can vary, so keep an eye on your cake as it bakes. If you notice it browning too quickly on top, feel free to cover it loosely with aluminum foil to prevent over-baking.
- Let it cool completely: Allowing your cake to cool completely before slicing makes a big difference. It sets the texture and makes for cleaner cuts, so you won’t have to deal with messy pieces.
- Add a festive touch: Consider decorating the top with sprinkles or even edible glitter for that extra St. Patrick’s Day flair! It’s all about making it look as good as it tastes!
With these tips, you’ll be well on your way to creating a memorable dessert that everyone will love. Happy baking!
Storage & Reheating Instructions
Now that you’ve baked this delightful St. Patrick’s Day cake, you might be wondering how to keep those leftover slices fresh for later enjoyment. Don’t worry, I’ve got you covered!
First, let the cake cool completely before storing it. This step is crucial because if you store it while it’s still warm, it can lead to moisture build-up and make your cake soggy. Once it’s cool, wrap the cake tightly in plastic wrap or aluminum foil. You can also place it in an airtight container to keep it from drying out.
If you plan to enjoy it within a few days, you can store it at room temperature. Just make sure it’s in a cool, dry place away from direct sunlight. However, if you want to keep it for a longer period, pop it in the fridge. It’ll stay fresh for about a week in there.
Now, when it comes to reheating, you can do it gently to preserve that lovely texture. Just slice off a piece you want to enjoy and pop it in the microwave for about 10-15 seconds. You’ll want to keep an eye on it to avoid overheating. If you prefer it warm from the oven, you can also preheat your oven to 350°F (175°C), place the slice on a baking sheet, and heat it for about 5-10 minutes. Just like that, you’ll have a warm, inviting dessert ready to delight your taste buds again!
So, whether you’re enjoying it fresh or reheated, this cake is sure to bring a smile to your face long after St. Patrick’s Day is over. Happy indulging!
Nutritional Information Section
As you dive into this scrumptious St. Patrick’s Day cake, it’s good to know what’s in each delightful slice! Here’s the estimated nutritional data to keep you informed:
- Calories: 250
- Sugar: 15g
- Sodium: 150mg
- Fat: 10g
- Saturated Fat: 6g
- Unsaturated Fat: 3g
- Trans Fat: 0g
- Carbohydrates: 35g
- Fiber: 1g
- Protein: 3g
- Cholesterol: 50mg
Please note that these values are estimates and can vary based on specific ingredients used and portion sizes. It’s always a good idea to keep an eye on your dietary needs while enjoying this festive treat!
FAQ Section
Got questions about making the best *St. Patrick’s Day food*? I’ve got answers! Here are some common queries I hear, and I’m excited to share my thoughts with you.
What can I serve with this dessert?
This cake pairs beautifully with a variety of treats! I recommend serving it with some freshly whipped cream for that extra creamy goodness. You can also add a scoop of vanilla ice cream on the side for an indulgent touch. If you’re feeling adventurous, a drizzle of Irish cream liqueur over the top can elevate the flavors even more. And don’t forget about that classic Irish coffee—it’s the perfect drink to complement your festive dessert!
Can I use other colors?
Absolutely! While green is the star of the show for St. Patrick’s Day, you can get creative with colors. You could use yellow or blue food coloring for a fun twist, or even a rainbow effect by dividing the batter and adding different colors. Just remember, the colors should be food-safe and suitable for baking. The kids will especially love a multi-colored cake!
How do I make this gluten-free?
Making this delicious dessert gluten-free is easier than you might think! Simply swap out the all-purpose flour for a gluten-free flour blend. Be sure to choose a blend that includes xanthan gum, which helps provide structure and texture. I also recommend checking that all your other ingredients, like baking powder and vanilla extract, are gluten-free. With these adjustments, you’ll have a fabulous gluten-free cake that everyone can enjoy!
If you have any more questions or need further clarification, feel free to reach out! I’m here to help you make your St. Patrick’s Day celebration as delightful as possible!
Serving Suggestions
Now that you’ve whipped up this delightful St. Patrick’s Day cake, let’s talk about how to elevate your dessert experience! Pairing your cake with the right accompaniments can really enhance the flavors and make your celebration even more festive.
First up, I can’t recommend enough how perfect Irish coffee is alongside this sweet treat. The rich coffee flavor, mixed with a splash of Irish whiskey and topped with fresh whipped cream, adds a lovely warmth that complements the cake beautifully. It’s like a cozy hug in a cup!
If you’re looking for something light and refreshing, consider a festive fruit salad. A mix of seasonal fruits, like juicy strawberries, zesty oranges, and maybe even some kiwi, adds a vibrant contrast to the sweet, buttery cake. Plus, it brings a splash of color to your table that’s just perfect for St. Patrick’s Day!
Another fun idea is to serve your cake with a drizzle of vanilla or mint ice cream. The creaminess of the ice cream balances out the sweetness of the cake, and the minty flavor can add a nice twist that feels festive and fun. It’s a classic combo that never disappoints!
And if you want to take it up a notch, how about a spiked whipped cream? Just a hint of Irish cream liqueur mixed into your whipped cream can turn an ordinary topping into something extraordinary. Everyone will be raving about it!
Trust me, these serving suggestions will not only enhance your dessert but also create a delightful spread that everyone will love. So go ahead, set the table, and get ready for a wonderful St. Patrick’s Day celebration filled with laughter, joy, and delicious flavors!
Print
St. Patrick’s Day Food: 5 Magical Recipes to Delight
- Total Time: 55 minutes
- Yield: 8 servings 1x
- Diet: Vegetarian
Description
Delicious recipes to celebrate St. Patrick’s Day.
Ingredients
- 2 cups all-purpose flour
- 1 cup sugar
- 1 cup unsalted butter
- 4 large eggs
- 1 teaspoon baking powder
- 1/2 teaspoon salt
- 1 teaspoon vanilla extract
- Green food coloring
Instructions
- Preheat your oven to 350°F (175°C).
- In a bowl, cream together the butter and sugar.
- Add eggs one at a time, mixing well after each.
- Stir in vanilla extract and green food coloring.
- In another bowl, combine flour, baking powder, and salt.
- Gradually add dry ingredients to the wet mixture.
- Pour batter into a greased baking pan.
- Bake for 30-35 minutes or until a toothpick comes out clean.
- Let it cool before serving.
Notes
- Adjust green coloring for desired hue.
- Serve with whipped cream for extra flavor.
- Prep Time: 20 minutes
- Cook Time: 35 minutes
- Category: Dessert
- Method: Baking
- Cuisine: Irish
Nutrition
- Serving Size: 1 slice
- Calories: 250
- Sugar: 15g
- Sodium: 150mg
- Fat: 10g
- Saturated Fat: 6g
- Unsaturated Fat: 3g
- Trans Fat: 0g
- Carbohydrates: 35g
- Fiber: 1g
- Protein: 3g
- Cholesterol: 50mg
Keywords: st. patricks day food, irish recipes, festive desserts


