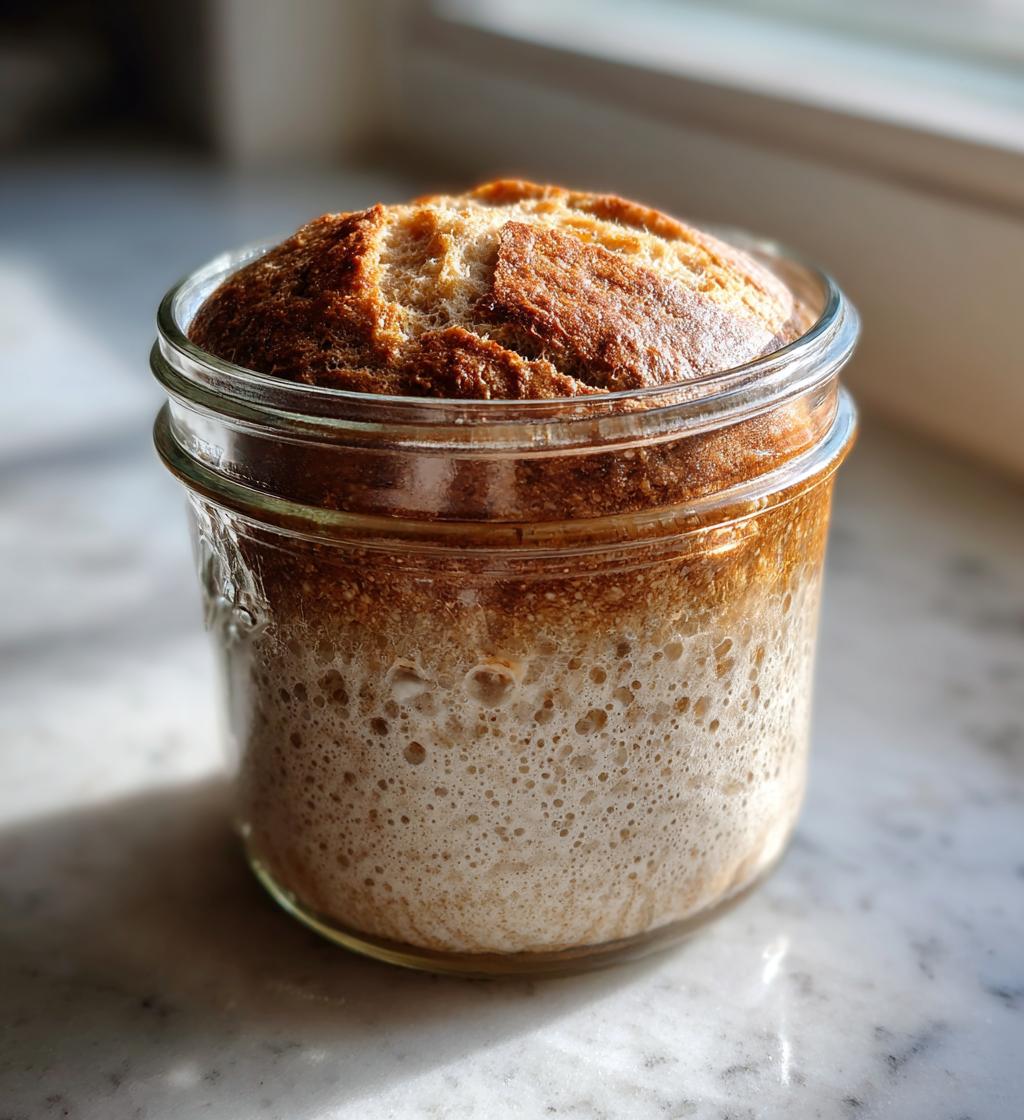
Oh, let me tell you about the magical world of making your own sourdough starter! This little jar of fermented goodness is the heart and soul of all your homemade bread adventures. Imagine capturing wild yeast and bacteria right from your kitchen – it sounds like something out of a fairy tale, doesn’t it? But it’s real, and it’s incredibly rewarding!
When I first started my sourdough journey, I was amazed at how simple it was to mix just flour and water and let nature do its thing. I remember the first time I saw those tiny bubbles forming in my starter. It felt like I was nurturing a living creature! Over the course of about a week, with a little patience and daily feedings, I transformed that mixture into a powerhouse of flavor. Trust me, once you taste bread made from your homemade starter, you’ll never want to go back to store-bought again!
So, roll up your sleeves, because I’m about to share everything you need to know to embark on this delicious journey. It’s going to be fun, and I promise you’ll love the process as much as the end result!
Ingredients List
Creating your own sourdough starter is a breeze with just a couple of simple ingredients! Here’s what you’ll need:
- 1 cup all-purpose flour: This is the foundation of your starter. I love using unbleached flour because it has a bit more flavor and nutrients!
- 1/2 cup water: Use room temperature water, which helps the yeast and bacteria thrive. If possible, use filtered water to avoid any chlorine that might inhibit fermentation.
That’s it! Just two ingredients to kickstart your sourdough adventure. Gather these up, and we’ll get to the fun part of mixing and waiting for the magic to happen!
How to Prepare Sourdough Starter
Ready to dive into the wonderful world of sourdough starter preparation? It’s easier than you think! Just follow these simple steps, and you’ll be on your way to creating a bubbly, active starter that will elevate your bread-making game. Trust me, the anticipation is part of the fun!
Step-by-Step Instructions
- Combine the ingredients: In a clean bowl, mix 1 cup of all-purpose flour with 1/2 cup of room temperature water. Use a wooden spoon or spatula to stir until everything is smooth and there are no dry flour pockets. It should have a thick but pourable consistency.
- Cover and rest: Now, cover the bowl with a clean cloth or plastic wrap. This keeps dust out while still allowing the starter to breathe. Let it sit at room temperature for 24 hours. During this time, the wild yeast and bacteria in the air will start to mingle with your mixture.
- Feed your starter: After the first 24 hours, you’ll want to feed your starter daily. Discard half of the mixture (about 1/2 cup) to prevent it from growing too large. Then, add 1 cup of all-purpose flour and 1/2 cup of water each time. Stir well until everything is blended, then cover it up again. This regular feeding is crucial for building a healthy starter!
- Watch for bubbles: Keep an eye on your starter over the next few days. After about 3 to 5 days, you should start to see bubbles forming and notice a pleasant sour smell. This is a great sign that your starter is alive and thriving!
- Be patient: It usually takes about a week for your sourdough starter to become fully mature and ready for baking. You want it to double in size within 4 to 6 hours of feeding. Once it does, you’re ready to bake some delicious bread!
Just remember, every sourdough starter is a little different, so don’t worry if yours takes a bit longer. Enjoy the process, and soon you’ll have a bubbly companion for all your baking adventures!
Why You’ll Love This Recipe
- Easy to make: With just two ingredients and a bit of patience, you can create your own sourdough starter right at home!
- Cost-effective: Say goodbye to store-bought starters! This method saves you money while giving you a personal touch to your bread.
- Flavorful results: Homemade sourdough bread has a depth of flavor that’s hard to beat, thanks to the wild yeast and bacteria captured in your starter.
- Rewarding experience: There’s something so satisfying about nurturing your starter and watching it grow into a bubbling, active mix ready for baking.
- Creative possibilities: Once you have your starter, the world of sourdough opens up! Experiment with different breads, pancakes, and even pizza dough!
Tips for Success
Getting your sourdough starter just right can be a bit tricky, but I’ve got some expert tips to help you avoid common pitfalls!
- Use the right container: Always opt for glass or plastic containers. Metal can react with the acids in the starter, so steer clear of that.
- Maintain a warm environment: Your starter loves warmth! Keep it in a cozy spot, ideally between 70°F and 85°F. If your kitchen is too cool, it may take longer to develop.
- Don’t skip feedings: Daily feedings are crucial. If you forget one, don’t panic! Just resume feeding as soon as you remember.
- Observe your starter: Pay attention to its activity. If it’s not bubbling or rising, it might need more frequent feedings or a warmer spot.
- Be patient: It takes time for your starter to develop its full potential. Don’t rush the process—great bread is worth the wait!
By keeping these tips in mind, you’ll be well on your way to creating a vibrant and healthy sourdough starter that will elevate your baking to new heights!
Nutritional Information
Before we dive into the details, it’s important to note that the nutrition information for your sourdough starter can vary based on the specific ingredients and brands you choose. So, while I can give you a general idea, it’s not an exact science!
Here’s a breakdown based on a typical serving size of 1 tablespoon of your homemade starter:
- Calories: 30
- Sugar: 0g
- Sodium: 0mg
- Fat: 0g
- Saturated Fat: 0g
- Unsaturated Fat: 0g
- Trans Fat: 0g
- Carbohydrates: 6g
- Fiber: 0g
- Protein: 1g
- Cholesterol: 0mg
Keep in mind that as your sourdough starter develops and you use it in recipes, the nutritional values will change. Enjoy your baking adventures and the delightful flavors that come from your homemade starter!
FAQ Section
Common Questions About Sourdough Starter
Q1: How long does it take to create a sourdough starter?
Creating a sourdough starter typically takes about a week. During this time, you’ll be feeding it daily and watching it develop. The key is patience! It may take a few days before you see bubbles and notice a sour smell, but trust me, it’s all part of the process.
Q2: Why do I need to discard some of the starter when feeding?
Discarding half of your starter before each feeding helps maintain the right balance of yeast and bacteria. If you don’t do this, your starter will grow too large and become difficult to manage. Plus, it ensures that your starter remains active and healthy, so it’s ready for baking!
Q3: Can I keep my sourdough starter in the refrigerator?
Absolutely! If you don’t plan to bake frequently, you can store your sourdough starter in the refrigerator. Just remember to feed it once a week to keep the yeast alive. When you’re ready to bake, take it out a day in advance, feed it, and let it come to room temperature.
Q4: What should I do if my sourdough starter isn’t bubbling?
If your starter isn’t bubbling, it could need more warmth or more frequent feedings. Make sure it’s in a cozy spot and try feeding it twice a day instead of once. Sometimes, it just takes a little extra love to get it going!
Q5: Can I use whole wheat flour instead of all-purpose flour?
Yes, you can use whole wheat flour to create your sourdough starter! Whole wheat contains more nutrients and can help your starter become more active. Just keep in mind that it may have a slightly different flavor and may need a bit more water than all-purpose flour.
Storage & Reheating Instructions
Storing your sourdough starter properly is key to keeping it healthy and ready for your next baking adventure! If you plan to use your starter regularly, keep it at room temperature in a glass or plastic container with a loose lid. This allows it to breathe while also protecting it from dust. Just remember to feed it daily!
If you’re taking a break from baking, don’t worry! You can store your starter in the refrigerator. Simply feed it one last time, let it sit at room temperature for a couple of hours, then pop it in the fridge. Make sure to feed it at least once a week to keep those wild yeasts happy. When you’re ready to bake again, take it out, feed it, and let it sit at room temperature for about 4 to 6 hours before using it.
With these simple storage tips, your sourdough starter will be a reliable companion, ready to bring life to your next loaf of bread!
Print
Sourdough Starter: 5 Magical Steps to Create Yours
- Total Time: 7 days
- Yield: 1 cup starter 1x
- Diet: Vegan
Description
A sourdough starter is a fermented mixture of flour and water that captures wild yeast and bacteria. It is used to leaven bread naturally.
Ingredients
- 1 cup all-purpose flour
- 1/2 cup water
Instructions
- Combine flour and water in a bowl.
- Stir until smooth.
- Cover with a cloth and let it sit at room temperature.
- Feed the starter daily with equal parts flour and water.
Notes
- Use a glass or plastic container.
- Keep the starter in a warm place.
- Discard half the starter before each feeding.
- Prep Time: 10 minutes
- Cook Time: 0 minutes
- Category: Baking
- Method: Fermentation
- Cuisine: Various
Nutrition
- Serving Size: 1 tablespoon
- Calories: 30
- Sugar: 0g
- Sodium: 0mg
- Fat: 0g
- Saturated Fat: 0g
- Unsaturated Fat: 0g
- Trans Fat: 0g
- Carbohydrates: 6g
- Fiber: 0g
- Protein: 1g
- Cholesterol: 0mg
Keywords: sourdough starter, bread making, fermentation


