Oh my goodness, I can’t contain my excitement! Making *rice crispy treats* is one of those magical kitchen moments that brings back all the warm, fuzzy feelings from my childhood. I remember gathering around the kitchen with my family, the aroma of melting marshmallows filling the air and the sound of crisp cereal crackling as it gets mixed in. Now, when Halloween rolls around, it’s the perfect time to turn those classic treats into something spook-tacular!
These *rice crispy treats Halloween* are not just delicious; they’re a canvas for creativity! Picture this: little ghosts and pumpkins, all made from that gooey, sweet goodness. It’s a fun way to get the kids involved too—they love shaping the treats and decorating them. Plus, they’re quick to whip up, making them a go-to treat for Halloween parties, school events, or even just a cozy night in with some spooky movies. Trust me, you’ll want to dive into this recipe and create those delightful little monsters that everyone will adore! So, let’s get started on crafting these festive treats that are sure to bring smiles all around!
Ingredients List
Gathering the right ingredients is the first step to making these delightful *rice crispy treats Halloween*. Here’s what you’ll need:
- 3 tablespoons butter: This will give your treats that rich, creamy flavor. Make sure it’s unsalted for the best results!
- 1 package (10 oz) marshmallows: You can use mini or regular marshmallows; both work perfectly to create that gooey goodness.
- 6 cups rice cereal: The classic choice! This is where the crunch comes from, so don’t skimp on quality.
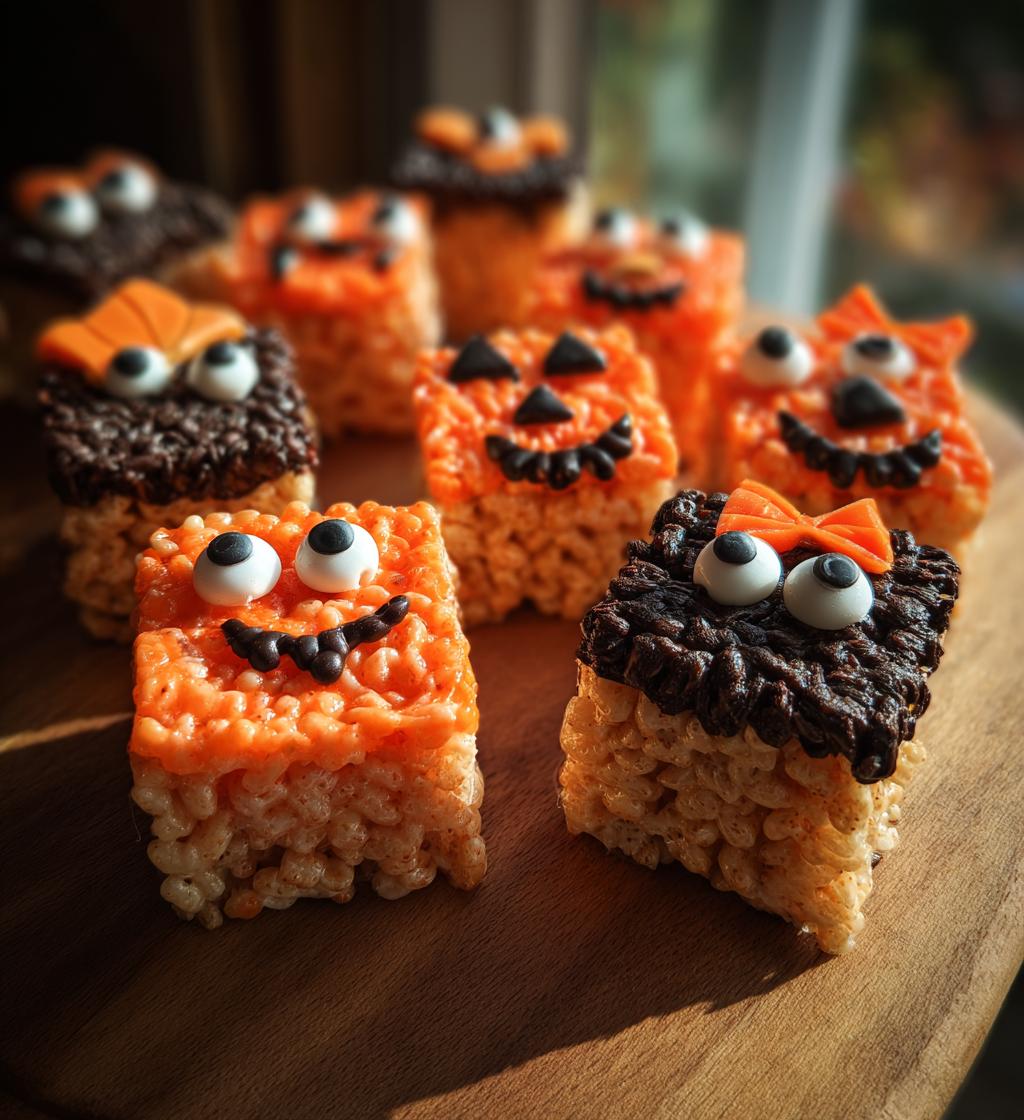
- Food coloring (orange, black): This is your chance to get creative! Use gel food coloring for vibrant colors that won’t alter the texture.
- Edible eyes: These little guys are essential for bringing your Halloween characters to life! You can find them in most craft or baking stores.
- Chocolate melts: Perfect for decorating and adding a delicious chocolatey touch. You can use dark, milk, or white—whatever tickles your taste buds!
Make sure to have everything ready before you start, as the process moves quickly once the marshmallows melt. Let’s get cooking!
How to Prepare Rice Crispy Treats Halloween
Now that you’ve got your ingredients ready, it’s time to dive into the fun part—making your *rice crispy treats Halloween*! Follow these steps to create those spooky delights that everyone will love!
Step 1: Melt the Butter
First things first, grab a large pot and set it on the stove over low heat. Toss in your 3 tablespoons of butter and let it melt slowly. You want to keep an eye on it because butter can burn easily! Stir it gently with a wooden spoon until it’s completely melted and smooth. This step is super important because it sets the stage for that gooey, delicious base!
Step 2: Add Marshmallows
Once your butter is all melted, it’s time to add the star of the show—those 10 ounces of marshmallows. Pour them in and start stirring right away! Keep stirring consistently until they’re fully melted and combined with the butter. This part is crucial, so don’t walk away! You want a silky, gooey mixture that’s just begging to be mixed with rice cereal.
Step 3: Mix in Rice Cereal
After the marshmallows are nice and melted, remove the pot from the heat. Now, add in your 6 cups of rice cereal and gently fold it in with a spatula or your wooden spoon. Be sure to coat all those crispy bits evenly! I like to go slow here—take your time to make sure every morsel gets that delicious marshmallow goodness. You’ll want to see a lovely, even mixture before moving on.
Step 4: Color the Mixture
Now comes the fun part—coloring your treats! Divide your gooey mixture into two bowls. In one bowl, add a few drops of orange food coloring and mix it in until you get that vibrant Halloween hue. In the other bowl, do the same with the black food coloring. Mix until the colors are even and bright. This is where your creativity shines, so don’t be shy with the color!
Step 5: Press Mixtures into Pans
Next, you’ll want to press your colored mixtures into greased pans. I usually use a 9×13 inch pan, but you can also use smaller molds for fun shapes! Just make sure to grease them well so nothing sticks. Use a spatula or your hands (lightly greased, of course) to press the mixtures down firmly and evenly into the pan. Once they’re all packed in, let them cool for about 30 minutes. Patience here is key; you want them to set up nicely!
Step 6: Cut and Decorate
Once your treats are cool and set, it’s time for the best part—cutting and decorating! Use cookie cutters to cut out fun shapes like ghosts, pumpkins, or even spooky monsters. For decorating, melt some chocolate melts in the microwave (follow the package instructions to avoid burning) and drizzle or dip your treats. Add those adorable edible eyes to bring your Halloween characters to life! Get creative here; the more festive, the better!
Tips for Success
Now that you’re ready to create your *rice crispy treats Halloween*, here are some tried-and-true tips to ensure your spooky snacks turn out perfectly every time. Trust me, these little nuggets of wisdom can make all the difference!
Use Fresh Ingredients
Always make sure your marshmallows and rice cereal are fresh. Stale marshmallows won’t melt well, and who wants crispy treats that aren’t, well, crispy? Check those expiration dates before you start, and you’ll be in great shape!
Watch Your Heat
When melting your butter and marshmallows, keep the heat low and don’t rush the process. If the heat’s too high, you risk burning the marshmallows, which can lead to a sticky mess instead of that lovely gooey texture we’re after. Patience is key!
Grease Your Pans Well
Don’t skip the greasing step! It’s important to coat your pans well with butter or cooking spray to prevent your treats from sticking. You’ll thank yourself later when it comes time to remove those perfectly shaped goodies!
Press Firmly, But Not Too Hard
When you press the mixtures into the pans, aim for a firm but gentle touch. You want them to hold together well, but pressing too hard can make them dense and chewy instead of light and crispy. It’s all about that perfect balance!
Get Creative with Shapes
Have fun with cookie cutters! You can find all sorts of Halloween-themed shapes, but don’t be afraid to get creative with what you have at home. Use a knife for more unique designs or even freehand some spooky characters. The sky’s the limit!
Don’t Overheat the Chocolate
When melting chocolate for decoration, do it in short bursts in the microwave. Start with 30 seconds, stir, then heat in 15-second intervals until it’s smooth. Overheating can cause it to seize up, and then you’ll be left with a lumpy mess instead of a smooth drizzle!
With these tips in your back pocket, you’ll be all set to create the most delightful *rice crispy treats Halloween* that’ll impress friends and family alike. Happy Halloween baking!
Variations
Now that you’ve mastered the classic *rice crispy treats Halloween*, let’s get those creative juices flowing with some fun variations! There are so many ways to switch things up and make these treats uniquely yours. Here are a few ideas that I absolutely love:
Colorful Swirls
Instead of dividing the mixture into two separate colors, why not create a colorful swirl effect? Just add both the orange and black food coloring to the same bowl and use a spatula to gently fold them together. You’ll get a marbled look that’s super fun and festive!
Monster Mash
Transform your treats into little monsters! Use green food coloring for the base and then decorate with mini chocolate chips for eyes, and broken pretzel pieces for arms. You can even use a bit of extra melted chocolate to create silly mouths. Kids will love this creative twist!
Festive Sprinkles
Take your decorated treats to the next level by adding sprinkles! After you’ve drizzled chocolate, sprinkle some Halloween-themed sprinkles on top—think orange, black, and purple. It adds a delightful crunch and extra pizzazz that’s perfect for any Halloween gathering.
Peanut Butter Twist
If you’re a peanut butter lover like me, try mixing in some creamy peanut butter with the melted marshmallows. This adds a rich, nutty flavor that pairs beautifully with the sweetness of the treats. You can even drizzle melted chocolate on top for that extra indulgence!
Pumpkin Spice Flavor
For a seasonal spin, add a pinch of pumpkin spice to the melted marshmallows. This will give your treats a warm, cozy flavor that’s perfect for fall! You can also shape them into little pumpkins using orange food coloring and decorate with green icing for the stem.
Chocolate-Covered Treats
Want to make your treats even more indulgent? After cutting them into shapes, dip each piece in melted chocolate and let them set on parchment paper. This adds a delicious chocolate coating that makes them irresistible! You can even sprinkle with sea salt for a sweet and salty combo.
These variations are just the tip of the iceberg! Feel free to mix and match ideas to create your own unique *rice crispy treats Halloween*. The best part about these treats is that they’re as fun to make as they are to eat, so don’t be afraid to get wild and creative in the kitchen!
Storage & Reheating Instructions
Once you’ve whipped up your fabulous *rice crispy treats Halloween*, you might be wondering how to keep those delicious creations fresh for as long as possible. Thankfully, storing them is super easy!
To store your treats, place them in an airtight container. This will help maintain their delightful crispiness while preventing any unwanted moisture from sneaking in. I usually layer parchment paper between the treats if I stack them, just to keep them from sticking together. Trust me, no one wants a clump of marshmallow goodness!
These treats can last at room temperature for about 3 to 5 days if stored properly. I recommend keeping them in a cool, dry place away from direct sunlight. If you find yourself with leftovers (which is rare, but it happens!), just pop the lid on that container, and you’re good to go!
If you want to enjoy them warm and gooey again, you can gently reheat them in the microwave. Just place a single treat on a microwave-safe plate and heat it for about 10-15 seconds. Keep an eye on it, though! You want it warm, not molten lava! This will bring back that lovely soft, gooey texture that makes these treats so irresistible.
And if you happen to have any chocolate-covered versions, just be cautious with microwaving, as the chocolate can melt quickly. A quick 5-second burst might be all you need! Enjoy every bite of your Halloween treats, and happy snacking!
Nutritional Information
Here’s a quick look at the nutritional information for each serving of these delightful *rice crispy treats Halloween*. Keep in mind that these values can vary based on the specific ingredients and brands you choose, so consider this a general guide rather than precise measurements.
- Serving Size: 1 treat
- Calories: 150
- Sugar: 10g
- Sodium: 50mg
- Fat: 5g
- Saturated Fat: 2g
- Unsaturated Fat: 3g
- Trans Fat: 0g
- Carbohydrates: 25g
- Fiber: 0g
- Protein: 1g
- Cholesterol: 10mg
So, whether you’re whipping these up for a festive gathering or just treating yourself, you can feel good knowing exactly what’s in your spooky snacks! Happy Halloween munching!
Why You’ll Love This Recipe
- Quick Preparation: With only 20 minutes from start to finish, you can whip up a batch of these delightful treats in no time—perfect for last-minute Halloween events!
- Easy to Make: The simple steps and minimal ingredients mean that even beginner cooks can create these festive treats with confidence.
- Fun for Kids: Involve the little ones in the process! They’ll love mixing, coloring, and decorating their own spooky creations, making it a memorable family activity.
- Customizable: There are endless possibilities for colors and shapes, allowing you to get creative based on your Halloween theme or personal taste.
- Great for Parties: These treats are always a hit at Halloween parties, school events, or even just cozy nights in. They’re sure to bring smiles to faces young and old!
- Deliciously Nostalgic: Enjoying these sweet, gooey treats will take you back to childhood memories, making them a timeless favorite for all ages.
FAQ Section
Got questions about making the perfect *rice crispy treats Halloween*? Don’t worry, I’ve got you covered! Here are some of the most common queries I get from fellow treat-makers:
Can I use different types of cereal for these treats?
Absolutely! While rice cereal is the classic choice, feel free to mix things up with other cereals like cornflakes or even puffed rice. Just keep in mind that different cereals may alter the texture a bit, but it’s all about having fun and experimenting!
How do I prevent my treats from becoming too hard?
The key to keeping your treats soft and chewy is to not over-press them into the pan. A gentle but firm hand works best! Also, make sure to store them in an airtight container to maintain that delightful texture. If they do get a bit hard, a quick zap in the microwave for a few seconds can help bring back some softness!
Can I make these treats ahead of time?
Sure thing! These *rice crispy treats Halloween* can be made a day or two in advance. Just store them in an airtight container, and they’ll stay fresh and tasty! If you’re decorating them with chocolate or sprinkles, I recommend waiting until the day you plan to serve them for the best presentation.
What can I do if I don’t have cookie cutters?
No cookie cutters? No problem! You can simply use a knife to cut the treats into squares or rectangles. Or get creative and freehand your own spooky shapes! Just remember, the more unique the shapes, the more fun they’ll be for everyone!
How can I make these treats gluten-free?
To make your *rice crispy treats Halloween* gluten-free, just ensure that you’re using gluten-free rice cereal. Many brands offer delicious options that taste just as good, so you won’t miss out on any of that classic flavor. Plus, you can still enjoy all the fun decorating!
With these FAQs in mind, you’re all set to tackle your Halloween treats like a pro! Happy baking!
Print
Rice Crispy Treats Halloween: 5 Spooky Variations to Try
- Total Time: 20 minutes
- Yield: 12 servings 1x
- Diet: Vegetarian
Description
Delicious rice crispy treats shaped like Halloween characters.
Ingredients
- 3 tablespoons butter
- 1 package (10 oz) marshmallows
- 6 cups rice cereal
- Food coloring (orange, black)
- Edible eyes
- Chocolate melts
Instructions
- Melt butter in a large pot over low heat.
- Add marshmallows and stir until completely melted.
- Remove from heat and mix in rice cereal until well coated.
- Divide mixture into two bowls. Color one with orange and the other with black.
- Press colored mixtures into greased pans and let cool.
- Cut into shapes and decorate with chocolate melts and edible eyes.
Notes
- Use cookie cutters for fun shapes.
- Store in an airtight container.
- Add sprinkles for extra decoration.
- Prep Time: 15 minutes
- Cook Time: 5 minutes
- Category: Dessert
- Method: Stovetop
- Cuisine: American
Nutrition
- Serving Size: 1 treat
- Calories: 150
- Sugar: 10g
- Sodium: 50mg
- Fat: 5g
- Saturated Fat: 2g
- Unsaturated Fat: 3g
- Trans Fat: 0g
- Carbohydrates: 25g
- Fiber: 0g
- Protein: 1g
- Cholesterol: 10mg
Keywords: rice crispy treats halloween, Halloween treats, easy Halloween recipes


