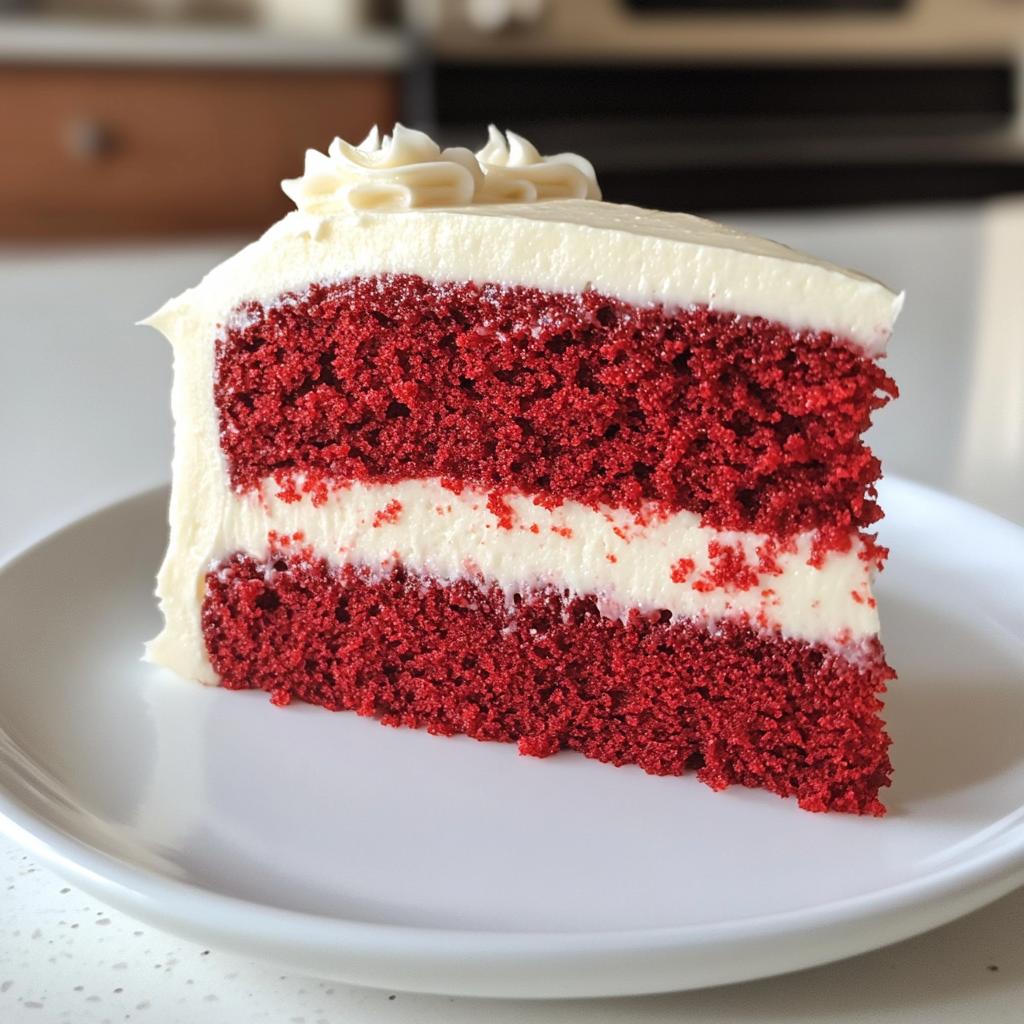
There’s something magical about a classic red velvet cake – that rich, velvety crumb paired with its signature crimson hue just screams celebration. My love affair with this dessert started when I baked my first one for my mom’s birthday years ago (and yes, I totally messed up the frosting swirls!). What makes red velvet cake so special isn’t just its stunning color – it’s that perfect balance between the subtle cocoa flavor, the tang from buttermilk, and that unmistakable tender texture that keeps you coming back for just one more slice.
This recipe has been my go-to for everything from Valentine’s Day to anniversary dinners. There’s a reason red velvet cake has been stealing hearts since the 1800s – it’s equal parts nostalgic and showstopping. Trust me, once you master this version with its moist crumb and that slight tang, you’ll understand why it’s remained a classic for generations.
Why You’ll Love This Red Velvet Cake
This isn’t just any red velvet cake – it’s the kind that makes people sneak back into the kitchen for “just one more bite.” Here’s why it’s my forever favorite:
- That perfect crumb: Moist without being heavy, with that signature velvety texture that melts in your mouth
- Striking color: A bold, beautiful red that looks stunning against creamy white frosting (no dull pink cakes here!)
- Balanced flavor: Just enough cocoa to intrigue but not overwhelm, with a subtle tang from buttermilk
- Easy enough for weeknights: No fancy techniques – just straightforward mixing and baking
- Always impresses: Whether it’s for birthdays or just because, this cake feels like a special occasion
Honestly? The hardest part is waiting for it to cool before frosting!
Ingredients for Red Velvet Cake
Listen, I’ve learned the hard way that red velvet cake is one of those recipes where every ingredient matters. Forget one thing or take shortcuts, and you’ll end up with a sad, pinkish-brown cake that’s just… meh. Here’s exactly what you’ll need to make that vibrant, velvety masterpiece:
Dry Ingredients
- 2 1/2 cups all-purpose flour – Spoon and level it, don’t scoop! Packed flour means a dense cake.
- 1 1/2 cups granulated sugar – Plain white sugar gives that classic sweetness without overpowering.
- 1 tsp baking soda – Fresh is key for that perfect rise.
- 1 tsp salt – Just enough to balance the sweetness.
- 1 tsp cocoa powder – Yes, just a teaspoon! It’s not chocolate cake – the cocoa’s just there to deepen the flavor.
Wet Ingredients
- 1 1/2 cups vegetable oil – I know it sounds like a lot, but this is what gives that incredible moist texture.
- 1 cup buttermilk, room temperature – The tang is essential! If you must substitute, see my notes later.
- 2 large eggs, room temperature – Cold eggs don’t incorporate as well.
- 2 tbsp red food coloring – Gel gives the richest color (liquid makes the batter too thin).
- 1 tsp vanilla extract – Pure vanilla, please – this isn’t the place for imitation.
- 1 tsp white vinegar – Sounds weird, but it activates the baking soda for the perfect rise.
See those “room temperature” notes? I’m not being fussy – cold ingredients just don’t play nice in this batter. Take them out about an hour before you start baking. Your cake will thank you!
Equipment You’ll Need
You don’t need fancy gadgets to make showstopping red velvet cake, but a few key tools make all the difference. After burning through countless hand-mixed batches (my poor arms!), here’s what I always reach for:
- Two 9-inch round cake pans – Light-colored metal works best for even baking.
- Electric mixer – A stand or hand mixer saves your arms and gives that perfect fluffy texture.
- Mixing bowls – One large one for wet ingredients, another for dry.
- Whisk – For blending dry ingredients thoroughly.
- Measuring cups and spoons – Precision matters, especially with the food coloring.
- Spatula – To scrape every last bit of that gorgeous red batter into pans.
- Cooling rack – Letting cakes cool properly prevents frosting meltdowns (literally!).
Pro tip: If your pans are looking worn, line them with parchment rounds too – nothing worse than your masterpiece sticking!
How to Make Red Velvet Cake
Making red velvet cake feels like a little kitchen magic – that moment when the batter turns that deep, vibrant red? Pure joy! But the real secret is in the details. Follow these steps, and you’ll have a cake that’s as stunning as it is delicious.
Preparing the Batter
First things first – preheat your oven to 350°F (175°C). Trust me, you don’t want to be waiting around with your batter ready but your oven cold! While that’s heating up, grease and flour your cake pans. I like to line the bottoms with parchment paper too – it’s like insurance against sticking disasters.
Now, let’s mix! Grab your large mixing bowl and whisk together all the dry ingredients – flour, sugar, baking soda, salt, and that little bit of cocoa powder. Whisk them until they’re evenly combined, with no cocoa lumps hiding in there.
In another bowl (or your stand mixer), beat together the wet ingredients – oil, buttermilk, eggs, food coloring, vanilla, and vinegar. Don’t skimp on the mixing here – you want everything fully incorporated and smooth. That’s when the magic starts to happen, and the batter turns that gorgeous red.
Now, here’s the key: gradually add the dry ingredients to the wet mixture. I like to do it in three batches, mixing just until combined after each addition. Overmixing is the enemy here – it’ll make your cake tough instead of tender. A few small lumps in the batter are totally fine!
Baking and Cooling
Once your batter is ready, divide it evenly between your prepared pans. Smooth the tops with a spatula – this helps them bake evenly. Pop them in the oven and set your timer for 25 minutes. Here’s where patience comes in – don’t open the oven door to peek! You’ll let out all that precious heat.
After 25 minutes, check with a toothpick. If it comes out with a few moist crumbs, you’re golden. If it’s still wet, give it another 5 minutes or so. Every oven is different, so trust the toothpick, not just the timer!
When the cakes are done, let them cool in the pans for about 10 minutes. Then, carefully run a knife around the edges and flip them onto a cooling rack. This is the hardest part – you *must* let them cool completely before frosting. I know, I know, it’s tempting to rush, but warm cake + frosting = a melty mess. Trust me, it’s worth the wait!
Tips for Perfect Red Velvet Cake
After making more red velvet cakes than I can count (and yes, a few disasters along the way), I’ve learned all the little tricks that take this cake from good to extraordinary. Here are my can’t-live-without tips:
Room temperature is non-negotiable
I know I sound like a broken record, but cold eggs and buttermilk will give you uneven mixing and a denser cake. Take them out at least an hour before baking – or if you’re impatient like me, place eggs in warm water for 10 minutes and microwave buttermilk for 15 seconds to take the chill off.
Sift that cocoa powder
That single teaspoon of cocoa powder loves to clump up. If you skip sifting, you might bite into a bitter cocoa pocket – not the velvety experience we’re after! A fine mesh strainer works perfectly to break up any lumps.
Gel food coloring is your best friend
Liquid food coloring makes the batter too thin and gives you a pale pink cake. Gel coloring gives that rich, vibrant red we all love. I use about 2 tablespoons, but don’t be afraid to add a bit more if needed – the color fades slightly during baking.
The vinegar isn’t optional
I once left it out thinking “it’s just a teaspoon, what difference could it make?” Big mistake! That vinegar activates the baking soda for the perfect rise. No vinegar = flat, dense cake. Even if it smells funny when you mix it in, power through – the smell bakes out!
Don’t rush the cooling
I get it – you want to frost that gorgeous red cake immediately. But frosting a warm cake is a recipe for sliding, melting disaster. Wait until the cakes are completely cool to the touch – about 2 hours. Pro tip: pop them in the fridge for 30 minutes if you’re really in a hurry!
Oh, and one last thing – when measuring flour, always spoon it into your cup and level it off. Packing flour down is the #1 reason people end up with dry, dense cakes. Now go make some red velvet magic!
Ingredient Substitutions
Look, I get it – sometimes you’re halfway through making this cake and realize you’re out of buttermilk. Or maybe you’re trying to avoid artificial dyes. Been there! Here are my tried-and-true swaps that still give you that classic red velvet magic:
Buttermilk Alternatives
“But I don’t have buttermilk!” – said every baker ever at least once. Here’s how to fake it:
- Vinegar + milk: Mix 1 tbsp white vinegar with enough milk to make 1 cup. Let it sit for 5 minutes until slightly curdled.
- Lemon juice + milk: Same as above, but with lemon juice instead of vinegar.
- Plain yogurt + milk: Thin 3/4 cup plain yogurt with 1/4 cup milk until pourable.
Just don’t use regular milk alone – you’ll miss that essential tang!
Natural Food Coloring Options
If you’re avoiding artificial dyes, these can give you a pretty (if not quite as vibrant) red:
- Beet powder: Mix 2-3 tbsp with a bit of hot water to dissolve before adding.
- Pomegranate juice: Reduce 1 cup juice to 1/4 cup syrup for concentrated color.
- Red raspberry puree: Strain seeds from blended berries for smooth color.
Fair warning – these will give you more of a pinkish-red than that classic crimson. Still pretty, just different!
The Non-Negotiables
Some ingredients just can’t be swapped if you want real red velvet cake:
- Cocoa powder: That teaspoon is essential for the signature flavor. Don’t skip it!
- Vinegar: It activates the baking soda for the perfect rise. No substitutes here.
- Oil: Butter changes the texture completely. Stick with vegetable oil.
One last tip – if you’re using natural dyes, add a teaspoon of lemon juice to help preserve the color during baking. The cake might not be quite as vibrant as the classic version, but it’ll still be delicious!
Serving and Storing Red Velvet Cake
Okay, let’s talk about the best part – enjoying your gorgeous red velvet creation! After all that baking, you want to serve it right and keep any leftovers (if there are any!) tasting fresh. Here’s everything I’ve learned over years of red velvet triumphs:
The Perfect Pairings
Red velvet cake practically begs for cream cheese frosting – that tangy-sweet combo is pure magic. My go-to is a simple blend of cream cheese, butter, powdered sugar, and vanilla. But if you’re feeling fancy, try these twists:
- Orange zest: Adds a bright citrus note that plays beautifully with the cocoa
- Espresso powder: Just 1/2 teaspoon in the frosting deepens all the flavors
- Toasted pecans: Sprinkle on top for crunch and that classic Southern touch
And for serving? A hot cup of coffee or cold glass of milk are my absolute favorites. The bitterness of coffee cuts through the sweetness perfectly!
Storing Like a Pro
Here’s how to keep your cake tasting fresh:
- Room temperature: Covered with a cake dome or inverted bowl, it’ll stay perfect for 2 days
- Refrigerator: If frosted with cream cheese, refrigerate after 24 hours – it’ll keep for 5 days
- Freezing: Wrap unfrosted layers tightly in plastic wrap, then foil – they freeze beautifully for 1 month
Pro tip: If freezing slices, place parchment between layers so they don’t stick together. Thaw overnight in the fridge before serving – nobody likes icy cake!
One last thing – if your cake does dry out slightly (hey, it happens!), a quick zap in the microwave for 10 seconds brings back that just-baked moisture. Just don’t tell anyone I told you this shortcut!
Red Velvet Cake FAQs
After making this cake dozens of times (and fielding just as many panicked texts from friends attempting it), here are the questions I get asked most often. Consider this your red velvet troubleshooting guide!
Can I make red velvet cake without food coloring?
You absolutely can, but fair warning – you’ll get more of a “mahogany velvet” than red! The cocoa powder alone gives a warm brown color. If you want natural coloring, try beet powder or pomegranate juice (see my substitutions section), but expect a softer hue. Honestly? The classic vibrant red is part of the magic for me!
Why did my cake turn out dense?
Oh honey, I’ve been there! Usually it’s one of three things: overmixing the batter (stop as soon as ingredients combine), using cold eggs/buttermilk (they don’t incorporate well), or packing your flour (always spoon and level). Next time, try my room temperature trick and mix gently – you’ll get that perfect velvety crumb.
Is the vinegar really necessary?
I know it sounds weird, but YES! That little bit of vinegar activates the baking soda for the perfect rise. I once forgot it and ended up with a flat, sad cake that could’ve doubled as a doorstop. The vinegar smell disappears during baking, I promise!
Can I use butter instead of oil?
While butter makes amazing cakes, red velvet specifically needs oil for that signature moist, tender texture. Butter would make it more like a traditional cake – still tasty, but not quite right. Stick with vegetable oil for authentic results.
How do I get that deep red color?
Two secrets: use gel food coloring (liquid just won’t cut it), and don’t skimp! I use 2 full tablespoons, sometimes a smidge more. The color fades slightly while baking, so go bold. And remember – natural dyes will give you pretty results, just not that classic vibrant red.
Nutritional Information
Okay, let’s be real – we’re not eating red velvet cake for its health benefits! But if you’re curious (or just keeping track), here’s the nutritional breakdown per slice. Just remember: these are estimates – actual numbers can vary depending on your exact ingredients and how big you slice that cake (no judgment if your “slice” is really two slices in disguise!).
- Calories: 450
- Total Fat: 25g (4g saturated, 18g unsaturated)
- Cholesterol: 40mg
- Sodium: 300mg
- Total Carbohydrates: 50g
- Fiber: 1g
- Sugars: 30g
- Protein: 5g
Now listen – these numbers don’t even include the cream cheese frosting (wink). But hey, life’s too short not to enjoy a proper slice of red velvet cake now and then. Everything in moderation, right? Just maybe don’t eat the whole cake in one sitting… unless it’s been that kind of day – I won’t tell!
Share Your Red Velvet Cake
Nothing makes me happier than seeing your gorgeous red velvet creations! Did you add a special twist? Maybe some crushed pecans in the frosting or a dash of cinnamon in the batter? I want to see it all – the perfect layers, the occasional frosting mishaps (we’ve all been there!), and especially those proud “I made this!” smiles.
Snap a photo and tag me @[YourHandle] on Instagram or leave a rating below – your feedback helps more bakers discover this recipe. And hey, if you ran into any trouble, tell me that too! I’ll do my best to help troubleshoot for next time. After all, baking’s more fun when we share the sweet (and sometimes messy) moments together.
Now who’s ready to slice into that beautiful cake? Don’t forget the milk!
Print
Irresistible 3-Layer Red Velvet Cake That Melts in Mouth
- Total Time: 50 minutes
- Yield: 12 servings 1x
- Diet: Vegetarian
Description
A classic red velvet cake with rich flavor and vibrant color, perfect for celebrations.
Ingredients
- 2 1/2 cups all-purpose flour
- 1 1/2 cups granulated sugar
- 1 tsp baking soda
- 1 tsp salt
- 1 tsp cocoa powder
- 1 1/2 cups vegetable oil
- 1 cup buttermilk
- 2 large eggs
- 2 tbsp red food coloring
- 1 tsp vanilla extract
- 1 tsp white vinegar
Instructions
- Preheat oven to 350°F (175°C). Grease and flour two 9-inch cake pans.
- Mix flour, sugar, baking soda, salt, and cocoa powder in a bowl.
- Beat oil, buttermilk, eggs, food coloring, vanilla, and vinegar in another bowl.
- Combine wet and dry ingredients, mixing until smooth.
- Divide batter evenly between pans.
- Bake for 25-30 minutes or until a toothpick comes out clean.
- Cool cakes completely before frosting.
Notes
- Use gel food coloring for deeper red color.
- Ensure ingredients are at room temperature.
- Do not overmix batter.
- Prep Time: 20 minutes
- Cook Time: 30 minutes
- Category: Dessert
- Method: Baking
- Cuisine: American
Nutrition
- Serving Size: 1 slice
- Calories: 450
- Sugar: 30g
- Sodium: 300mg
- Fat: 25g
- Saturated Fat: 4g
- Unsaturated Fat: 18g
- Trans Fat: 0g
- Carbohydrates: 50g
- Fiber: 1g
- Protein: 5g
- Cholesterol: 40mg
Keywords: red velvet cake, dessert, baking, homemade cake


