There’s something magical about making ice cream at home, especially when you know exactly what’s going into it. You skip the preservatives and additives, making a treat that’s not only delicious but also healthy! I mean, who wouldn’t want to indulge in a creamy bowl of ice cream without the guilt? With my trusty Ninja blender, whipping up a batch takes just minutes, and the clean-up is a breeze. Seriously, it’s as simple as tossing in some ripe bananas, a splash of almond milk, and a handful of frozen berries.
When I first tried making my own ice cream, I was skeptical. Would it really taste as good as the stuff from the store? But wow, was I pleasantly surprised! The flavors burst in my mouth, and the creamy texture was just heavenly. Plus, I loved experimenting with different fruits, and I could adjust the sweetness to my liking. I remember one hot summer afternoon, my kids and I made a berry swirl ice cream that we devoured while lounging in the sun. It felt like the perfect way to enjoy a summer day while keeping it nutritious. Trust me, once you try it, you’ll never look back!
Ninja Ice Cream Recipes Healthy
Let me tell you, these ninja ice cream recipes are a total game changer! Not only are they incredibly easy to prepare, but they also let you control exactly what goes into your delicious dessert. Think about it: no artificial flavors, no excess sugars, just wholesome ingredients that taste amazing. With the Ninja blender, you can whip up a creamy, dreamy treat in just ten minutes! Can you believe it?
What I love most is the flexibility these recipes offer. You can swap in your favorite fruits for a personalized twist! Plus, they’re great for all sorts of diets—vegan, dairy-free, and even gluten-free. You can indulge guilt-free, knowing that you’re treating yourself to something nutritious. And hey, it’s a fun activity to do with the kids. They’ll be thrilled to see the whole process, from blending to serving, and they’ll love knowing they helped create their own ice cream. You might even catch them sneaking spoonfuls straight from the blender! Trust me, once you try making ice cream this way, you’ll be hooked on the healthy goodness and the joyful memories you create while making it.
Ingredients List
Gathering your ingredients for this healthy ice cream is a breeze, and I promise you won’t need anything fancy! Here’s what you’ll need:
- 2 ripe bananas: These are the star of the show! Make sure they’re nicely speckled with brown spots, as that means they’re super sweet and perfect for blending. Slice them up and freeze them for at least 2 hours before using – this creates that creamy texture we all love!
- 1 cup unsweetened almond milk: This adds a lovely creaminess without the dairy! You can also use other plant-based milks like oat or coconut milk if you prefer. Just keep it unsweetened for that healthy touch!
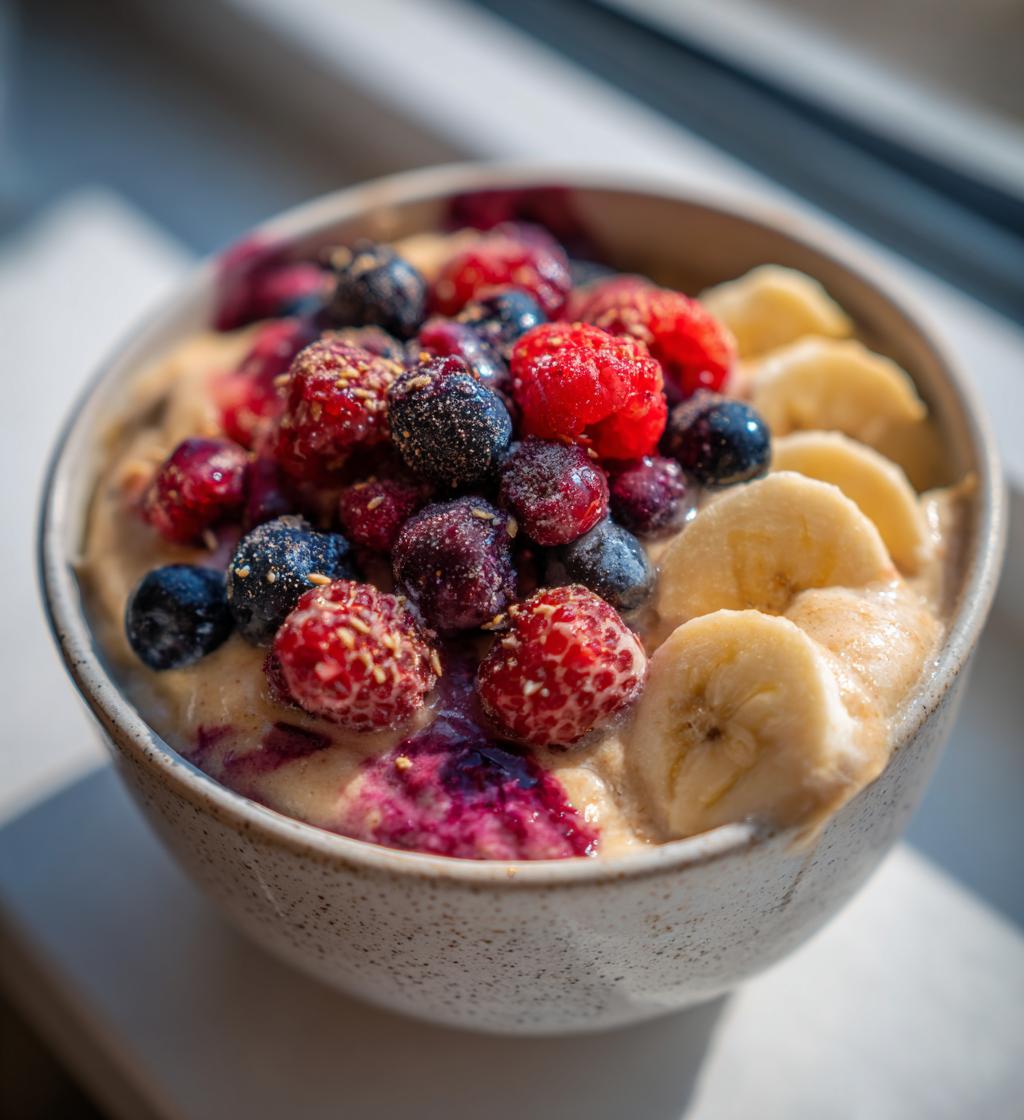
- 1 cup frozen berries: This is where the flavor magic happens! You can use any combination of frozen berries you like – strawberries, blueberries, raspberries, or even a mix! They not only add vibrant color but also pack in those antioxidants.
- 1 tablespoon honey or maple syrup: Just a hint of sweetness to balance everything out! Use honey for a more traditional flavor or maple syrup for a delightful twist. Adjust the amount according to your taste – it’s all about what you love!
- 1 teaspoon vanilla extract: This adds a warm, comforting flavor that enhances the overall taste of your ice cream. Trust me, don’t skip this step; it really brings everything together!
And there you have it! These simple, wholesome ingredients come together to create a delicious and guilt-free treat. I can’t wait for you to taste it!
How to Prepare Ninja Ice Cream
Making this delicious ninja ice cream is as easy as pie—well, easier actually! I’m here to guide you through each step, so let’s get started!
Step 1: Freezing Bananas
First things first, you’ll want to grab those ripe bananas. Slice them into thick chunks, about an inch or so. This makes them easier to blend later on. Once sliced, spread them out on a baking sheet lined with parchment paper and pop them in the freezer for at least 2 hours. This step is crucial because freezing the bananas creates that ultra-creamy texture that makes this ice cream so irresistible. Don’t worry if you forget them for a bit longer; they can chill in there for a whole day if needed!
Step 2: Blending the Ingredients
Once your bananas are frozen and ready to go, it’s time to get blending! Toss those frozen banana chunks into your Ninja blender along with the almond milk, frozen berries, honey or maple syrup, and vanilla extract. I like to add the almond milk first; it helps everything blend smoothly. Now, secure the lid and start blending. You may need to stop and scrape down the sides a couple of times. Blend until the mixture reaches a silky-smooth consistency. If you prefer a thicker texture, you can stop a little sooner; it’s all about what you love!
Step 3: Serving Suggestions
Now, here comes the fun part—serving it up! You can enjoy this ice cream immediately for a soft-serve style treat. Just scoop it into bowls and dig in! If you like a firmer texture, transfer it to an airtight container and freeze it for about 1-2 hours. This way, it’ll be more scoopable and resemble traditional ice cream. Just remember to let it sit out for a few minutes before serving if it gets too hard. I promise, whichever way you choose, it’s going to be a hit!
Tips for Success
Making your ninja ice cream healthy is all about fun and creativity! Here are some tips to ensure your ice cream turns out perfectly every time:
- Freeze your fruit properly: Make sure your bananas are fully frozen before blending. If you’re using other fruits, like mango or peaches, slice and freeze them just like the bananas for that creamy texture you want.
- Experiment with flavors: Don’t be afraid to mix and match! Try adding a tablespoon of peanut butter or almond butter for a nutty twist. You can even sneak in a handful of spinach or kale for added nutrients—trust me, you won’t taste it!
- Adjust sweetness: Taste your mixture before you freeze it and adjust the sweetness to your liking. Some fruits are sweeter than others, so you might not need as much honey or maple syrup. I like to err on the side of less sweet since the flavors really shine through!
- Use a high-powered blender: If your Ninja blender is struggling, you might need to stop and stir things around to help it along. It’s all about getting that silky-smooth consistency!
- Store properly: If you have leftovers (which is rare in my house!), store them in an airtight container and consume within a week for the best flavor and texture. Just let it sit out for a few minutes before digging in again!
With these tips, you’ll be a ninja ice cream pro in no time! Enjoy the process and let your creativity run wild!
Nutritional Information
When it comes to enjoying a bowl of this delicious ninja ice cream, you’ll be pleased to know it’s not just tasty but also quite nutritious! Here’s a breakdown of the estimated nutritional values per serving:
- Calories: 150
- Total Fat: 3g
- Saturated Fat: 0g
- Unsaturated Fat: 3g
- Trans Fat: 0g
- Cholesterol: 0mg
- Sodium: 100mg
- Total Carbohydrates: 32g
- Dietary Fiber: 4g
- Sugars: 20g
- Protein: 3g
These values are estimates, of course, but they give you a good idea of how wholesome this treat is! With natural ingredients like bananas and berries, you’re getting a delightful mix of vitamins, minerals, and fiber. So go ahead and indulge without the guilt—you deserve it!
FAQ Section
Can I use other fruits?
Absolutely! One of the best things about these ninja ice cream recipes is their versatility. You can use almost any frozen fruit you enjoy. Whether it’s mango, peaches, or even kiwi, feel free to mix and match! I often switch things up based on what I have in my freezer. Just remember, the key is to use frozen fruit to achieve that creamy texture. You might even discover a new favorite flavor combination—how fun is that?
How long can I store leftovers?
If you happen to have any leftovers—though that’s rare in my house—you can store the ice cream in an airtight container in the freezer. It should keep well for about a week. Just a heads up, the longer it stays in the freezer, the firmer it’ll get. I recommend letting it sit out at room temperature for a few minutes before scooping to make it easier to serve. Trust me, you’ll want to enjoy every last creamy bite!
Can I make this recipe without a Ninja blender?
Of course! While I swear by my Ninja blender, you can use any high-powered blender or even a food processor. Just keep in mind that if your blender isn’t as powerful, you may need to stop and stir the mixture more often to get that smooth consistency. If you find it’s struggling, add a splash more almond milk to help it along. No matter the appliance, you can still create a delicious, healthy ice cream treat!
Why You’ll Love This Recipe
- Quick and Easy: You can whip up this delicious ice cream in just ten minutes! It’s perfect for those moments when you crave a sweet treat without spending hours in the kitchen.
- Wholesome Ingredients: Made with fresh, healthy ingredients, you know exactly what you’re eating—no hidden preservatives or artificial flavors here!
- Customizable: The recipe is super flexible! You can mix and match your favorite fruits to create a personalized flavor that suits your taste buds.
- Kid-Friendly: This is a fun activity for kids! They’ll love being part of the process, and you can feel good knowing they’re enjoying a nutritious dessert.
- Guilt-Free Indulgence: With just 150 calories per serving, you can indulge without the guilt while satisfying your sweet tooth in a healthy way!
Trust me, once you give this recipe a try, you’ll be hooked! It’s a delightful way to enjoy ice cream that’s good for you and your family.
Call to Action
Now that you’ve got all the details for making these delicious ninja ice cream recipes healthy, I’d love to hear from you! Have you tried making your own ice cream at home? What flavors did you experiment with? Please leave a comment below to share your experiences, tips, or any tweaks you made to the recipe. Your feedback is so valuable, and it inspires others to dive into this fun, healthy cooking adventure!
If you enjoyed this recipe, don’t forget to rate it! Your ratings help me know what you love and what you’d like to see more of. And hey, if you have friends or family who are looking for a healthier dessert option, share this recipe with them! Let’s spread the joy of wholesome, homemade ice cream together. Happy blending, everyone!
Print
Ninja Ice Cream Recipes Healthy: 5 Guilt-Free Delights
- Total Time: 10 minutes
- Yield: 2 servings 1x
- Diet: Vegan
Description
A collection of healthy ice cream recipes made using a Ninja blender.
Ingredients
- 2 ripe bananas
- 1 cup unsweetened almond milk
- 1 cup frozen berries
- 1 tablespoon honey or maple syrup
- 1 teaspoon vanilla extract
Instructions
- Slice the bananas and freeze them for at least 2 hours.
- Add frozen bananas, almond milk, frozen berries, honey, and vanilla extract to the Ninja blender.
- Blend until smooth and creamy.
- Taste and adjust sweetness if needed.
- Serve immediately or freeze for 1-2 hours for a firmer texture.
Notes
- Use any frozen fruit of your choice.
- For a dairy-free option, ensure the almond milk is used.
- Store leftovers in an airtight container in the freezer.
- Prep Time: 10 minutes
- Cook Time: 0 minutes
- Category: Dessert
- Method: Blending
- Cuisine: Healthy
Nutrition
- Serving Size: 1 cup
- Calories: 150
- Sugar: 20g
- Sodium: 100mg
- Fat: 3g
- Saturated Fat: 0g
- Unsaturated Fat: 3g
- Trans Fat: 0g
- Carbohydrates: 32g
- Fiber: 4g
- Protein: 3g
- Cholesterol: 0mg
Keywords: ninja ice cream recipes healthy


