
Oh my gosh, you guys – remember that first time you watched The Nightmare Before Christmas and couldn’t decide if it was Halloween or Christmas magic? That’s exactly the feeling I wanted to capture with this cake! Every October, I bake this spooky-but-sweet Nightmare Before Christmas cake for my annual Halloween party, and it’s always the star of the dessert table. There’s just something about those bold black and orange layers (Jack Skellington would approve) that makes everyone’s inner Tim Burton fan squeal with delight. Trust me, even if you’re not a pro baker, this showstopper is easier than you think – and I’ll walk you through every step!
Why You’ll Love This Nightmare Before Christmas Cake
This cake is an absolute winner for so many reasons – and I’m not just saying that because I’m obsessed with Jack Skellington! Here’s why you’ll fall in love with it too:
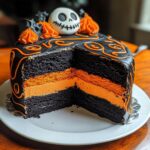
- It’s a total showstopper: The bold black and orange layers scream Halloween vibes, and the Jack Skellington-inspired decorations? Pure magic. Your guests won’t stop talking about it.
- Easier than it looks: Don’t let the spookiness intimidate you! The recipe is straightforward, and I’ll guide you through every step. Even if you’re a beginner, you can nail this.
- Perfect for parties: Whether it’s Halloween, a themed birthday bash, or just because you love Tim Burton, this cake fits the occasion. It’s as fun to make as it is to eat!
Trust me, once you make this cake, it’ll become your go-to for every spooky season. Let’s get baking!
Ingredients for Your Nightmare Before Christmas Cake
Okay, let’s gather our spooky supplies! Here’s everything you’ll need to bring this Nightmare Before Christmas cake to life. (And yes, I learned the hard way – always measure everything out first. No mid-baking panic runs to the grocery store!)
- Dry stuff: 2 cups all-purpose flour, 1 1/2 cups granulated sugar, 3/4 cup unsweetened cocoa powder (the good stuff!), 2 tsp baking powder, 1/2 tsp baking soda, 1/2 tsp salt
- Wet team: 1 cup whole milk, 1/2 cup vegetable oil, 2 large eggs (room temp – they mix better!), 2 tsp vanilla extract, 1 cup boiling water (trust me on this one)
- Color magic: Black food coloring (gel-based – liquid just won’t cut it), orange food coloring (again, gel for that vibrant pop)
- The finisher: 2 cups buttercream frosting (homemade or store-bought – no judgment here!)
See? Nothing too crazy. Just make sure your cocoa powder is fresh – stale cocoa makes for a sad, flat-tasting cake. Learned that one the hard way last Halloween!
Equipment You’ll Need for the Nightmare Before Christmas Cake
Before we dive into baking madness, let’s round up our tools! You don’t need anything fancy—just the basics (plus maybe a little Halloween spirit). Here’s what I grab from my kitchen:
- Two 8-inch round cake pans – The classic size for perfect layers
- Mixing bowls (one large, one medium) – For keeping dry and wet ingredients separate
- Electric mixer – A hand mixer works too, but your arm might protest!
- Spatula – For scraping every last bit of that delicious batter
- Whisk – To banish cocoa powder lumps
- Cake tester/toothpicks – Because underbaked cake is truly spooky
Pro tip: Line those pans with parchment paper—it’s way easier than wrestling with stuck cake!
How to Make the Nightmare Before Christmas Cake
Alright, let’s turn those ingredients into Halloween magic! Follow these steps carefully – I’ve included all my “oops-I-learned-this-the-hard-way” tips so you don’t have to.
Preparing the Cake Batter
First things first: preheat your oven to 350°F (175°C). Now, grab your large mixing bowl and whisk together all the dry ingredients – flour, sugar, cocoa powder, baking powder, baking soda, and salt. In another bowl, mix the milk, oil, eggs, and vanilla until smooth. Slowly pour the wet mixture into the dry ingredients while mixing on medium speed. Here’s the fun part: carefully add the boiling water last (the batter will thin out – that’s normal!). Mix just until combined – overmixing makes tough cake!
Coloring and Baking the Cake
Divide your batter evenly between two bowls. Now the Halloween transformation begins! Stir black gel food coloring into one bowl (start with a teaspoon and add until spookily dark) and orange into the other. Pour each color into a prepared cake pan – I like to gently swirl them slightly for a marbled effect. Bake for 30-35 minutes until a toothpick comes out clean. Let cakes cool completely – rushing this step leads to frosting meltdown!
Assembling and Decorating the Cake
Once cooled, level the cakes if needed (a serrated knife works wonders). Place the orange layer on your cake stand, spread a generous layer of buttercream, then top with the black layer. Chill for 15 minutes – this prevents crumbs in your frosting! Now frost the entire cake black. Use white buttercream to pipe Jack’s face – start with simple circles for eyes and a stitched smile. Voilà – your edible Tim Burton masterpiece!
Tips for the Perfect Nightmare Before Christmas Cake
After making this cake more times than I can count (and yes, having a few Halloween disasters along the way), here are my absolute must-know tips:
- Gel food coloring is your BFF – Liquid coloring waters down the batter and gives sad, pastel colors. Gel gives that deep, dramatic look Jack Skellington deserves!
- Chill before decorating – Pop those cake layers in the fridge for 20 minutes before frosting. Cold cakes = no crumbs in your beautiful black frosting!
- Let it sit before serving – I know it’s tempting, but wait an hour after decorating. The flavors meld and the frosting sets perfectly.
- Use dental floss to level – Unflavored floss gives cleaner cuts than knives for perfectly flat layers.
Bonus trick: If your black frosting looks grayish, add a tiny bit of purple gel coloring – it deepens the black like magic!
Variations for Your Nightmare Before Christmas Cake
Okay, let’s get creative! While I adore the classic chocolate version, sometimes you wanna mix things up – here’s how:
- Flavor twists: Swap cocoa powder for vanilla cake mix (keep those spooky colors!) or go wild with red velvet for extra drama.
- Character spotlight: Skip Jack’s face and pipe Sally’s stitches or Oogie Boogie’s burlap texture with different frosting tips.
- Mini madness: Bake cupcakes instead – perfect for classroom parties! Top each with Jack’s face or tiny fondant bats.
Remember: Halloween baking should be fun. If my six-year-old niece can decorate these as “spooky monster cakes,” so can you!
Serving and Storing Your Nightmare Before Christmas Cake
This cake is best served at room temperature – trust me, it lets the flavors shine! Pair it with a glass of cold milk or a pumpkin spice latte for the ultimate Halloween treat. If you’ve got leftovers (big “if” in my house), cover them tightly with plastic wrap or store in an airtight container. It’ll keep in the fridge for up to 3 days – just let it sit out for 15 minutes before serving again. And hey, if you’re feeling extra festive, a scoop of vanilla ice cream on the side never hurts!
Nutritional Information for Nightmare Before Christmas Cake
Here’s the scoop on what you’re biting into (because let’s be real – we all pretend not to care about calories on Halloween!): Each slice (about 1/12 of the cake) packs roughly 320 calories, 12g fat, 48g carbs, and 4g protein. Of course, your exact numbers might dance around a bit depending on brands and how generous you are with that buttercream!
Frequently Asked Questions About Nightmare Before Christmas Cake
I get asked about this cake all the time – here are answers to the questions that pop up most often (usually while folks are mid-bake with batter-covered hands!):
- “Help! I can’t find black gel food coloring!” – No panic! Mix equal parts red, blue and green gel coloring to make black. Start with 1/4 tsp each and adjust. Pro tip: A tiny bit of cocoa powder helps deepen the color.
- “Can I use 9-inch pans instead?” Absolutely! Your layers will just be slightly thinner. Check for doneness at 25 minutes – they’ll bake faster than the 8-inch versions.
- “Why boiling water? That seems weird!” I know! But it “blooms” the cocoa powder, making the chocolate flavor richer. Just pour slowly while mixing – the batter will thin but thicken as it bakes.
- “Can I make this ahead?” You bet! Bake the layers up to 2 days early, wrap them tightly in plastic, and fridge them. Frost day-of for freshest results. Decorated cake stays fresh 3 days refrigerated.
- “My frosting keeps tearing the cake – help!” Ah, the crumb coat struggle! Chill your cake layers first, then do a thin “crumb coat” of frosting. Chill again before the final thick layer. Game changer!
Spooky 2-Layer Nightmare Before Christmas Cake Your Guests Will Adore
- Total Time: 1 hour 5 minutes
- Yield: 1 cake (8-inch, 2 layers) 1x
- Diet: Vegetarian
Description
A spooky and fun cake inspired by the movie The Nightmare Before Christmas. Perfect for Halloween or themed parties.
Ingredients
- 2 cups all-purpose flour
- 1 1/2 cups granulated sugar
- 3/4 cup unsweetened cocoa powder
- 2 tsp baking powder
- 1/2 tsp baking soda
- 1/2 tsp salt
- 1 cup whole milk
- 1/2 cup vegetable oil
- 2 large eggs
- 2 tsp vanilla extract
- 1 cup boiling water
- Black food coloring (gel-based)
- Orange food coloring (gel-based)
- 2 cups buttercream frosting
Instructions
- Preheat your oven to 350°F (175°C). Grease and line two 8-inch round cake pans.
- In a large bowl, mix flour, sugar, cocoa powder, baking powder, baking soda, and salt.
- Add milk, vegetable oil, eggs, and vanilla extract. Beat on medium speed until smooth.
- Slowly pour in boiling water while mixing. The batter will be thin.
- Divide the batter into two parts. Color one part black and the other orange.
- Pour the colored batters into the prepared pans. Bake for 30-35 minutes or until a toothpick comes out clean.
- Let the cakes cool completely. Level the tops if needed.
- Stack the cakes with a layer of buttercream in between. Frost the entire cake with black buttercream.
- Decorate with Jack Skellington-inspired designs using white buttercream.
Notes
- Use gel food coloring for vibrant colors without thinning the batter.
- Chill the cake before frosting for easier handling.
- Let the cake sit at room temperature before serving for the best texture.
- Prep Time: 30 minutes
- Cook Time: 35 minutes
- Category: Dessert
- Method: Baking
- Cuisine: American
Nutrition
- Serving Size: 1 slice (1/12 of cake)
- Calories: 320
- Sugar: 25g
- Sodium: 180mg
- Fat: 12g
- Saturated Fat: 4g
- Unsaturated Fat: 7g
- Trans Fat: 0g
- Carbohydrates: 48g
- Fiber: 2g
- Protein: 4g
- Cholesterol: 40mg
Keywords: nightmare before christmas cake, halloween cake, jack skellington cake, themed cake


