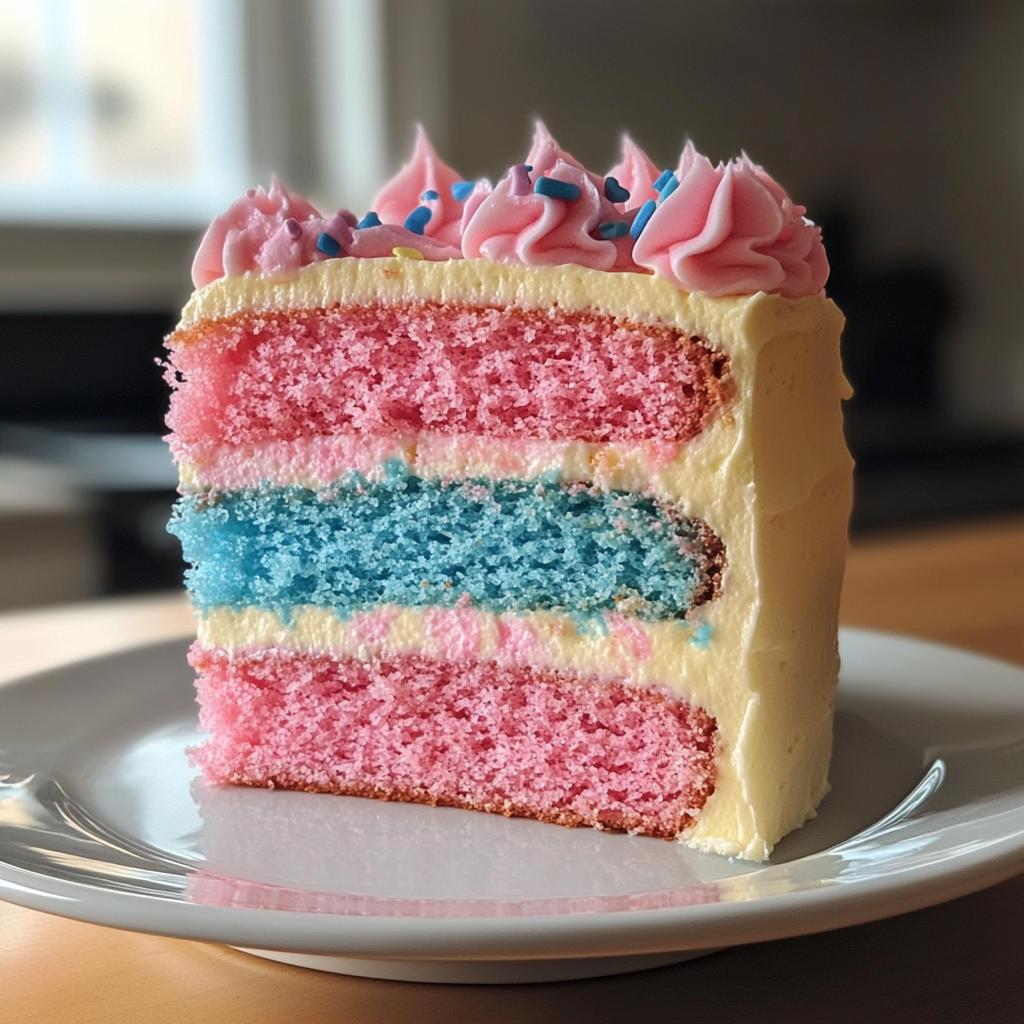
There’s nothing quite like the thrill of a gender reveal celebration—it’s that magical moment when everyone holds their breath, waiting to see if it’s a boy or a girl. And honestly, what better way to share the news than with a Gender Reveal Cake? I’ll never forget the first one I made for my best friend’s baby shower. The room was buzzing with excitement, and when she cut into that cake to reveal a burst of pink, the cheers and happy tears were unforgettable. It’s not just a cake; it’s a memory in the making. Trust me, once you try this, you’ll want to make it for every special occasion!
Ingredients List
Here’s everything you’ll need to create the perfect Gender Reveal Cake – trust me, I’ve made enough of these to know what works best! The secret is in keeping things simple but precise:
- 2 cups all-purpose flour (spooned and leveled – no packing!)
- 1 1/2 cups granulated sugar (yes, it seems like a lot, but it balances the flavors)
- 1/2 cup unsalted butter, softened (real butter only – margarine just won’t give you that rich taste)
- 3 large eggs at room temperature (this makes all the difference in texture)
- 1 cup whole milk (the fat content helps create a moist crumb)
- 1 teaspoon pure vanilla extract (skip the imitation stuff)
- 1 teaspoon baking powder
- 1/2 teaspoon fine sea salt
- Gel food coloring – pink AND blue (I swear by Wilton brand for vibrant colors that won’t fade)
Pro tip: Measure everything before you start mixing – it makes the process so much smoother when you’re dividing the batter later!
How to Make Gender Reveal Cake
Okay, let’s get baking! I know gender reveal cakes might look intimidating, but I promise they’re easier than you think. Follow these steps carefully, and you’ll have a showstopper that’ll have everyone talking (and snapping photos!).
Prepping Like a Pro
First things first – preheat that oven to 350°F (175°C). While it’s heating up, grease two 8-inch round cake pans really well. I like to use butter and a dusting of flour, but you can use baking spray if you’re in a hurry. Just make sure you get into all the nooks and crannies!
Mixing the Magic
In a large bowl, whisk together your flour, sugar, baking powder, and salt. Now here’s where the fun begins! Add your softened butter (it should leave a slight indent when you press it) and mix until it looks like coarse crumbs. Don’t overdo it – we’re not making pastry here!
Next, add the eggs one at a time, mixing well after each addition. You’ll notice the batter getting smoother and creamier. Pour in the milk and vanilla, and mix just until everything’s combined. The batter should be thick but pourable – if it looks too stiff, add a tablespoon more milk.
The Big Color Reveal
Here’s where the magic happens! Divide your batter evenly between two bowls. Now grab your gel food coloring – remember, we’re using gel because liquid coloring will water down your batter. Add pink to one bowl and blue to the other, starting with just a little and adding more until you get that perfect vibrant shade.
Pro tip: Use separate spoons for each color unless you want a surprise purple cake! Stir gently but thoroughly – you don’t want any streaks of white batter peeking through.
Baking to Perfection
Carefully pour each colored batter into its prepared pan. Smooth the tops with a spatula, then give each pan a gentle tap on the counter to release any air bubbles. Pop them in the oven and set your timer for 25 minutes.
Now, here’s something I learned the hard way – ovens lie! Start checking at 20 minutes by inserting a toothpick near the center. If it comes out clean or with just a few moist crumbs, you’re golden. If not, give it another 2-3 minutes and check again. Overbaking is the enemy of moist cake!
The Final Reveal
When your cakes are done, let them cool in the pans for about 10 minutes before turning them out onto wire racks. This patience pays off – rushing this step can lead to broken cakes (been there!). Let them cool completely before assembling.
When it’s time for the big moment, place one layer on your serving plate, add a thin layer of frosting (if you’re using it), then top with the second layer. The real magic happens when that knife cuts through – get your cameras ready for those gasps of delight!
Remember, the secret to a perfect gender reveal cake is in the details – take your time with the colors, don’t overmix, and most importantly, have fun with it. This is one baking project where the smiles are just as important as the taste!
Why You’ll Love This Gender Reveal Cake
This cake isn’t just delicious—it’s a total crowd-pleaser that makes any celebration extra special. Here’s why it’s become my go-to for gender reveals:
- Super simple – Even if you’re not a pro baker, this recipe walks you through each step so you can’t mess it up
- Custom colors – Want mint green and gold? Purple and yellow? You do you! The gel food coloring makes any combo pop
- Memory maker – That moment when the knife cuts through? Pure magic. I still get chills thinking about the reactions
- Works for any party – Baby showers, gender reveals, even birthday parties looking for a fun twist
Trust me, once you see those happy tears, you’ll be hooked on making these cakes!
Tips for Perfect Gender Reveal Cake
After making more gender reveal cakes than I can count (and learning from all my mistakes!), here are my absolute can’t-live-without tips:
Gel food coloring is non-negotiable. Those little liquid droppers? They’ll water down your batter and give you sad, pastel colors. I use gel colors and start with just a toothpick amount – you can always add more, but you can’t take it out once it’s mixed in!
Weigh your batter when dividing it for colors. My kitchen scale is my best friend here – just zero out your bowl, pour half the batter, note the weight, then match it for the second color. No more lopsided cakes!
The freezer is your secret weapon. If you’re transporting the cake, pop it in the freezer for 20 minutes first – it firms up just enough to prevent color bleeding when you slice it. And for heaven’s sake, warn your photographer before the big moment – you don’t want them blinking when the knife goes in!
Ingredient Substitutions
Don’t stress if you’re missing an ingredient – I’ve made this cake with all sorts of swaps and it still turns out great! Here are my tried-and-true substitutions:
For dairy-free: Swap the milk for almond or oat milk – just make sure it’s unsweetened. Coconut milk works too, but it might add a slight coconut flavor (which can be delicious!).
Egg-free? No problem! For each egg, mix 1 tablespoon ground flaxseed with 3 tablespoons water and let it sit for 5 minutes. It won’t change the color and gives great texture.
Out of butter? Coconut oil works in a pinch, but reduce it by 1 tablespoon since it’s 100% fat. The cake might be slightly denser, but still tasty!
Remember – some swaps might change the texture slightly, but the magic reveal moment will still be perfect!
Serving Suggestions
Oh, the fun part – showing off your masterpiece! For the ultimate reveal, place your cake on a simple white cake stand – it makes those vibrant colors pop even more. Right before slicing, I love adding a scoop of vanilla ice cream alongside each piece. The creamy cold against the warm cake? Absolute heaven!
At baby showers, I’ll sometimes arrange fresh berries around the base – strawberries for pink, blueberries for blue. It’s such an easy way to make the presentation extra special. Pro tip: Have someone video the cutting moment from above – you’ll want to relive those surprised faces forever!
Storage & Reheating
Okay, let’s talk about keeping that gorgeous Gender Reveal Cake fresh! If you somehow have leftovers (trust me, it’s rare), here’s the scoop: Wrap any remaining cake tightly in plastic wrap or store it in an airtight container at room temperature. It’ll stay moist and delicious for about 3 days this way.
Want to freeze it? Absolutely! Just slice it first, then wrap each piece individually in plastic before popping them in a freezer bag. They’ll keep for up to 2 months this way. When you’re ready to enjoy, let them thaw at room temperature overnight – no microwave! Heating can make the colors run together, and nobody wants a rainbow mess.
Pro tip: If you’re freezing the whole cake, skip the frosting until after thawing. That way everything stays picture-perfect for your next celebration!
Gender Reveal Cake FAQs
I get asked SO many questions about these cakes—here are the ones that pop up most often with my tried-and-true answers:
Can I make cupcakes instead of a whole cake? Absolutely! This batter makes about 24 perfect cupcakes. Just fill your lined cupcake tins halfway with one color, then add the other color on top (don’t mix!). Bake at 350°F for 18-20 minutes. The surprise inside is just as magical!
How do I keep the colors from bleeding together? Three words: freezer before slicing! Pop the assembled cake in the freezer for 20 minutes to firm up the layers. Also, use gel coloring instead of liquid—it stays put way better. And for the love of baking, don’t overmix when adding colors!
What if I want to use different colors? Go wild! I’ve done purple and gold for a royal theme, mint and blush for a vintage look—just keep the colors contrasting for maximum wow factor. Gel food coloring gives the best results for bold shades.
Can I make this cake ahead of time? You bet! Bake the layers up to 2 days in advance, wrap them tightly in plastic, and store at room temp. Frost and assemble the day of your event for freshest results. The freezer trick still works great with pre-made layers!
Help! My colors turned out pastel instead of vibrant. Been there! Next time, use gel food coloring (I can’t stress this enough) and add color gradually until you reach that perfect bold shade. Pastel can be pretty too though—call it a “soft reveal”!
Nutritional Information
Just a quick note about nutrition – these values are rough estimates since brands and ingredient choices can vary. A typical slice of Gender Reveal Cake might have around 250 calories, with sugars from both the cake and frosting. Remember, this is a celebratory treat meant for special moments – so enjoy every delicious bite without stressing the numbers!
Print
Magical Gender Reveal Cake Recipe for 2 Perfect Layers
- Total Time: 50 minutes
- Yield: 1 cake 1x
- Diet: Vegetarian
Description
A fun and colorful cake used to reveal the gender of a baby.
Ingredients
- 2 cups all-purpose flour
- 1 1/2 cups sugar
- 1/2 cup butter
- 3 eggs
- 1 cup milk
- 1 tsp vanilla extract
- 1 tsp baking powder
- 1/2 tsp salt
- Food coloring (pink or blue)
Instructions
- Preheat oven to 350°F.
- Mix flour, sugar, baking powder, and salt.
- Add butter, eggs, milk, and vanilla. Mix well.
- Divide batter into two bowls. Add pink coloring to one and blue to the other.
- Pour batters into separate cake pans.
- Bake for 25-30 minutes.
- Let cool before assembling.
Notes
- Use gel food coloring for vibrant colors.
- Keep the reveal a surprise until cutting.
- Prep Time: 20 minutes
- Cook Time: 30 minutes
- Category: Dessert
- Method: Baking
- Cuisine: American
Nutrition
- Serving Size: 1 slice
- Calories: 250
- Sugar: 20g
- Sodium: 200mg
- Fat: 10g
- Saturated Fat: 6g
- Unsaturated Fat: 3g
- Trans Fat: 0g
- Carbohydrates: 35g
- Fiber: 1g
- Protein: 4g
- Cholesterol: 60mg
Keywords: gender reveal cake, baby shower, dessert


