
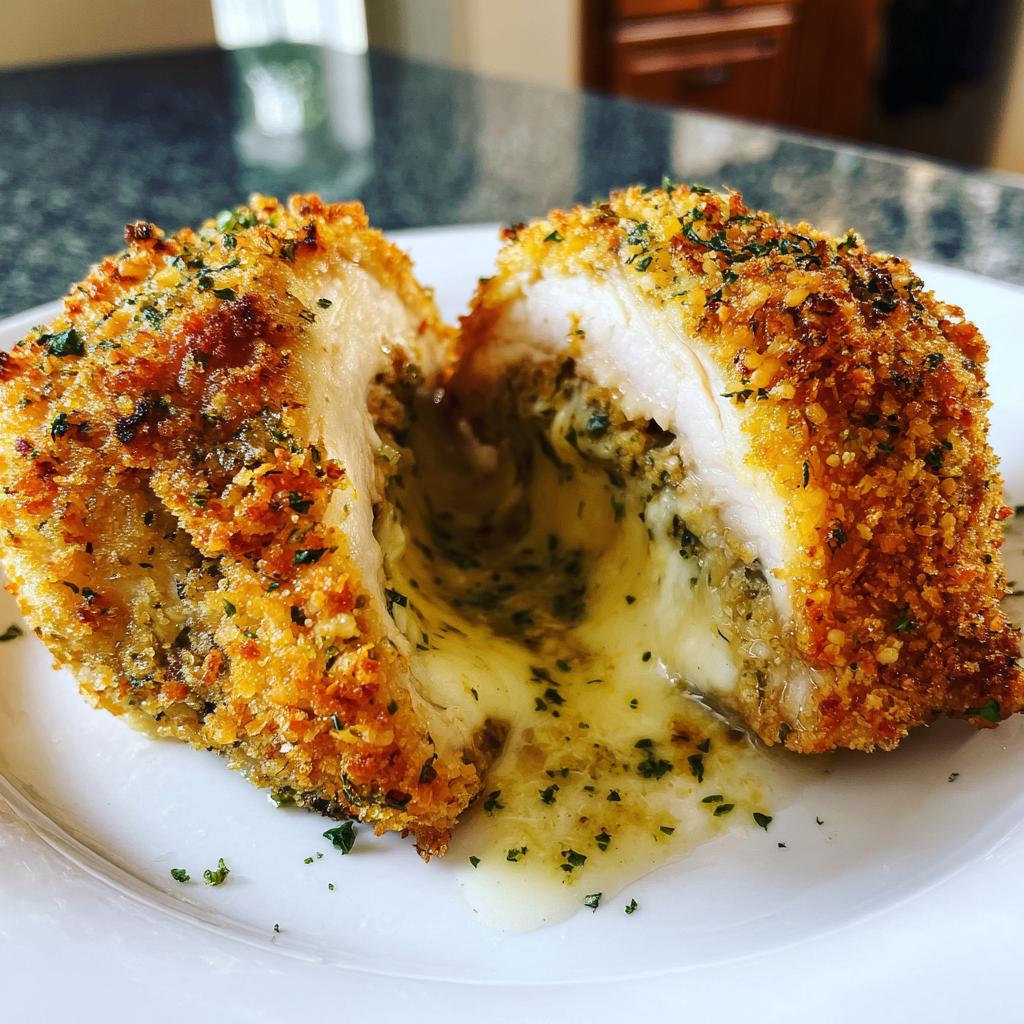
Let me tell you about the first time I made Easy Chicken Kiev – it was a total game-changer. I’d always thought it was a fancy, complicated dish, but when I finally tried it, I was shocked at how simple it was to whip up. The crispy golden breadcrumb coating, the oozing garlic butter filling – it’s like magic in every bite. Honestly, it’s become my go-to recipe when I want something that feels special but doesn’t take hours in the kitchen. Trust me, once you’ve tried this, you’ll be making it on repeat. It’s the perfect balance of crunchy, buttery, and oh-so-satisfying. Let’s dive in and make some magic together!
Why You’ll Love This Easy Chicken Kiev Recipe
Let me count the ways this recipe will become your new favorite:
- Quick prep magic: From fridge to table in under an hour – perfect for busy weeknights when you need something special fast
- Restaurant-worthy wow factor: That golden crust and buttery center will make everyone think you spent hours in the kitchen
- Flavor explosion: The garlic-herb butter melts into every bite, keeping the chicken incredibly juicy and flavorful
- Simple ingredients: Nothing fancy here – just pantry staples transformed into something extraordinary
- Versatile star: Equally impressive for date nights or casual family dinners (my kids beg for this weekly!)
Ingredients for Easy Chicken Kiev
Here’s everything you’ll need to create this buttery masterpiece. I’ve learned through trial and error that quality ingredients make all the difference here – especially with something as simple as this recipe!
- 4 boneless, skinless chicken breasts (about 150-175g each) – look for evenly thick ones so they cook at the same rate
- 100g butter, softened – I always use unsalted so I can control the seasoning myself
- 2 cloves garlic, minced – fresh is best, but 1 tsp of jarred works in a pinch
- 1 tbsp fresh parsley, chopped – the flat-leaf kind has the best flavor
- 1/2 tsp salt – I prefer sea salt for its clean taste
- 1/4 tsp black pepper – freshly cracked adds wonderful aroma
- 1 egg, beaten – helps the breadcrumbs stick beautifully
- 100g breadcrumbs – I often use panko for extra crunch
- 2 tbsp plain flour – just regular all-purpose works perfectly
- 2 tbsp vegetable oil – for that perfect golden fry
See? Nothing complicated – just good, honest ingredients that turn into something magical when combined the right way!
How to Make Easy Chicken Kiev
Okay, let’s get down to business! I promise this isn’t as tricky as it looks – just follow these simple steps and you’ll have perfect Chicken Kiev every time. The key is taking it one step at a time and not rushing the process. Here’s exactly how I make it:
Preparing the Garlic Butter Filling
First things first – that glorious garlic butter! In a small bowl, mix together the softened butter, minced garlic, chopped parsley, salt, and pepper until it’s all beautifully combined. Now here’s my secret – divide this into 4 equal portions and roll each into a little log about the size of your thumb. Pop them in the fridge for at least 10 minutes to firm up. This chilling step makes them SO much easier to handle when stuffing the chicken later.
Stuffing and Coating the Chicken
Now for the fun part! Take each chicken breast and make a pocket by carefully slicing horizontally through the thickest part, being careful not to cut all the way through. Use your fingers to gently widen the pocket (don’t tear it!). Take one of your chilled butter logs and tuck it inside, then press the edges firmly to seal – this is crucial to keep all that delicious butter inside during cooking. I like to give each one a little pat to make sure it’s really closed up tight.
Set up your breading station: flour in one bowl, beaten egg in another, and breadcrumbs in a third. Now coat each stuffed chicken breast first in flour (shake off excess), then egg (let the excess drip off), and finally breadcrumbs, pressing gently to make sure they stick everywhere. Pro tip: use one hand for dry ingredients and one for wet to avoid breadcrumb fingers!
Coooking Your Easy Chicken Kiev
Heat your oil in a large oven-safe pan over medium heat. When it’s hot (a breadcrumb should sizzle when dropped in), add the chicken and fry for 2-3 minutes per side until beautifully golden. Transfer the whole pan to a preheated 200°C (180°C fan) oven and bake for 15-20 minutes. The chicken is done when the juices run clear – I always check by inserting a skewer into the thickest part. Let them rest for 5 minutes before serving (trust me, this helps keep all that butter inside where it belongs!).
Tips for Perfect Easy Chicken Kiev
After making this recipe dozens of times, I’ve learned a few tricks that guarantee perfect results every time. First – that sharp knife is non-negotiable! A dull blade will tear the chicken instead of making a clean pocket. And about that butter filling – resist the urge to overstuff. Too much and it’ll burst out during cooking (we’ve all been there!).
Here’s my golden rule: let the chicken rest for 5 minutes after baking. I know it’s tempting to dig right in, but this gives the butter time to settle so it doesn’t all gush out on your plate. And if you’re worried about leakage during cooking, try sealing the edges with toothpicks – just remember to remove them before serving!
One last pro tip: if your breadcrumbs aren’t browning evenly during frying, don’t panic – they’ll finish beautifully in the oven. And for extra crispiness? Give them a quick spritz with oil before baking. You’ll thank me later!
Serving Suggestions for Easy Chicken Kiev
Oh, the sides you can serve with Chicken Kiev! My absolute favorite is creamy mashed potatoes – they’re perfect for catching all that glorious garlic butter that escapes. But honestly, almost anything works:
- Simple steamed veggies – green beans or broccoli balance the richness perfectly
- A crisp green salad – the acidity cuts through the butter beautifully
- Buttered noodles – my kids’ pick every time
- Roasted carrots – brings out the sweetness alongside the garlic
Pro tip: serve it with crusty bread too – you’ll want to sop up every last drop of that garlic butter sauce!
Storing and Reheating Easy Chicken Kiev
Here’s how to keep your Chicken Kiev tasting just as delicious the next day! For leftovers, store them in an airtight container in the fridge for up to 3 days. When reheating, skip the microwave (it’ll make the coating soggy) and use a 180°C oven for 10-15 minutes instead – it brings back that perfect crispiness.
Want to freeze them? No problem! After breading but before frying, place the coated chicken on a baking sheet and freeze solid. Then transfer to freezer bags for up to 3 months. When you’re ready, just fry and bake from frozen (add a few extra minutes to the cooking time). The butter will still ooze perfectly!
Easy Chicken Kiev Variations
Once you’ve mastered the basic recipe, the fun begins! Try swapping parsley for fresh dill or chives in the butter – it gives such a lovely twist. I sometimes add a pinch of lemon zest too for brightness. And for extra crunch? Panko breadcrumbs are my secret weapon – they make that golden crust even crispier!
Feeling adventurous? Mix some grated parmesan into the breadcrumbs or add a teaspoon of Dijon mustard to the butter filling. My sister swears by adding a few capers to the butter mixture – gives it this amazing salty kick. The beauty of Chicken Kiev is how easily you can make it your own!
Easy Chicken Kiev FAQs
Over the years, I’ve gotten so many questions about making perfect Chicken Kiev – here are the ones that come up most often:
Can I make Chicken Kiev ahead of time?
Absolutely! Prepare them up to the breading stage and refrigerate for up to 24 hours before cooking. I actually think the flavors develop even better this way. Just wait to fry until you’re ready to bake.
How do I prevent butter leakage during cooking?
The keys are chilling the butter logs thoroughly and sealing the chicken edges really well. I like to press firmly with my fingers, then give each one a gentle squeeze to check for gaps. If you’re nervous, secure them with toothpicks!
Can I use chicken thighs instead of breasts?
You can, but they’ll cook differently! Thighs have more fat and need longer cooking. I’d recommend pounding them to an even thickness first. The butter flavor pairs beautifully with thigh meat though – just adjust your cooking time.
What if I don’t have fresh parsley?
No worries! Dried parsley works (use 1 teaspoon), or try other fresh herbs like chives or dill. I’ve even used a pinch of dried Italian seasoning in a pinch – still delicious!
Nutritional Information for Easy Chicken Kiev
Just so you know, these numbers are estimates – your actual counts might vary depending on your exact ingredients and brands. Per serving (one delicious chicken breast), you’re looking at about 350 calories, 30g protein, and 22g fat. Not bad for something that tastes this indulgent! Remember, portion sizes and cooking methods can affect the final numbers.
Print
Irresistible Easy Chicken Kiev Recipe in Under 1 Hour
- Total Time: 40 minutes
- Yield: 4 servings 1x
- Diet: Low Lactose
Description
A simple and delicious Chicken Kiev recipe with crispy breadcrumb coating and a buttery garlic filling.
Ingredients
- 4 boneless, skinless chicken breasts
- 100g butter, softened
- 2 cloves garlic, minced
- 1 tbsp fresh parsley, chopped
- 1/2 tsp salt
- 1/4 tsp black pepper
- 1 egg, beaten
- 100g breadcrumbs
- 2 tbsp plain flour
- 2 tbsp vegetable oil
Instructions
- Preheat oven to 200°C (180°C fan).
- Mix butter, garlic, parsley, salt, and pepper in a bowl.
- Divide mixture into 4 portions and shape into small logs. Chill for 10 minutes.
- Make a pocket in each chicken breast and insert a butter log. Seal edges.
- Coat each chicken breast in flour, then egg, then breadcrumbs.
- Heat oil in a pan and fry chicken for 2-3 minutes per side until golden.
- Transfer to a baking tray and bake for 15-20 minutes until cooked through.
- Serve immediately.
Notes
- Use a sharp knife to make the pocket in the chicken.
- Chill the butter filling to prevent it from melting too quickly.
- Check chicken is cooked by piercing the thickest part – juices should run clear.
- Prep Time: 15 minutes
- Cook Time: 25 minutes
- Category: Main Course
- Method: Baking, Frying
- Cuisine: European
Nutrition
- Serving Size: 1 chicken breast
- Calories: 350
- Sugar: 1g
- Sodium: 450mg
- Fat: 22g
- Saturated Fat: 10g
- Unsaturated Fat: 10g
- Trans Fat: 0g
- Carbohydrates: 15g
- Fiber: 1g
- Protein: 30g
- Cholesterol: 150mg
Keywords: chicken kiev, easy chicken recipe, butter garlic chicken


