You know that moment when you’re staring at a plain cake and suddenly feel like Picasso with a spatula? That’s me every single time I dive into cake decorating! I still remember my first attempt—a lopsided disaster with frosting thicker than the cake itself. But here’s the secret: cake decorating doesn’t have to be perfect to be magical. Whether you’re swirling buttercream roses or just slathering on sprinkles with wild abandon, it’s all about having fun and making something deliciously beautiful. Trust me, if I can go from frosting avalanches to smooth, piped masterpieces (well, almost), you absolutely can too. Let’s turn that humble cake into your edible canvas!
Ingredients for Cake Decorating
Gathering the right ingredients is half the battle in cake decorating! Here’s what you’ll need to transform that plain cake into something spectacular:
- 1 pre-baked cake – cooled completely (warm cakes melt frosting!)
- 2 cups frosting – buttercream works best, at room temperature for easy spreading
- Food coloring (optional) – gel colors give vibrant hues without thinning your frosting
- Sprinkles, edible glitter, or other decorations (optional) – for that extra festive touch
Pro tip: If your frosting feels stiff, let it sit out for 15-20 minutes before decorating. Too soft? A quick 5-minute fridge visit firms it right up!
Essential Tools for Cake Decorating
Every artist needs their brushes, and for cake decorating, these are my can’t-live-without tools:
- Piping bags – disposable ones save so much cleanup time!
- Decorating tips – start with a star tip and round tip for endless designs
- Turntable – my game-changer for smooth frosting and even piping
- Offset spatula – makes frosting sides a breeze
That turntable? Worth every penny. Just spin and frost – no more awkward arm angles trying to reach all sides. I resisted buying one for years and now wonder how I ever decorated without it!
How to Decorate a Cake Step by Step
Alright, let’s get decorating! Follow these simple steps, and you’ll have a cake that looks like it came from a bakery (but with way more personality). The secret? Patience between layers—I learned that the hard way after many frosting meltdowns!
Step 1: Prepare the Cake
First things first—level that cake! Use a serrated knife to gently slice off any domed top so you’ve got a flat surface to work with. Crumbs? Don’t sweat them yet. We’ll trap those sneaky bits in the next step.
Step 2: Apply the Crumb Coat
This is my favorite trick for a flawless finish! Spread a super thin layer of frosting all over the cake—just enough to catch loose crumbs. Think of it like primer before painting. Pop it in the fridge for 15 minutes (set a timer!) to let this “glue” set. You’ll thank me later when no rogue crumbs ruin your smooth finish!
Step 3: Add the Final Frosting Layer
Now for the fun part—the real frosting! Pile it on generously, then use a bench scraper or offset spatula to smooth the sides. Spin that turntable slowly while holding your tool steady for professional-looking edges. Top tip: dip your scraper in warm water for ultra-smooth results!
Step 4: Pipe Designs and Add Decorations
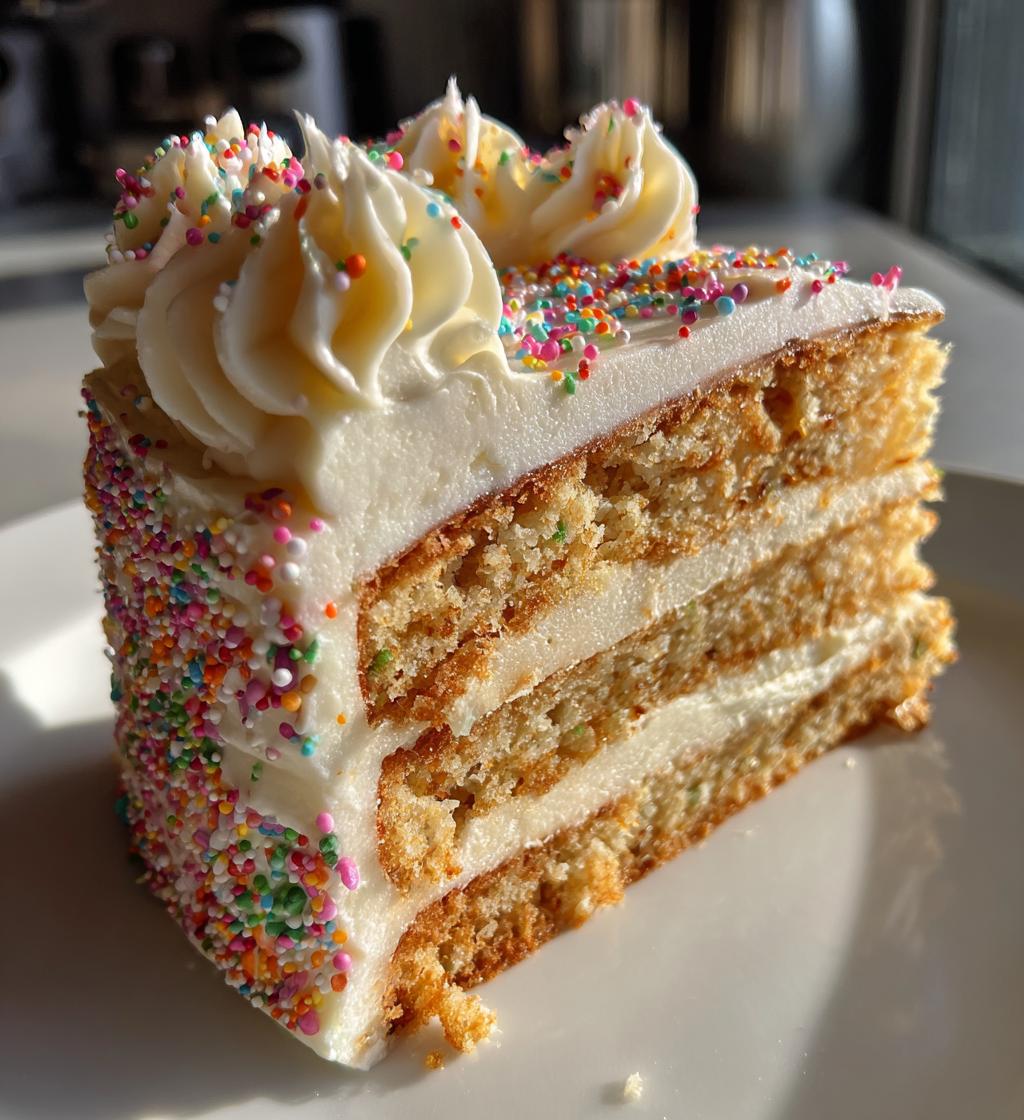
Grab your piping bag fitted with a star tip—hold it straight up and squeeze gently to create rosettes, or drag slightly for swirly borders. Feeling adventurous? Toss on sprinkles while the frosting’s still soft so they stick. Remember, there are no mistakes here—just happy accidents (and delicious ones at that)!
Cake Decorating Tips for Success
Here’s the truth – cake decorating is equal parts art and patience! My biggest lesson? Room-temperature frosting is your best friend – too cold and it tears the cake, too warm and it slides right off. Another game-changer: work with chilled layers between steps. That 15-minute fridge break for the crumb coat? Non-negotiable! And when piping, hold the bag at a 45-degree angle – trust me, your wrists will thank you later. Most importantly, have fun with it! Even my “mess-ups” have turned into happy surprises.
Cake Decorating Variations
Ready to get creative? Try ombre frosting for a stunning gradient effect—just divide your frosting into bowls, tint each with varying amounts of food coloring, and layer as you frost. Or, go wild with themed toppers like fresh flowers, chocolate shards, or even edible glitter. The sky’s the limit—experiment and make it uniquely yours!
Serving and Storing Your Decorated Cake
The best part? Digging in! Serve your masterpiece at room temperature—cold buttercream just isn’t the same. Leftovers? Cover loosely with plastic wrap or pop a cake dome over it. Frosting stays perfect at room temp for 2 days, or refrigerate up to 5 days (just let it warm up slightly before serving again). Pro tip: slice with a warm knife for clean cuts through all that frosting glory!
Cake Decorating Nutritional Information
Now, let’s be real—we’re not decorating cakes for their health benefits! But since you asked, here’s the scoop (based on a standard slice with buttercream frosting):
- Calories: About 250 per slice
- Sugar: 20g (hey, it’s a celebration!)
- Fat: 10g
Remember, these are estimates—your actual numbers will vary based on ingredients and how generously you frost (wink). My philosophy? Enjoy every beautiful, delicious bite!
Cake Decorating FAQs
Can I use store-bought frosting?
Absolutely! While homemade buttercream tastes amazing, quality store-bought frosting works great in a pinch. Just give it a quick whip with your mixer to fluff it up—you’ll be amazed at how much easier it pipes!
My frosting keeps melting—help!
Been there! If your kitchen’s warm, chill the frosted cake for 10 minutes between layers. Also, try adding 1 tablespoon powdered sugar to stiffen runny frosting. And remember—cold cake + room-temp frosting = decorating magic.
How do I fix piping mistakes?
First rule: don’t panic! Gently scrape off boo-boos with a clean knife and re-frost that spot. My secret? Keep extra sprinkles on hand—they’re the perfect edible “erasers” for covering imperfections!
Now it’s your turn—grab that spatula and make some frosting magic happen! Don’t worry about perfection (my first attempts looked like abstract art). The real joy comes from creating something delicious with your own hands. Snap a photo of your decorated masterpiece and tag me—I’d love to see your edible artwork! Remember, every cake decorator started with wobbly lines and uneven layers. The secret ingredient? Always, always have fun with it. Happy decorating!
Print
Master Cake Decorating in 7 Simple Steps for Stunning Results
- Total Time: 35 minutes
- Yield: 1 decorated cake 1x
- Diet: Vegetarian
Description
Learn how to decorate a cake with simple techniques.
Ingredients
- 1 pre-baked cake
- 2 cups frosting
- Food coloring (optional)
- Sprinkles (optional)
- Piping bags
- Decorating tips
Instructions
- Prepare your cake by leveling the top if needed.
- Apply a thin layer of frosting as a crumb coat.
- Chill the cake for 15 minutes.
- Apply the final layer of frosting smoothly.
- Use piping bags with tips to add designs.
- Add sprinkles or other decorations if desired.
Notes
- Keep frosting at room temperature for easy spreading.
- Use a turntable for even frosting application.
- Prep Time: 20 minutes
- Cook Time: 0 minutes
- Category: Dessert
- Method: Decorating
- Cuisine: International
Nutrition
- Serving Size: 1 slice
- Calories: 250
- Sugar: 20g
- Sodium: 150mg
- Fat: 10g
- Saturated Fat: 5g
- Unsaturated Fat: 4g
- Trans Fat: 0g
- Carbohydrates: 35g
- Fiber: 1g
- Protein: 3g
- Cholesterol: 20mg
Keywords: cake decorating, frosting, piping, sprinkles


