
Nothing says Christmas like a batch of freshly baked, beautifully decorated sugar cookies! Every year, my kitchen turns into a festive workshop where flour dusts the countertops like snow, and the air smells like vanilla and holiday magic. These Christmas sugar cookies decorated with colorful icing and sprinkles are my absolute favorite tradition – simple enough for beginners but endlessly creative for seasoned bakers. I’ve been making them since I was a kid helping my grandma, and now my own children giggle as they press cookie cutters into the soft dough. The best part? Even if your decorations aren’t perfect, they’ll still taste amazing!
Why You’ll Love These Christmas Sugar Cookies Decorated
- So easy to make – no fancy equipment needed, just basic baking tools
- Perfect holiday activity for the whole family (messy fingers welcome!)
- Customizable with different colors and designs – let your creativity shine
- Soft yet sturdy texture holds its shape beautifully for decorating
- Makes your kitchen smell like Christmas should smell
Ingredients for Christmas Sugar Cookies Decorated
Gathering your ingredients is the first step to cookie magic! Here’s what you’ll need for these festive treats:
- 2 3/4 cups all-purpose flour – spooned and leveled, not packed
- 1 tsp baking soda – fresh for best rise
- 1/2 tsp baking powder – aluminum-free if possible
- 1 cup unsalted butter, softened – leave out for 30 minutes (should dent slightly when pressed)
- 1 1/2 cups white sugar – packed lightly into measuring cup
- 1 egg – large, room temperature
- 1 tsp vanilla extract – pure vanilla makes all the difference
- Food coloring (red, green, optional) – gel works better than liquid
- Sprinkles (optional) – the more festive, the better!
Ingredient Substitutions & Notes
Don’t stress if you’re missing something! Here are easy swaps:
- Salted butter? Use it but skip any added salt.
- Gluten-free? Try a 1:1 gluten-free flour blend.
- Out of vanilla? Almond extract works in a pinch (use half the amount).
- No gel food coloring? Liquid works but may thin dough slightly.
- Vegan? Substitute butter with coconut oil and egg with flax egg.
How to Make Christmas Sugar Cookies Decorated
Ready to create some holiday magic? Let’s walk through each step – I promise it’s easier than you think! Just follow these simple instructions, and you’ll have gorgeous, delicious cookies in no time.
Step 1: Mix Dry Ingredients
First things first – whisk together your flour, baking soda, and baking powder in a medium bowl. I like to sift mine to prevent lumps, but a good stir works too! Pro tip: Don’t overmix at this stage – we just want everything evenly combined.
Step 2: Cream Butter & Sugar
Now for the fun part! In your mixing bowl, beat together the softened butter (it should dent when you press it) and sugar until light and fluffy. This takes about 2-3 minutes. Scrape down the sides of the bowl halfway through – trust me, it makes all the difference!
Step 3: Add Egg & Vanilla
Next, beat in your egg (make sure it’s room temperature!) and vanilla extract. Mix just until combined – we don’t want to overwork it. If the mixture looks slightly curdled at first, keep mixing and it’ll come together beautifully.
Step 4: Combine & Chill Dough
Gradually add your dry ingredients to the wet mixture, mixing until just incorporated. Here’s where you can get creative – divide the dough and add food coloring if you’d like! Then comes the hardest part: wrap the dough and chill for at least 30 minutes. I know it’s tempting to skip this, but it makes rolling so much easier!
Step 5: Cut & Bake
Preheat your oven to 375°F while the dough chills. Roll out the dough (about 1/4 inch thick) on a lightly floured surface and cut into shapes. Place them on parchment-lined baking sheets – they won’t spread too much, but give them a little space. Bake for 8-10 minutes until the edges are just golden but the centers still look soft. They’ll firm up as they cool!
Step 6: Decorate
The best part! Let your cookies cool completely before decorating. I recommend royal icing for smooth designs – pipe the outlines first, then “flood” with thinned icing. If using sprinkles, add them immediately after icing while it’s still wet. Don’t stress about perfection – messy cookies taste just as good, and kids love helping with this part!
Tips for Perfect Christmas Sugar Cookies Decorated
After years of baking (and eating!) these cookies, I’ve learned all the tricks to make them foolproof. Here’s my hard-earned wisdom:
- Rolling thickness matters: 1/4 inch is perfect – too thin and they’ll burn, too thick and they won’t crisp up
- The underbake rule: Pull them when edges are light golden – they’ll continue cooking on the tray!
- Icing consistency: Should flow slowly off a spoon – add milk 1 tsp at a time to thin
- Decorating hack: Use toothpicks to fix icing mistakes or push sprinkles into place
- Flour your cutter: Dip cookie cutters in flour to prevent sticking to the dough
Remember – even “imperfect” cookies taste amazing with a glass of cold milk!
Storage & Serving Suggestions
These Christmas sugar cookies decorated with love deserve proper storage! Keep them fresh in an airtight container at room temperature for up to a week – just separate layers with parchment paper to protect your beautiful decorations. They pair perfectly with a glass of cold milk or hot cocoa. Want to spread holiday cheer? Stack them in clear cellophane bags tied with ribbon for adorable homemade gifts. Pro tip: The icing actually helps preserve them longer!
Christmas Sugar Cookies Decorated FAQs
Over the years, I’ve gotten all sorts of questions about these festive treats. Here are the answers to what everyone really wants to know!
Can I freeze the dough?
Absolutely! Wrap the dough tightly in plastic wrap, then pop it in a freezer bag. It’ll keep for up to 3 months. When you’re ready to bake, just thaw in the fridge overnight – it rolls out perfectly!
How do I prevent spreading?
The secret is chilling the dough (don’t skip it!) and not over-creaming the butter and sugar. Also, make sure your baking powder isn’t expired – fresh leaveners help cookies hold their shape.
Why are my cookies tough?
You probably overmixed the dough after adding flour. Mix just until combined – a few flour streaks are okay! Also check you didn’t add too much flour by packing it into the measuring cup.
Can I make these ahead?
Yes! The decorated cookies stay fresh in an airtight container for a week. For longer storage, freeze undecorated baked cookies up to a month – just decorate after thawing.
What’s the easiest way to decorate?
For beginners, start with simple icing outlines and sprinkles. Use squeeze bottles for flooding – they’re way easier than piping bags when you’re learning!
Nutritional Information
Just so you know what you’re enjoying (because let’s be real – no one stops at just one cookie!), here’s the nutritional breakdown per cookie. Keep in mind these are estimates – your exact amounts might vary slightly depending on your ingredients and decorations!
Per cookie: Calories 150, Fat 7g (Saturated 4g), Carbs 20g, Protein 2g, Sugar 10g, Sodium 50mg. Now go enjoy that holiday treat guilt-free!
Share Your Creations!
I’d love to see your cookie masterpieces! Tag me @MyHolidayKitchen or use #ChristmasCookieMagic – nothing makes me happier than seeing your festive creations!
Print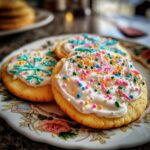
25 Magical Christmas Sugar Cookies Decorated with Joy
- Total Time: 30 mins
- Yield: 24 cookies 1x
- Diet: Vegetarian
Description
Easy-to-make Christmas sugar cookies decorated with festive designs.
Ingredients
- 2 3/4 cups all-purpose flour
- 1 tsp baking soda
- 1/2 tsp baking powder
- 1 cup unsalted butter, softened
- 1 1/2 cups white sugar
- 1 egg
- 1 tsp vanilla extract
- Food coloring (red, green, optional)
- Sprinkles (optional)
Instructions
- Preheat oven to 375°F (190°C).
- In a bowl, mix flour, baking soda, and baking powder.
- Cream butter and sugar until smooth. Beat in egg and vanilla.
- Gradually blend in dry ingredients.
- Divide dough, add food coloring if desired.
- Roll dough and cut into shapes with cookie cutters.
- Place on baking sheets and bake for 8-10 minutes.
- Cool and decorate with icing and sprinkles.
Notes
- Chill dough for 30 minutes for easier handling.
- Use royal icing for smooth decorating.
- Store in an airtight container to keep cookies fresh.
- Prep Time: 20 mins
- Cook Time: 10 mins
- Category: Dessert
- Method: Baking
- Cuisine: American
Nutrition
- Serving Size: 1 cookie
- Calories: 150
- Sugar: 10g
- Sodium: 50mg
- Fat: 7g
- Saturated Fat: 4g
- Unsaturated Fat: 2g
- Trans Fat: 0g
- Carbohydrates: 20g
- Fiber: 0g
- Protein: 2g
- Cholesterol: 25mg
Keywords: christmas sugar cookies, decorated cookies, holiday baking


