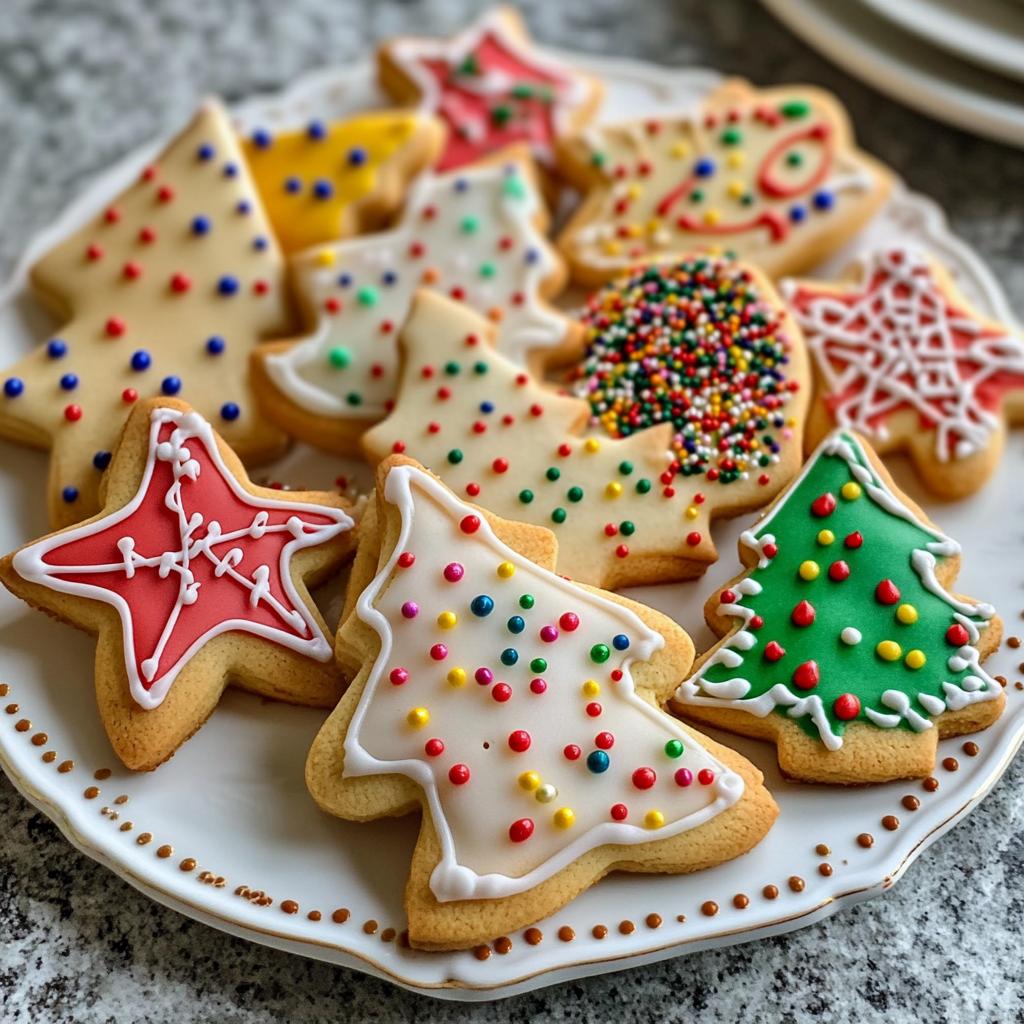
The holiday season is truly magical, isn’t it? One of my favorite traditions is gathering around the kitchen table with my family to dive into the delightful world of christmas cookie decorating. The air fills with the sweet scent of baking cookies, and laughter echoes as we try to outdo each other with our creative designs. I still remember the year my niece decided to go rogue and turned her gingerbread men into a rainbow of colors—what a sight that was!
Decorating cookies isn’t just about the end result; it’s about the memories we create together. Each swirl of icing and sprinkle of sugar brings a sense of joy and togetherness that embodies the spirit of the holidays. Whether you’re a seasoned pro or a complete newbie, every cookie is a canvas waiting for your creativity. So, let’s roll up our sleeves and get ready to make some festive magic happen!
Ingredients List
- 2 cups all-purpose flour
- 1/2 cup unsalted butter, softened
- 1 cup granulated sugar
- 1 large egg
- 1 teaspoon vanilla extract
- 1 teaspoon baking powder
- 1/2 teaspoon salt
- Royal icing (for decorating)
- Food coloring (for a splash of festive color)
- Sprinkles (to add that magical finishing touch)
How to Prepare Instructions
Alright, let’s get those festive cookies baking! First things first, preheat your oven to 350°F (175°C). This step is crucial because a well-preheated oven ensures even baking. Trust me, you don’t want to pull out cookies that are unevenly cooked!
Now, grab a large mixing bowl and let’s cream together the softened unsalted butter and granulated sugar. Use a hand mixer or a sturdy wooden spoon, and mix until it’s light and fluffy—about 2-3 minutes should do the trick. Next, add in that large egg and the teaspoon of vanilla extract, and mix well until everything is combined. The smell of vanilla will get you in the holiday spirit!
In another bowl, whisk together the all-purpose flour, baking powder, and salt. This step is essential for ensuring your dry ingredients are evenly distributed. Gradually mix this dry mixture into the wet mixture. I like to add it in three parts: start with a third, mix until just combined, and repeat until everything is blended. Don’t overmix; it’s okay if there are a few flour streaks left!
Now it’s time to roll out the dough! Lightly flour your countertop and use a rolling pin to flatten the dough to about 1/4 inch thick. Grab your favorite cookie cutters and start cutting out shapes. Place your cookies on a baking sheet lined with parchment paper.
Pop those beauties into the preheated oven and bake for 8-10 minutes. Keep an eye on them! You want just a hint of golden edges. Once baked, let them cool completely on a wire rack. This is super important because decorating warm cookies can lead to a melted icing disaster! Trust me, I’ve been there.
While they’re cooling, prepare your royal icing and divide it into bowls for coloring. Don’t forget to let your creativity shine when decorating—this is the fun part! When the cookies are cool and your icing is ready, it’s time to bring your cookie vision to life!
Why You’ll Love This Recipe
- Easy Preparation: With simple ingredients and straightforward steps, this recipe is perfect for bakers of all skill levels.
- Fun for All Ages: Gather your family and friends! Everyone can join in on the decorating fun, making it a fantastic holiday activity.
- Festive Appeal: These cookies are not just delicious; they’re a feast for the eyes! Let your creativity shine with vibrant colors and festive designs.
- Memorable Traditions: Creating and decorating cookies together can become a cherished family tradition that everyone looks forward to each year.
Tips for Success
To achieve perfect cookies and stunning decorations, there are a few handy tips I swear by! First, when mixing your dough, aim for a soft yet slightly sticky consistency. If it feels too dry, a splash of milk can help bring it together. Just remember, overworking the dough can lead to tough cookies, so mix until everything is just combined.
For the royal icing, achieving the right consistency is key! Aim for a thick yet pipeable texture that holds its shape but isn’t too runny. A good test is to drizzle some icing back into the bowl; if it takes about 10 seconds to disappear, you’re golden! Also, when coloring your icing, gel food coloring works wonders for vibrant hues without thinning out your mixture.
Finally, don’t rush the decorating process. Take your time, and let each layer of icing dry before adding more details. This patience pays off in beautiful, multi-dimensional designs that will wow everyone!
Variations
The beauty of christmas cookie decorating lies in its endless possibilities for customization! Try using different cookie shapes—think stars, trees, or even snowflakes—to add variety to your festive treat platter. You can also experiment with flavors by swapping out the vanilla for almond extract or adding spices like cinnamon or nutmeg to the dough for a warm twist.
If you’re feeling adventurous, consider adding a touch of cocoa powder for chocolate-flavored cookies or incorporating citrus zest for a refreshing burst of flavor. As for decorations, think outside the box! Use edible glitter, chocolate drizzle, or even themed sprinkles to make your cookies truly unique. The sky’s the limit!
Storage & Reheating Instructions
To keep your beautifully decorated cookies fresh, store them in an airtight container at room temperature. This will help maintain their softness and keep the icing intact. I recommend layering parchment paper between the cookies if you’re stacking them, as this prevents any icing from sticking together. They’ll stay delicious for about a week, but trust me, they probably won’t last that long!
If you need to reheat cookies, pop them in the microwave for just 5-10 seconds to warm them up gently. Avoid heating them too long, as you don’t want to melt the icing. Enjoy the cozy flavors of the season!
Nutritional Information
When it comes to enjoying cookies, it’s always good to know what you’re indulging in! Please note that nutritional values can vary based on the specific ingredients and brands you use, so these numbers are approximate. Each cookie contains about 120 calories, with 5 grams of fat, 1 gram of protein, and 17 grams of carbohydrates. They also have around 8 grams of sugar and 50 mg of sodium. Remember, cookies are meant to be a treat, so enjoy them in moderation while savoring each delicious bite!
FAQ Section
What type of icing is best for decorating?
For christmas cookie decorating, royal icing is my go-to! It dries hard, which means your designs won’t smudge, and it’s perfect for intricate details. Plus, you can easily color it to match your festive theme!
How do I store decorated cookies?
To keep your cookies fresh, store them in an airtight container at room temperature. If you stack them, place parchment paper between layers to avoid any icing sticking together. They’ll stay delicious for about a week!
Can I freeze decorated cookies?
Absolutely! Just make sure they’re completely dry before wrapping them tightly in plastic wrap and placing them in a freezer-safe container. They can last up to three months in the freezer. Just thaw at room temperature when you’re ready to enjoy!
What if my royal icing is too runny?
If your icing is too runny, simply add a bit more powdered sugar to thicken it up. Remember, you want it to hold its shape while still being pipeable. A good consistency is key for beautiful designs!
Can I use different flavors in the cookie dough?
Definitely! Feel free to experiment with flavors like almond or peppermint extract. You can also add spices like cinnamon or nutmeg for a festive twist that’ll have everyone coming back for more!

Christmas Cookie Decorating: 7 Tips for Happy Memories
- Total Time: 40 minutes
- Yield: 24 cookies 1x
- Diet: Vegetarian
Description
A fun activity for creating festive cookies during the holiday season.
Ingredients
- 2 cups all-purpose flour
- 1/2 cup unsalted butter, softened
- 1 cup granulated sugar
- 1 large egg
- 1 teaspoon vanilla extract
- 1 teaspoon baking powder
- 1/2 teaspoon salt
- Royal icing
- Food coloring
- Sprinkles
Instructions
- Preheat your oven to 350°F (175°C).
- In a bowl, cream together the butter and sugar.
- Add the egg and vanilla extract, mixing well.
- In another bowl, combine flour, baking powder, and salt.
- Gradually mix the dry ingredients into the wet mixture.
- Roll out the dough and cut shapes using cookie cutters.
- Place cookies on a baking sheet and bake for 8-10 minutes.
- Let cookies cool completely.
- Prepare royal icing and divide into bowls for coloring.
- Decorate cookies with icing and sprinkles.
Notes
- Make sure cookies are completely cool before decorating.
- Store decorated cookies in an airtight container.
- Use gel food coloring for vibrant colors.
- Prep Time: 30 minutes
- Cook Time: 10 minutes
- Category: Dessert
- Method: Baking
- Cuisine: American
Nutrition
- Serving Size: 1 cookie
- Calories: 120
- Sugar: 8g
- Sodium: 50mg
- Fat: 5g
- Saturated Fat: 3g
- Unsaturated Fat: 2g
- Trans Fat: 0g
- Carbohydrates: 17g
- Fiber: 0g
- Protein: 1g
- Cholesterol: 15mg
Keywords: christmas cookie decorating


