Ah, the magic of the holiday season! There’s just something about making Christmas candy recipes that fills my heart with joy and nostalgia. The kitchen becomes a whirlwind of laughter, sugar, and festive spirit as we gather together, mixing, pouring, and creating sweet treats that bring smiles to everyone around. I can still remember my grandmother’s kitchen, filled with the rich aroma of melting chocolate and the sound of her cheerful voice as she guided me through her favorite candy recipes. These delightful little confections are not just sweets; they’re tokens of love and tradition that we share during the holidays. Whether you’re treating yourself or gifting them to loved ones, these candies are sure to spread warmth and cheer. So grab your apron, and let’s dive into the world of homemade Christmas candy that will make your holiday celebrations extra special!
Ingredients List
- 2 cups granulated sugar
- 1/2 cup light corn syrup
- 1/2 cup water
- 1 teaspoon vanilla extract
- 1 cup chopped nuts (your choice, like walnuts or pecans)
- 1 cup chocolate chips (semi-sweet or dark for a richer flavor)
- 1/2 cup powdered sugar (for dusting)
How to Prepare Christmas Candy Recipes
Step 1: Combine Ingredients
First things first, let’s get those ingredients together! In a medium-sized saucepan, combine the 2 cups of granulated sugar, 1/2 cup of light corn syrup, and 1/2 cup of water. It’s important to stir everything together until it’s well mixed. This will help ensure that the sugar dissolves evenly as we heat it up. Trust me, this step sets the foundation for your candy!
Step 2: Cook the Mixture
Now, place the saucepan over medium heat. You’ll want to keep an eye on it and stir occasionally to help the sugar dissolve completely. As the mixture heats up, it will look a bit cloudy at first, but don’t worry; it’ll clear up as the sugar melts. Just be patient – this usually takes about 5-10 minutes. Once you see the sugar is dissolved, you can stop stirring and let it come to a boil!
Step 3: Reach Hard Ball Stage
This is where it gets exciting! You need to cook the mixture until it reaches the hard ball stage, which is around 250°F (121°C) on a candy thermometer. If you don’t have a thermometer, you can do the cold water test: drop a small spoonful of the mixture into a glass of cold water. When it forms a hard ball that holds its shape, you’re good to go!
Step 4: Add Flavorings and Nuts
Once you’ve achieved the hard ball stage, remove the saucepan from the heat. This is where the magic happens! Stir in 1 teaspoon of vanilla extract and 1 cup of chopped nuts – I love using walnuts or pecans for that added crunch. This step is crucial because it adds layers of flavor to your candy, making it even more delightful!
Step 5: Pour and Cool
Next, carefully pour the mixture onto a greased baking sheet. Make sure to spread it out evenly, as this helps in getting uniform pieces later on. Let it cool for about 10-15 minutes until it’s firm but still warm enough to cut. This is a great time to clean up your workspace and get ready for the next steps!
Step 6: Cut and Dip
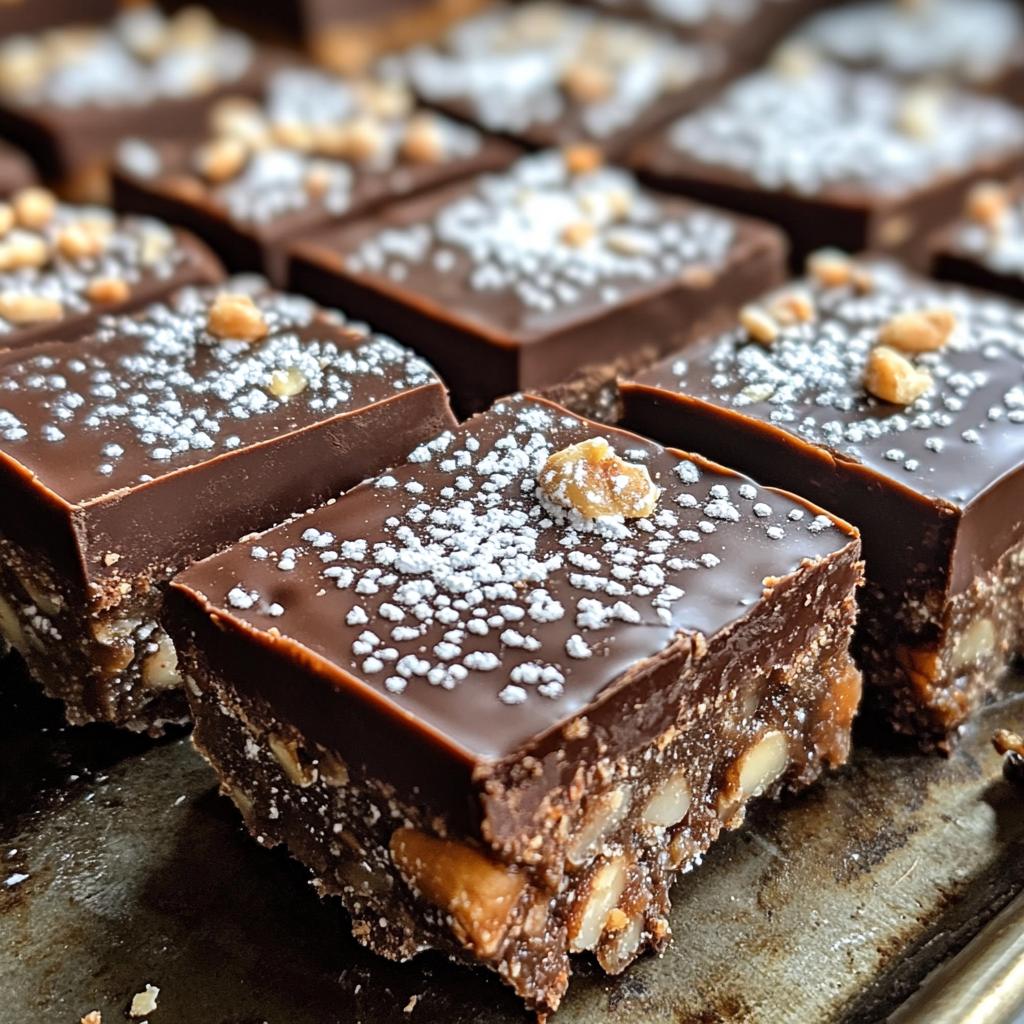
Once cooled, use a sharp knife to cut the candy into squares of your desired size. Don’t worry if they aren’t perfect; the charm of homemade candy is in its rustic look! Now, melt your 1 cup of chocolate chips in a microwave-safe bowl, heating in short bursts until smooth. Dip each square into the melted chocolate, letting the excess drip off before placing them back on the baking sheet.
Step 7: Finish with Powdered Sugar
Finally, for that festive touch, sprinkle 1/2 cup of powdered sugar over the chocolate-dipped candies before they set. This not only adds a lovely sweetness but also makes them look extra special for the holidays. Now, all that’s left is to let them cool completely before serving or packing them up as delightful gifts!
Why You’ll Love This Recipe
- Quick to make: With just 35 minutes from start to finish, you’ll have a delicious treat ready in no time!
- Perfect for gifting: Pack these candies in festive boxes or jars, and they make thoughtful homemade gifts for friends and family.
- Festive presentation: The chocolate-dipped squares dusted with powdered sugar look gorgeous on any holiday table or dessert platter.
- Customizable: Feel free to mix in your favorite nuts or swap them for dried fruits to make them your own!
- Family tradition: Making these candies can easily become a cherished holiday activity with your loved ones, creating sweet memories to last a lifetime.
Tips for Success
To ensure your Christmas candy turns out perfectly every time, here are some pro tips just for you!
- Use a candy thermometer: This is key for achieving the hard ball stage accurately, so you get that perfect texture.
- Prep your workspace: Have everything measured and your baking sheet greased beforehand to keep the process smooth and fun!
- Be patient: Allow the mixture to cool slightly before cutting; this helps maintain its shape and makes it easier to handle.
- Experiment with flavors: Don’t hesitate to try different extracts or spices to make these candies uniquely yours!
- Store properly: Keep your finished candies in an airtight container to maintain freshness and texture.
Nutritional Information Section
Here’s the estimated nutritional breakdown for one piece of these delightful Christmas candies:
- Calories: 150
- Sugar: 20g
- Fat: 7g
- Saturated Fat: 2g
- Unsaturated Fat: 4g
- Trans Fat: 0g
- Carbohydrates: 22g
- Fiber: 1g
- Protein: 2g
- Cholesterol: 0mg
- Sodium: 15mg
Keep in mind that these values are approximate and can vary based on the specific ingredients you use. Enjoy indulging in these festive treats while keeping an eye on the nutrition!
FAQ Section
Can I substitute ingredients in Christmas candy recipes?
Absolutely! One of the great things about Christmas candy recipes is their flexibility. If you’re not a fan of nuts or have allergies, you can easily swap them out for dried fruits like cranberries or cherries for a sweet and chewy texture. Other options include adding seeds like sunflower or pumpkin seeds for a delightful crunch. Just remember that whatever you choose should complement the other flavors in the candy!
How do I store my Christmas candy?
To keep your Christmas candy fresh and delicious, store it in an airtight container at room temperature. Make sure to layer the candies with parchment paper if you’re stacking them to prevent sticking. If you live in a particularly warm area, you might want to keep them in the fridge, but let them come to room temperature before serving for the best texture and flavor!
Can I make these candies in advance?
You bet! These candies are perfect for making ahead of time. In fact, they often taste even better after they’ve had a day or two to set and meld flavors. Just prepare them according to the recipe, let them cool completely, and then store them as mentioned above. They can last for up to two weeks, making them a great treat to have on hand for unexpected guests or holiday gatherings!
Serving Suggestions
When it comes to serving your delightful Christmas candies, think of creating an inviting festive spread! These treats shine on a beautiful dessert platter alongside a warm cup of hot cocoa or spiced apple cider. You can also pair them with a selection of holiday cookies for a delightful sweet table that guests will adore. For an elegant touch, arrange the candies in decorative jars adorned with ribbons as charming centerpieces. And don’t forget, they make a wonderful addition to gift baskets alongside homemade jams or flavored popcorn. Trust me, everyone will be reaching for seconds!
Print
Christmas Candy Recipes: 7 Sweet Treats to Cherish This Season
- Total Time: 35 minutes
- Yield: 24 pieces 1x
- Diet: Vegetarian
Description
Delicious and festive Christmas candy recipes for the holiday season.
Ingredients
- 2 cups granulated sugar
- 1/2 cup light corn syrup
- 1/2 cup water
- 1 teaspoon vanilla extract
- 1 cup chopped nuts
- 1 cup chocolate chips
- 1/2 cup powdered sugar
Instructions
- Combine sugar, corn syrup, and water in a saucepan.
- Cook over medium heat until sugar dissolves.
- Bring to a boil and cook until it reaches the hard ball stage.
- Remove from heat and stir in vanilla and nuts.
- Pour mixture onto a greased baking sheet.
- Let cool slightly, then cut into squares.
- Melt chocolate chips and dip each square.
- Sprinkle with powdered sugar before serving.
Notes
- Store in an airtight container.
- Can substitute nuts with dried fruits.
- Prep Time: 15 minutes
- Cook Time: 20 minutes
- Category: Dessert
- Method: Stovetop
- Cuisine: American
Nutrition
- Serving Size: 1 piece
- Calories: 150
- Sugar: 20g
- Sodium: 15mg
- Fat: 7g
- Saturated Fat: 2g
- Unsaturated Fat: 4g
- Trans Fat: 0g
- Carbohydrates: 22g
- Fiber: 1g
- Protein: 2g
- Cholesterol: 0mg
Keywords: christmas candy recipes, holiday sweets, homemade candy


