Oh, the joy of making Christmas candy! There’s something absolutely magical about stirring up a batch of sweet treats during the holiday season. The air fills with the warm scents of vanilla and peppermint, instantly transporting you to cozy winter nights filled with laughter and cheer. I remember the first time I made this delightful Christmas candy with my kids. We turned the kitchen into a festive wonderland, and the excitement was palpable as we watched the sugar transform into colorful, chewy goodness!
This recipe is not just about creating a delicious treat; it’s about making memories. Every piece of candy we pulled and cut was a little moment of joy, a tiny gift wrapped in love. And the best part? It’s so easy to customize! Want a bit more peppermint zing? Go for it! Feel like adding a splash of color? You got this! Trust me, once you make your own Christmas candy, you’ll never want to go back to store-bought again. So, grab your apron and let’s dive into the sweetest holiday tradition together!
Ingredients List
To whip up this delightful Christmas candy, you’ll need just a few simple ingredients. Gather the following:
- 2 cups sugar: This is the base of our candy, providing that sweet, irresistible flavor that makes it a holiday favorite.
- 1 cup corn syrup: This helps keep the candy smooth and prevents it from crystallizing. It’s a key player in achieving that perfect chewy texture.
- 1 cup water: Just enough to help dissolve the sugar and corn syrup. No fancy tricks here, just good old H2O!
- 1 teaspoon vanilla extract: A splash of vanilla adds a warm, comforting flavor that rounds out the sweetness beautifully.
- 1/2 teaspoon peppermint extract: This is where the festive flair comes in! It gives your candy that refreshing minty kick that everyone loves during the holidays.
- Food coloring: Optional, but oh-so-fun! Use it to make your candy as colorful and festive as your holiday spirit.
Make sure you have everything on hand before you start cooking. It’ll make the process so much smoother and more enjoyable. Happy candy making!
How to Prepare Christmas Candy
Now that you’ve gathered all your ingredients, it’s time to roll up your sleeves and dive into the candy-making magic! This process is both fun and rewarding, so let’s break it down step by step so you can create your own Christmas candy masterpiece.
Step 1: Combine Sugar, Corn Syrup, and Water
Start by grabbing a medium-sized saucepan and combine 2 cups of sugar, 1 cup of corn syrup, and 1 cup of water. Stir them together gently. It’s essential to mix everything well at this stage to ensure the sugar dissolves evenly. No lumps allowed! Once combined, you’ll be ready to move on to the cooking stage.
Step 2: Cook the Mixture
Place the saucepan over medium heat. This is where the magic happens! Keep a close eye on the mixture as it heats up. You’ll want to cook it until it reaches a precise temperature of 300°F. A candy thermometer is your best friend here, so clip it onto the side of the pot for an accurate read. Stir the mixture occasionally, but be careful not to over-stir, as this can cause crystallization. The bubbling and fizzing will let you know you’re on the right track!
Step 3: Add Flavorings
Once your mixture hits that sweet 300°F mark, quickly remove it from the heat. Now’s the time to add in 1 teaspoon of vanilla extract and 1/2 teaspoon of peppermint extract. The aroma will be heavenly! Stir gently to combine, being cautious of the steam. This step infuses your candy with that delightful holiday flavor that everyone loves.
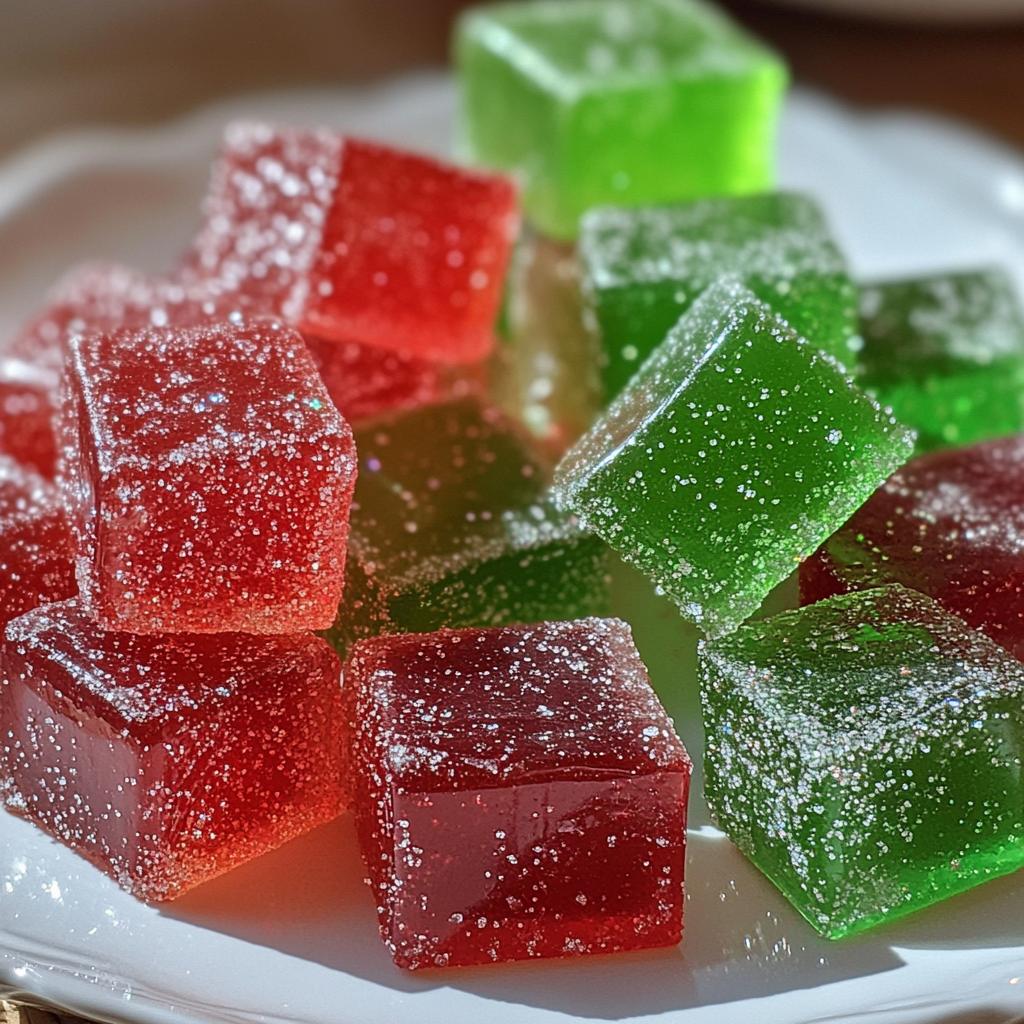
Step 4: Color the Mixture
Now, divide the candy mixture into a few bowls if you want to create different colors. Add a few drops of food coloring to each bowl, starting with just a bit and mixing thoroughly. You can always add more if you want a brighter hue! This is where the fun really begins—experiment with colors to match your festive spirit!
Step 5: Pour and Cool
Carefully pour the candy mixture onto a greased surface, like a marble countertop or a cutting board. Make sure to spread it out a bit, but don’t worry about perfection. Let it cool for just a few minutes until it’s warm but manageable. Be cautious! The mixture will be extremely hot, so handle it with care.
Step 6: Stretch and Pull the Candy
Here comes the fun part—stretching and pulling! Once the candy is cool enough to handle, you can start pulling it. This technique helps aerate the candy and makes it glossy. Use your hands to stretch it, folding it over itself as you go. Keep at it until it turns opaque—this usually takes about 10 minutes. Trust me, it’s a workout but so worth it for that perfect texture!
Step 7: Cut and Cool Completely
After you’ve stretched the candy, it’s time to cut it into bite-sized pieces. Use a sharp knife or kitchen shears for this—whatever works best for you! Once cut, let the pieces cool completely on your greased surface or a parchment-lined tray. This cooling step ensures they hold their shape and stay deliciously chewy. Once cooled, you can store them in an airtight container, ready to share with family and friends!
Why You’ll Love This Recipe
- Quick Preparation: With just 15 minutes of prep and 20 minutes of cooking, you can whip up this delightful Christmas candy in no time!
- Festive Flavor: The combination of vanilla and peppermint extracts gives your candy that iconic holiday taste that fills the air with cheer.
- Easy to Customize: Want to switch up the flavors? Feel free to substitute different extracts or play with colors to match your holiday theme. The possibilities are endless!
- Perfect for Gifting: This candy makes a wonderful homemade gift! Package it up in festive boxes or jars for a sweet treat that friends and family will adore.
- Fun Activity: Making this candy is a joyous experience, especially with kids or loved ones. It’s a fantastic way to create lasting memories while enjoying the magic of the season.
Tips for Success
Making Christmas candy is such a delightful experience, but there are a few tips that can help ensure your candy turns out perfectly every time. Trust me, these little nuggets of wisdom can make all the difference!
Use a Candy Thermometer
This is a must-have tool for candy making. A candy thermometer helps you monitor the temperature accurately, ensuring you hit that crucial 300°F mark. If you don’t have one, you can do the cold water test, but it’s a bit trickier. So, invest in a thermometer for consistent results!
Be Patient with Heating
When you’re cooking the sugar mixture, resist the urge to crank up the heat to speed things along. Medium heat is your friend here. Cooking too quickly can lead to uneven melting or even burnt sugar, which is a disaster! Let it heat gradually while you stir occasionally.
Keep Everything Greased
Make sure your work surface is greased before pouring the candy. This prevents sticking and makes it much easier to handle later on. You can also grease your hands lightly when stretching the candy—it helps avoid a sticky situation!
Work Quickly Once You Add Flavorings
After you remove the mixture from heat and add your flavorings, you’ll need to move fast. The candy can start to harden quickly, so have your food coloring and greased surface ready to go. This ensures you can pour and mold it before it sets up too much.
Stretch with Care
Stretching the candy is a fun part of the process, but be cautious! The candy will still be warm, so wear rubber gloves if you need to protect your hands. Stretch it gently, folding it over itself to incorporate air. This step is vital for achieving that glossy finish!
Let It Cool Completely
Don’t rush the cooling process. Allow the candy to cool completely before cutting it into pieces. If you cut it too soon, it might lose its shape or become sticky. Patience is key for that perfectly chewy texture!
With these tips, you’ll be well on your way to mastering your Christmas candy. Happy candy making, and enjoy every sweet bite!
Storage & Reheating Instructions
Once you’ve made your delicious Christmas candy, it’s essential to store it properly to keep it fresh and tasty. Here’s how to do it:
First and foremost, let your candy cool completely before storing it. This helps prevent any condensation from forming that can make it sticky. Once cooled, transfer the pieces into an airtight container. I like to use glass jars or plastic containers with tight-fitting lids. Not only do they keep the candy fresh, but they also look super festive on the countertop!
When stored correctly, your Christmas candy can last for up to two weeks. Just make sure to keep it in a cool, dry place away from direct sunlight. If you live in a particularly warm climate, consider placing it in the fridge, but be sure to let it come to room temperature before enjoying it again. This will help restore some of that delightful chewy texture!
As for reheating, you usually won’t need to! However, if your candy does become a bit too hard over time, you can try placing it in a microwave for just a few seconds. But be super careful not to overdo it! Just a quick zap should be enough to soften it slightly without melting it. Enjoy your homemade Christmas candy, and may it bring sweet smiles to all who taste it!
Nutritional Information
When it comes to enjoying your homemade Christmas candy, it’s always nice to know what you’re indulging in! Here’s an estimated breakdown of the nutritional values for one piece of this delightful treat:
- Calories: 90
- Sugar: 15g
- Sodium: 5mg
- Fat: 0g
- Saturated Fat: 0g
- Carbohydrates: 22g
- Fiber: 0g
- Protein: 0g
- Cholesterol: 0mg
Keep in mind that these values are estimates and can vary based on the specific ingredients used and the size of each piece. So, while you’re enjoying the festive flavors, just remember to indulge in moderation and savor every sweet bite of your homemade Christmas candy!
FAQ Section
Q1. Can I use different extracts in this Christmas candy recipe?
Absolutely! While vanilla and peppermint are traditional favorites, feel free to experiment with other extracts. Almond, orange, or even coconut can add unique flavors to your candy. Just remember to adjust the amounts to suit your taste!
Q2. What should I do if my candy mixture crystallizes?
Don’t worry if your mixture starts to crystallize! This can happen if the sugar is stirred too much while cooking or if any sugar crystals touch the sides of the pan. If you see crystallization forming, you can try adding a tiny bit of water and heating it gently while stirring until it becomes smooth again. Prevention is key, so try to keep the sides of the pan clean while you cook!
Q3. How can I ensure my Christmas candy turns out chewy?
To achieve that perfect chewy texture, make sure you reach the right temperature of 300°F during cooking. This high temperature helps create that ideal candy consistency. Also, remember to stretch and pull the candy once it’s cool enough to handle; this aerates it and improves the texture!
Q4. Can I make this candy in advance for the holidays?
Definitely! This Christmas candy can be made a week or two in advance. Just be sure to store it in an airtight container in a cool, dry place. It makes a fantastic homemade gift or sweet treat to have on hand for holiday gatherings!
Q5. What’s the best way to package my Christmas candy for gifting?
Packaging your Christmas candy can be so much fun! I love using festive jars, clear treat bags, or colorful boxes. Line them with some tissue paper, and maybe add a little ribbon or a handmade tag. It not only keeps the candy fresh but also adds a personal touch that anyone would appreciate!

Christmas Candy: 7 Magical Steps to Sweet Memories
- Total Time: 35 minutes
- Yield: 2 pounds 1x
- Diet: Vegetarian
Description
A delightful treat perfect for the holiday season.
Ingredients
- 2 cups sugar
- 1 cup corn syrup
- 1 cup water
- 1 teaspoon vanilla extract
- 1/2 teaspoon peppermint extract
- Food coloring
Instructions
- Combine sugar, corn syrup, and water in a saucepan.
- Cook over medium heat until the mixture reaches 300°F.
- Remove from heat and add vanilla and peppermint extracts.
- Divide the mixture into bowls and color with food coloring.
- Pour the mixture onto a greased surface and let cool slightly.
- Stretch and pull the candy until it becomes opaque.
- Cut into pieces and let cool completely.
Notes
- Store in an airtight container.
- Can substitute extracts for different flavors.
- Be careful with hot sugar mixture.
- Prep Time: 15 minutes
- Cook Time: 20 minutes
- Category: Candy
- Method: Stovetop
- Cuisine: American
Nutrition
- Serving Size: 1 piece
- Calories: 90
- Sugar: 15g
- Sodium: 5mg
- Fat: 0g
- Saturated Fat: 0g
- Unsaturated Fat: 0g
- Trans Fat: 0g
- Carbohydrates: 22g
- Fiber: 0g
- Protein: 0g
- Cholesterol: 0mg
Keywords: christmas candy


