
Ah, the magic of the Christmas bake sale! There’s something truly special about gathering in the kitchen to whip up festive treats that fill the air with sweet aromas and warm holiday cheer. Whether it’s the laughter of friends and family or the joy of sharing delicious goodies with the community, these moments are what make this season so memorable. I can still remember my very first bake sale – the excitement of seeing my treats displayed, the smiles they brought, and the generous donations for a good cause. It’s a wonderful way to spread joy and connect with others, and trust me, you want to have the right recipes in your back pocket!
This collection of baked goods is my absolute go-to for any Christmas bake sale! It’s a simple yet delightful recipe that combines all the classic flavors we love, like chocolate and nuts, into one irresistible bite. Plus, it’s quick to throw together, making it ideal for those busy holiday weeks. With just a few ingredients and easy steps, you’ll have a tray full of deliciousness that will delight everyone! So, let’s dive into the ingredients and get started on creating something truly festive!
Ingredients List
Gathering the right ingredients is key to creating those scrumptious treats for your Christmas bake sale! Here’s what you’ll need:
- 2 cups all-purpose flour: Make sure it’s spooned into the measuring cup and leveled off for accuracy.
- 1 cup sugar: Regular granulated sugar works perfectly here to sweeten things up!
- 1/2 cup butter: Use unsalted butter, softened but not melted, to ensure a creamy texture when creaming with sugar.
- 2 eggs: Eggs should be at room temperature for better mixing; they help bind everything together.
- 1 cup milk: Whole milk is best for richness, but feel free to use whatever you have on hand.
- 2 teaspoons baking powder: This will give your baked goods that lovely lift, so check that it’s fresh!
- 1 teaspoon vanilla extract: Use pure vanilla if possible for that wonderful warm flavor.
- 1/2 teaspoon salt: Just a pinch to balance the sweetness and enhance the flavors.
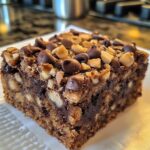
- 1 cup chocolate chips: Semi-sweet chocolate chips are a classic choice, but you can mix it up with milk or dark chocolate if you prefer.
- 1 cup chopped nuts: Walnuts or pecans add a delightful crunch and flavor, but you can leave them out if you have nut allergies.
Make sure you have everything ready before you start baking. Trust me, it makes the process so much smoother and more enjoyable!
How to Prepare Instructions
Now that you’ve gathered all those wonderful ingredients, it’s time to bring them together in a delightful mix! Follow these steps for a smooth baking experience:
- Preheat your oven: Start by preheating your oven to 350°F (175°C). This is crucial for ensuring even baking, so don’t skip it!
- Cream the butter and sugar: In a large mixing bowl, cream together the softened butter and sugar until the mixture is light and fluffy. This usually takes about 2-3 minutes. You want it to look pale and airy!
- Add the eggs: Crack the eggs in one at a time, mixing well after each addition. This helps to incorporate air and adds to the cake’s fluffiness.
- Stir in the vanilla: Pour in the vanilla extract and mix until everything is well combined. Trust me, the smell is heavenly!
- Combine dry ingredients: In a separate bowl, whisk together the flour, baking powder, and salt. This step is important as it ensures the leavening agent is evenly distributed throughout the flour.
- Mix wet and dry ingredients: Gradually add the dry mixture to the wet ingredients, alternating with the milk. Start and finish with the dry ingredients. Mix until just combined – don’t overdo it! A few flour streaks are okay.
- Fold in the goodies: Gently fold in the chocolate chips and chopped nuts using a spatula. This keeps the batter light and incorporates those delicious bits evenly.
- Prepare to bake: Pour the batter into a greased baking pan, spreading it out evenly. This ensures that each piece bakes uniformly!
- Bake: Place the pan in the preheated oven and bake for 30-35 minutes. Keep an eye on it, and use the toothpick test: it should come out clean or with a few moist crumbs.
- Cool and serve: Once baked, let it cool in the pan for about 10 minutes before transferring it to a wire rack to cool completely. This makes cutting much easier!
And there you have it! A simple and straightforward process that leads to delicious baked treats perfect for your Christmas bake sale. Enjoy the process, and don’t forget to sneak a piece while it’s still warm!
Why You’ll Love This Recipe
This festive recipe is a must-have for your Christmas bake sale, and here’s why:
- Quick and Easy: With just 15 minutes of prep time, you can whip up a batch of these delightful treats without spending all day in the kitchen!
- Irresistible Flavor: The combination of chocolate chips and crunchy nuts creates a flavor explosion that everyone will love. It’s the perfect balance of sweet and satisfying.
- Perfect for Sharing: This recipe yields 24 pieces, making it ideal for sharing with friends, family, or even your local community. Everyone will be clamoring for more!
- Versatile: Feel free to mix and match your favorite add-ins or toppings. This recipe is a blank canvas for your baking creativity!
- Make Ahead: You can bake these goodies in advance and store them, so you’re always prepared for unexpected guests or last-minute bake sale requests.
Trust me, once you taste these treats, you’ll see why they’re a staple in my holiday baking repertoire!
Tips for Success
To ensure your baked goods turn out perfectly every time, keep these tips in mind:
- Use room temperature ingredients: Bring your butter, eggs, and milk to room temperature before mixing. This helps them blend together smoothly, creating a better texture.
- Don’t overmix: When combining your wet and dry ingredients, mix just until everything is incorporated. Overmixing can lead to a dense texture, and nobody wants that!
- Check your oven temperature: Ovens can often be off by a few degrees. Invest in an oven thermometer to ensure it’s at the right temperature for baking.
- Let the batter rest: If you have a few extra minutes, let the batter sit for about 5-10 minutes before baking. This can help improve the crumb structure.
- Cool properly: Allow your baked goods to cool in the pan for about 10 minutes before transferring them to a wire rack. This helps set the texture and makes cutting easier later on!
These little adjustments can make a world of difference, so don’t skip them! Happy baking!
Variations
One of the best things about this recipe is how adaptable it is! If you’re feeling adventurous or want to switch things up for your Christmas bake sale, here are some fun variations to consider:
- Different Chocolates: Swap out the semi-sweet chocolate chips for white chocolate or even butterscotch chips for a different flavor profile. Yum!
- Fruity Twist: Add a cup of dried cranberries or chopped dried apricots to give your treats a festive fruity burst. They add a lovely chewiness!
- Spicy Kick: Incorporate some warm spices like cinnamon or nutmeg into the batter for that extra holiday warmth. Just a teaspoon or so can make a big difference!
- Nut Choices: Experiment with different nuts like pecans, almonds, or even macadamia nuts for a delightful crunch. Each nut brings its own unique flavor!
- Gluten-Free Version: For a gluten-free option, use a 1:1 gluten-free flour blend. It works beautifully and ensures everyone can enjoy your treats!
These variations let you put your personal spin on this classic recipe, ensuring that every bake sale treat is as unique as the holiday spirit itself!
Storage & Reheating Instructions
Once you’ve baked these delightful treats and shared them at your Christmas bake sale, you’ll likely want to save some for later. Here’s how to store your goodies properly:
- Storing: Allow your baked treats to cool completely on a wire rack. Once cooled, place them in an airtight container to keep them fresh. If you have multiple layers, separate them with parchment paper to prevent sticking.
- Freezing: These treats freeze beautifully! Wrap them individually in plastic wrap and then place them in a freezer-safe bag or container. They can be frozen for up to three months. Just remember to label them with the date!
- Reheating: When you’re ready to enjoy your treats again, simply take out the desired amount. For a quick reheat, pop them in the microwave for about 15-20 seconds. If you prefer them warm from the oven, bake at 350°F (175°C) for about 5-10 minutes until heated through.
Following these steps will ensure your delicious creations stay fresh and tasty, ready to bring joy whenever you need a sweet treat!
Nutritional Information
When it comes to enjoying these delicious treats, it’s good to have an idea of what’s inside! Here’s a breakdown of the nutritional information per piece:
- Calories: 200
- Sugar: 15g
- Sodium: 150mg
- Fat: 8g
- Saturated Fat: 5g
- Carbohydrates: 30g
- Protein: 3g
- Fiber: 1g
- Cholesterol: 30mg
Keep in mind that nutritional values can vary based on the specific ingredients and brands you use, so consider this a rough estimate. Enjoy these festive goodies with joy and moderation as part of your holiday celebrations!
FAQ Section
Q1. Can I make these treats ahead of time for the Christmas bake sale?
Absolutely! You can bake these goodies a day or two in advance. Just store them in an airtight container to keep them fresh. They actually taste even better after resting a bit!
Q2. What can I substitute for the butter in this recipe?
If you’re looking for a dairy-free option, you can use coconut oil or a plant-based butter substitute. Just make sure it’s softened for easy mixing!
Q3. How do I know when the baked goods are done?
The toothpick test is your best friend! Insert a toothpick in the center, and if it comes out clean or with a few moist crumbs, they’re ready. Keep an eye on them to avoid overbaking!
Q4. Can I use different types of nuts?
Of course! Feel free to swap in your favorite nuts like pecans, almonds, or even leave them out entirely if you prefer a nut-free version.
Q5. How should I store leftovers after the bake sale?
Make sure they cool completely, then place them in an airtight container. They’ll stay fresh at room temperature for a few days, or you can freeze them for longer storage!
Christmas Bake Sale: 7 Irresistible Treats to Delight
- Total Time: 50 minutes
- Yield: 24 servings 1x
- Diet: Vegetarian
Description
A festive collection of baked goods perfect for a Christmas bake sale.
Ingredients
- 2 cups all-purpose flour
- 1 cup sugar
- 1/2 cup butter
- 2 eggs
- 1 cup milk
- 2 teaspoons baking powder
- 1 teaspoon vanilla extract
- 1/2 teaspoon salt
- 1 cup chocolate chips
- 1 cup chopped nuts
Instructions
- Preheat the oven to 350°F (175°C).
- In a bowl, cream together the butter and sugar.
- Add the eggs one at a time, mixing well after each addition.
- Stir in the vanilla extract.
- In another bowl, combine flour, baking powder, and salt.
- Gradually add the dry ingredients to the wet mixture.
- Pour in the milk and mix until smooth.
- Fold in chocolate chips and nuts.
- Pour the batter into a greased baking pan.
- Bake for 30-35 minutes.
- Allow to cool before cutting into pieces.
Notes
- Store in an airtight container.
- Can be frozen for later use.
- Prep Time: 15 minutes
- Cook Time: 35 minutes
- Category: Dessert
- Method: Baking
- Cuisine: American
Nutrition
- Serving Size: 1 piece
- Calories: 200
- Sugar: 15g
- Sodium: 150mg
- Fat: 8g
- Saturated Fat: 5g
- Unsaturated Fat: 2g
- Trans Fat: 0g
- Carbohydrates: 30g
- Fiber: 1g
- Protein: 3g
- Cholesterol: 30mg
Keywords: christmas bake sale


