
Let me tell you about the cake that turned me into a baking fanatic – my Black Velvet Cake. The first time I made it, I knew I’d found something special. That first bite? Pure magic. A deep, dark chocolate flavor so rich it feels like velvet on your tongue, with a moistness that makes you close your eyes and just savor it. I’ll never forget the look on my husband’s face when he tried it – “This is better than any bakery,” he mumbled through a mouthful of crumbs. What makes it so good? That perfect harmony of strong coffee enhancing the cocoa, buttermilk keeping it tender, and just enough sugar to make it indulgent without being cloying. This isn’t just dessert – it’s an experience.
Why You’ll Fall Head Over Heels for This Black Velvet Cake
Oh honey, let me count the ways this cake will steal your heart! First off, that texture – imagine sinking your fork into something so moist it practically melts, yet sturdy enough to hold gorgeous layers of frosting. The secret? Buttermilk and coffee team up to create pure magic in every bite.
Here’s what makes it irresistible:
- Cocoa bliss: We’re talking deep, dark chocolate flavor that lingers – none of that weak, powdery stuff
- Foolproof mixing: Just whisk everything together in one bowl (my kind of cleanup!)
- Crowd-pleaser: I’ve served this at everything from book club to birthday parties – plates always come back empty
- Better next day: Like a fine wine, the flavors deepen if you can resist eating it immediately (good luck with that!)
Trust me, once you try this black velvet beauty, you’ll understand why it’s my most requested recipe. That first slice? Consider yourself warned – you’ll be going back for seconds.
The Magic Ingredients for Black Velvet Cake
Here’s where the alchemy happens! Every ingredient in this black velvet cake has a purpose – I learned that the hard way after a disastrous baking experiment years ago (let’s just say baking soda and baking powder aren’t interchangeable!). Gather these goodies and let’s make some magic:
- 2 cups all-purpose flour – spooned and leveled, not packed (I learned this lesson with a dense hockey puck of a cake once!)
- 2 cups granulated sugar – the perfect amount for that rich-but-not-too-sweet balance
- ¾ cup unsweetened cocoa powder – go for the good stuff here, preferably Dutch-process for that deep color
- 2 tsp baking soda + 1 tsp baking powder – our leavening dream team for the perfect rise
- 1 tsp salt – trust me, it makes the chocolate sing
- 2 large eggs – at room temperature (I pop cold eggs in warm water for 5 minutes if I forget to take them out)
- 1 cup buttermilk – room temp, or make your own with 1 tbsp vinegar + milk to equal 1 cup
- 1 cup strong brewed coffee – cooled (don’t worry, you won’t taste coffee – it just amplifies the chocolate!)
- ½ cup vegetable oil – keeps it moist without weighing it down
- 2 tsp vanilla extract – the real stuff, please!
See how each ingredient plays its part? That’s what makes this cake so special – every measurement and prep step matters for that perfect velvety bite.
The Simple Tools You’ll Need for Black Velvet Cake
Here’s the beautiful part – you don’t need fancy equipment to make this showstopper! Just grab these basics from your kitchen:
- Two 9-inch round cake pans – my trusty aluminum ones have baked dozens of these beauties
- A sturdy whisk and mixing bowl – no stand mixer required (though it does make creaming easier)
- Wire cooling rack – crucial for preventing soggy bottoms
- Fine mesh sifter – for lump-free cocoa powder (worth the extra step!)
- Rubber spatula – to scrape every last bit of that glorious batter
That’s it! No special gadgets – just good old-fashioned baking tools that let the ingredients shine.
The Foolproof Steps to Perfect Black Velvet Cake
Alright, let’s get baking! I’ve made this cake so many times I could probably do it in my sleep, but I’ll walk you through each step carefully. Follow these instructions, and you’ll have the most incredible black velvet cake ready to impress.
Preparing the Batter – Where Magic Happens
First things first – preheat that oven to 350°F and grease your pans really well. I like to use butter and a dusting of cocoa powder instead of flour (no white spots on our beautiful black cake!). Now, grab your biggest bowl and sift together all the dry ingredients – flour, sugar, cocoa powder, baking soda, baking powder, and salt. Sifting might seem like extra work, but trust me, it makes all the difference in getting that velvety texture.
Make a well in the center and add your eggs, buttermilk, coffee, oil, and vanilla. Here’s my secret – whisk the wet ingredients together briefly before incorporating them into the dry. Mix until just combined – overmixing leads to tough cake, and we want melt-in-your-mouth tender!
Baking and Cooling – Patience is Key
Divide that gorgeous dark batter evenly between your prepared pans – I use a kitchen scale to be precise. Slide them into the middle rack of your preheated oven and set your timer for 30 minutes. Don’t open the oven door before then! At 30 minutes, do the toothpick test – it should come out with a few moist crumbs, not wet batter.
When perfect, pull them out and let them cool in the pans for exactly 10 minutes – any longer and they’ll steam, any less and they might break. Then, carefully invert onto wire racks to cool completely before frosting. I know it’s hard to wait, but warm cake melts frosting into a sad mess!
Pro Tips for the Ultimate Black Velvet Cake
After baking this cake more times than I can count, I’ve picked up some game-changing tricks:
- Cocoa matters: Splurge on Dutch-process cocoa powder – that deep color and rich flavor are worth it
- Temperature is key: Room temp ingredients blend smoothly (cold eggs = lumpy batter)
- Don’t skip the coffee: Even if you hate coffee, it enhances chocolate flavor without tasting like coffee
- Baking soda hack: If your batter seems too thick, add 1-2 tbsp extra buttermilk
- Cool completely: I know it’s torture, but frosting warm cake leads to sliding disaster!
These little touches turn a good cake into a legendary one. Your future self will thank you!
Ingredient Swaps That Actually Work
Ran out of buttermilk? No problem! Over the years, I’ve tested every substitution in the book for this black velvet cake. Here are my tried-and-true swaps that won’t ruin your masterpiece:
- Buttermilk substitute: Mix 1 tbsp lemon juice or vinegar with 1 cup milk (let it sit 5 minutes to curdle)
- Dairy-free option: Plain almond milk + 1 tbsp vinegar works shockingly well
- Gluten-free flour: Use a 1:1 GF baking blend (I like King Arthur’s)
- Oil alternative: Melted coconut oil works, but the cake might be slightly denser
- No coffee? : Hot water works in a pinch, but the flavor won’t be as deep
Just remember – first time bakers should stick to the original recipe. These are my emergency solutions when the pantry rebels!
Serving Suggestions That’ll Make Your Black Velvet Cake Shine
Oh, the possibilities! This cake is stunning on its own, but a few simple touches take it over the top. My absolute favorite? A dollop of barely-sweetened whipped cream and fresh raspberries – the tart berries cut through the richness perfectly. For parties, I dust the top with edible gold flakes (so fancy, so easy!). Coffee lovers will adore it with an espresso on the side – the flavors dance together beautifully. And if you’re feeling indulgent, warm up a slice and add a scoop of vanilla bean ice cream. Honestly, it’s hard to go wrong – even straight from the pan with a fork counts as “serving” in my book!
Keeping Your Black Velvet Cake Fresh and Fabulous
Here’s the beautiful thing about this cake – it actually gets better after a day! To keep it at its velvety best, store it in an airtight container at room temperature. No fridge needed – that just dries it out. If you must refrigerate (maybe for a frosted cake), let slices come to room temp before serving – cold mutes all those amazing chocolate flavors. For longer storage, wrap individual slices tightly in plastic wrap and freeze for up to 3 months. A quick 10-second microwave zap brings back that just-baked magic!
The Skinny on Black Velvet Cake Nutrition
Let’s be real – we’re not eating chocolate cake for diet points! But since folks ask, here’s the scoop per slice (based on my exact ingredients): About 320 calories, with that perfect balance of 12g fat to satisfy and 3g fiber to… well, let’s just say it’s worth every bite! Remember, nutrition varies based on your specific ingredients and brands. My motto? Life’s too short not to enjoy amazing cake – just savor each luxurious mouthful!
Your Black Velvet Cake Questions – Answered!
After sharing this recipe with countless friends, I’ve heard all the questions! Here are the ones that pop up most often:
Can I leave out the coffee? Technically yes, but please don’t! The coffee doesn’t make it taste like coffee – it just makes the chocolate flavor richer and deeper. If you absolutely must, use hot water instead, but you’ll miss that magical depth.
How long does black velvet cake stay fresh? At room temperature in an airtight container, it’s dreamy for 3-4 days. The flavors actually improve on day two! You can freeze unfrosted layers for up to 3 months – just wrap them tightly in plastic.
Why did my cake sink in the middle? Oh honey, we’ve all been there! Usually it means the batter was overmixed or the oven wasn’t hot enough. Next time, mix just until combined and check your oven temp with a thermometer – they’re often off by 25 degrees!
Can I make cupcakes instead? Absolutely! Fill liners ⅔ full and bake at 350°F for 18-22 minutes. They make adorable individual treats – perfect for bake sales or lunchboxes!
Final Thoughts
There you have it – my all-time favorite cake recipe that never fails to impress! I’d love to hear how your black velvet cake turns out – tag me in your baking adventures or leave a review. Happy baking, and may your cake be as velvety as mine!
Print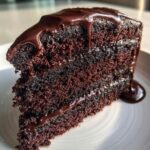
Irresistible Black Velvet Cake Recipe for 2 Blissful Layers
- Total Time: 55 mins
- Yield: 12 servings 1x
- Diet: Vegetarian
Description
A rich and moist chocolate cake with a deep, velvety texture, perfect for special occasions.
Ingredients
- 2 cups all-purpose flour
- 2 cups granulated sugar
- 3/4 cup unsweetened cocoa powder
- 2 tsp baking soda
- 1 tsp baking powder
- 1 tsp salt
- 2 large eggs
- 1 cup buttermilk
- 1 cup strong brewed coffee, cooled
- 1/2 cup vegetable oil
- 2 tsp vanilla extract
Instructions
- Preheat oven to 350°F. Grease and flour two 9-inch round cake pans.
- In a large bowl, sift together flour, sugar, cocoa powder, baking soda, baking powder, and salt.
- Add eggs, buttermilk, coffee, oil, and vanilla. Mix until smooth.
- Divide batter evenly between the prepared pans.
- Bake for 30-35 minutes or until a toothpick inserted comes out clean.
- Let cakes cool in pans for 10 minutes, then transfer to a wire rack.
- Frost and assemble the cake once fully cooled.
Notes
- For extra richness, use Dutch-process cocoa powder.
- Ensure all ingredients are at room temperature for best results.
- Store leftovers in an airtight container.
- Prep Time: 20 mins
- Cook Time: 35 mins
- Category: Dessert
- Method: Baking
- Cuisine: American
Nutrition
- Serving Size: 1 slice
- Calories: 320
- Sugar: 25g
- Sodium: 380mg
- Fat: 12g
- Saturated Fat: 2g
- Unsaturated Fat: 9g
- Trans Fat: 0g
- Carbohydrates: 52g
- Fiber: 3g
- Protein: 5g
- Cholesterol: 35mg
Keywords: black velvet cake, chocolate cake, dessert recipe


