Beer-Can Chicken: 1 Secret to Perfectly Crispy Skin
Beer-Can Chicken is a unique cooking technique that results in **juicy** and **flavorful** chicken with a **crispy skin**. This recipe not only saves you time but also guarantees an impressive dish that will leave everyone at your table wanting more. Have you ever struggled to get your chicken skin crispy while keeping the meat tender? With this method, you’ll achieve that perfect balance of textures and flavors.
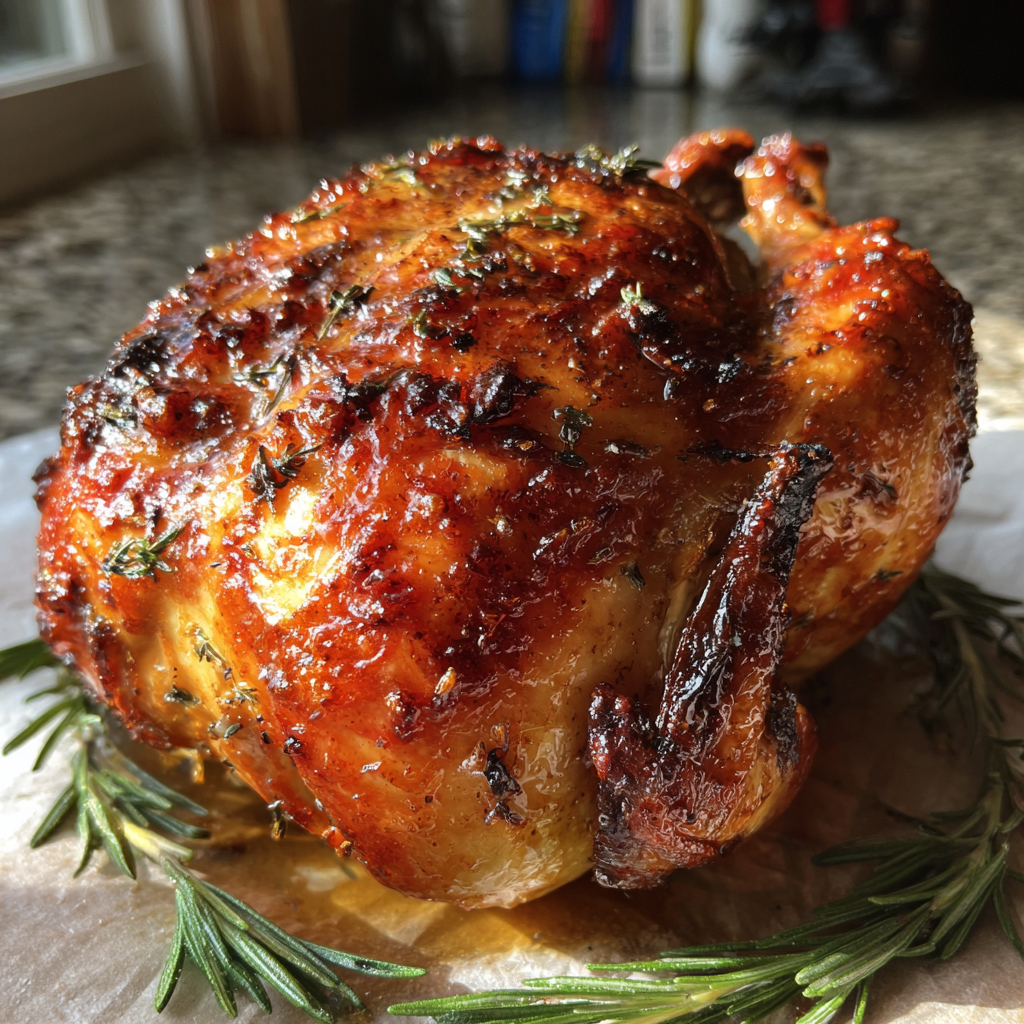
Imagine the aroma wafting through your kitchen as the beer-infused chicken roasts to golden perfection. The **golden-brown skin** glistens as it cooks, while the tender meat remains juicy inside. Each bite is a delightful explosion of flavor, enhanced by the spices and the beer. The combination of the **smoky**, **savory** spices and the fresh herbs adds a wonderful touch to this crowd-pleaser. Your guests will be amazed at how you managed to create such a succulent dish!
Beer-Can Chicken is an excellent choice for family gatherings, cookouts, or even a special occasion. The beauty of this dish lies in its simplicity and the ability to customize it to your taste. By using different types of beer, spices, or even herbs, you can create a unique flavor profile that suits your preferences. Whether you’re looking for a spicy kick or a more herbaceous flavor, the options are endless. So, what are you waiting for? Let’s dive into the health benefits and uniqueness of this recipe!
Health Benefits: The main ingredient in this recipe, chicken, offers several health benefits. First and foremost, it is a **great source of protein**, essential for muscle growth and repair. A 3-ounce serving of chicken provides about 26 grams of protein, making it an excellent choice for those looking to build muscle or maintain a healthy weight.
Additionally, chicken is rich in **B vitamins**, especially Vitamin B6 and niacin, which play a vital role in energy metabolism and brain health. Moreover, the inclusion of **olive oil** in this recipe introduces healthy fats, specifically **monounsaturated fats**, which can help lower bad cholesterol levels and reduce the risk of heart disease.
Furthermore, spices like **paprika** and **garlic powder** not only enhance the flavor but also add nutritional benefits. Paprika contains **vitamin A**, which is crucial for healthy vision and immune function, while garlic has been linked to various health benefits, including improved cardiovascular health and anti-inflammatory properties.
Interestingly, did you know that cooking chicken with beer can improve its flavor profile? The **alcohol** in beer acts as a tenderizer, helping to break down the proteins in the meat, resulting in a more succulent texture. Plus, the carbonation from the beer helps to create that crispy skin we all desire!
Why This Recipe: This Beer-Can Chicken recipe stands out because it harnesses the power of steam and flavor infusion to create a unique cooking experience. Traditional roasting methods often leave the chicken either dry or unevenly cooked. However, by using a can of beer, you create a **moist cooking environment** that allows the chicken to cook evenly while infusing it with delicious flavors.
This version is also unique because of the spice blend used. The combination of **paprika**, **garlic powder**, and **cayenne pepper** (if desired) creates a flavor that is both savory and slightly spicy, appealing to a wide range of palates. Additionally, it’s incredibly adaptable, making it a fantastic choice for families or novice cooks looking to impress at their next gathering.
Moreover, this recipe has been tried and tested by countless families and is perfect for special occasions or a casual weeknight dinner. You can even get the kids involved in preparing the spices and seasoning the chicken, making it a fun family activity.
Quick Summary: This Beer-Can Chicken recipe requires a prep time of about 15 minutes and a cook time of approximately 1.5 hours, depending on your grill or oven temperature. It serves up to 4-6 people, making it perfect for families or small gatherings. This recipe is suitable for beginners, and it’s an excellent option for weeknight dinners, meal prep, or when entertaining guests.
What is Beer-Can Chicken?
Beer-Can Chicken is a cooking method that involves placing a whole chicken over an open can of beer while grilling or roasting. The beer steams the chicken from the inside, keeping it moist while the outside crisps up beautifully. This technique not only creates flavorful chicken but also makes for an impressive presentation at any meal.
Why You Will Love This Recipe
- Results in incredibly **crispy skin** that everyone loves.
- Flavors are customizable based on your preferred spices and beer choice.
- Easy to prepare, making it suitable for beginners.
- Perfect for outdoor gatherings and cookouts.
- Provides a unique and entertaining cooking experience.
Ingredients You Need
- 1 whole chicken (about 4-5 pounds) – The star of the dish, providing the base for this delicious recipe.
- 1 can of beer (your choice) – Adds moisture and flavor; choose a lager or ale for best results.
- 2 tablespoons olive oil – Helps the spices adhere and promotes crispy skin.
- 2 tablespoons paprika – Provides color and a hint of smoky flavor.
- 1 tablespoon garlic powder – Adds depth and richness to the overall taste.
- 1 tablespoon onion powder – Complements the garlic and enhances flavor.
- 1 tablespoon salt – Essential for bringing out the flavors of the chicken.
- 1 teaspoon black pepper – Adds a mild heat and enhances flavor.
- 1 teaspoon cayenne pepper (optional) – For those who enjoy a little extra heat.
- Fresh herbs (like rosemary or thyme) – For garnish, adding freshness and a burst of flavor.
How to Make Beer-Can Chicken Step by Step
- Preheat your grill to medium heat (around 350°F) or preheat your oven to 375°F.
- Rinse the chicken under cold water and pat it dry with paper towels. This step is crucial for achieving that **crispy skin**.
- In a small bowl, mix together the olive oil, paprika, garlic powder, onion powder, salt, black pepper, and cayenne pepper (if using).
- Rub the spice mixture all over the chicken, making sure to get under the skin for maximum flavor.
- Open the can of beer and drink or pour out half of it. (Be sure to save the can!)
- Carefully place the can of beer inside the chicken cavity. Set the chicken upright on a grill-safe pan or directly on the grill grates.
- Grill the chicken for about 1 to 1.5 hours, or until the internal temperature reaches 165°F in the thickest part of the thigh.
- Once cooked, carefully remove the chicken from the grill. Let it rest for 10-15 minutes before carving.
- Garnish with fresh herbs and serve.
Pro Tip: Use a meat thermometer to check the internal temperature for the best results!
Expert Tips for Best Results
- Always use a whole chicken for the best results; cut-up chicken will not work.
- Choose a beer that you enjoy drinking; the flavor will transfer to the chicken.
- Let the chicken sit at room temperature for about 30 minutes before cooking for even cooking.
- Experiment with different spices and herbs based on your taste preferences.
- Make sure your grill or oven is adequately preheated to avoid uneven cooking.
- Let the chicken rest after cooking to allow the juices to redistribute for optimal juiciness.
Variations and Substitutions
- For a **gluten-free option**, use a gluten-free beer or substitute with chicken broth.
- Try different herbs for flavor; **thyme** and **oregano** work well too.
- For a **spicy version**, add additional cayenne or chili powder to the spice mix.
- If you’re in a hurry, use a **rotisserie chicken** and apply the spice rub before grilling for a quick dinner.
How to Serve and Store
Beer-Can Chicken pairs excellently with sides like grilled vegetables, coleslaw, or a fresh garden salad. For storage, you can keep leftovers in the fridge for up to 3 days. If you want to freeze the chicken, wrap it tightly in aluminum foil or freezer-safe bags, and it can last up to 3 months. To reheat, place it in the oven at 350°F until heated through for the best texture.
Frequently Asked Questions
What type of beer is best for Beer-Can Chicken?
Any beer you enjoy will work, but lighter ales or lagers are recommended for the best flavor infusion.
Can I use a different cooking method?
Yes, Beer-Can Chicken can be roasted in the oven or even cooked in a smoker for a unique flavor.
How can I ensure the chicken is cooked through?
Use a meat thermometer to check that the internal temperature reaches 165°F.
Can I make this recipe without a grill?
Absolutely! You can bake it in the oven; just follow the temperature and timing guidelines.
What should I do with leftover chicken?
Leftover chicken can be shredded for salads, sandwiches, or tacos. Store it in an airtight container in the fridge.
Is this recipe suitable for meal prep?
Yes, Beer-Can Chicken is great for meal prep; leftovers can be stored and used throughout the week.
In conclusion, Beer-Can Chicken is an exciting way to elevate your cooking while enjoying **crispy skin** and **tender meat**. It’s simple, flavorful, and perfect for a variety of occasions. Try this recipe today and leave a comment below!
Print
Beer-Can Chicken: 1 Secret to Perfectly Crispy Skin
Description
Juicy and flavorful, this Beer-Can Chicken recipe ensures perfectly cooked chicken with a crispy skin and a tender interior. The beer infuses the meat with moisture and flavor, making it a favorite for cookouts and gatherings.
Ingredients
- 1 whole chicken (about 4–5 pounds)
- 1 can of beer (your choice)
- 2 tablespoons olive oil
- 2 tablespoons paprika
- 1 tablespoon garlic powder
- 1 tablespoon onion powder
- 1 tablespoon salt
- 1 teaspoon black pepper
- 1 teaspoon cayenne pepper (optional for heat)
- Fresh herbs (like rosemary or thyme) for garnish
Instructions
- Preheat your grill to medium-high heat (about 375°F).
- In a small bowl, mix the olive oil, paprika, garlic powder, onion powder, salt, black pepper, and cayenne pepper to form a rub.
- Remove the giblets from the chicken and pat the chicken dry with paper towels.
- Rub the spice mixture all over the chicken, making sure to get under the skin for maximum flavor.
- Open the can of beer and take a few sips (or pour out some beer) to make space for the chicken.
- Insert the beer can into the cavity of the chicken, ensuring it stands upright.
- Place the chicken upright on the grill, using the can as a base to hold it steady.
- Close the grill lid and cook for about 1.5 hours, or until the internal temperature reaches 165°F in the thickest part of the thigh.
- Carefully remove the chicken from the grill using tongs or a chicken holder. Let it rest for 10 minutes before carving.
- Garnish with fresh herbs and serve.
Notes
- For extra flavor, you can marinate the chicken in the rub overnight.
- Feel free to experiment with different types of beer for varied flavors.
- Make sure to monitor the grill temperature to maintain consistent cooking.
Nutrition
- Serving Size: 1 serving
- Calories: 350
- Sodium: 600
- Fat: 20
- Carbohydrates: 5
- Protein: 40
Keywords: Beer-Can Chicken, Grilled Chicken, BBQ Chicken, Beer Chicken Recipe, Easy Chicken Recipe, Outdoor Cooking


