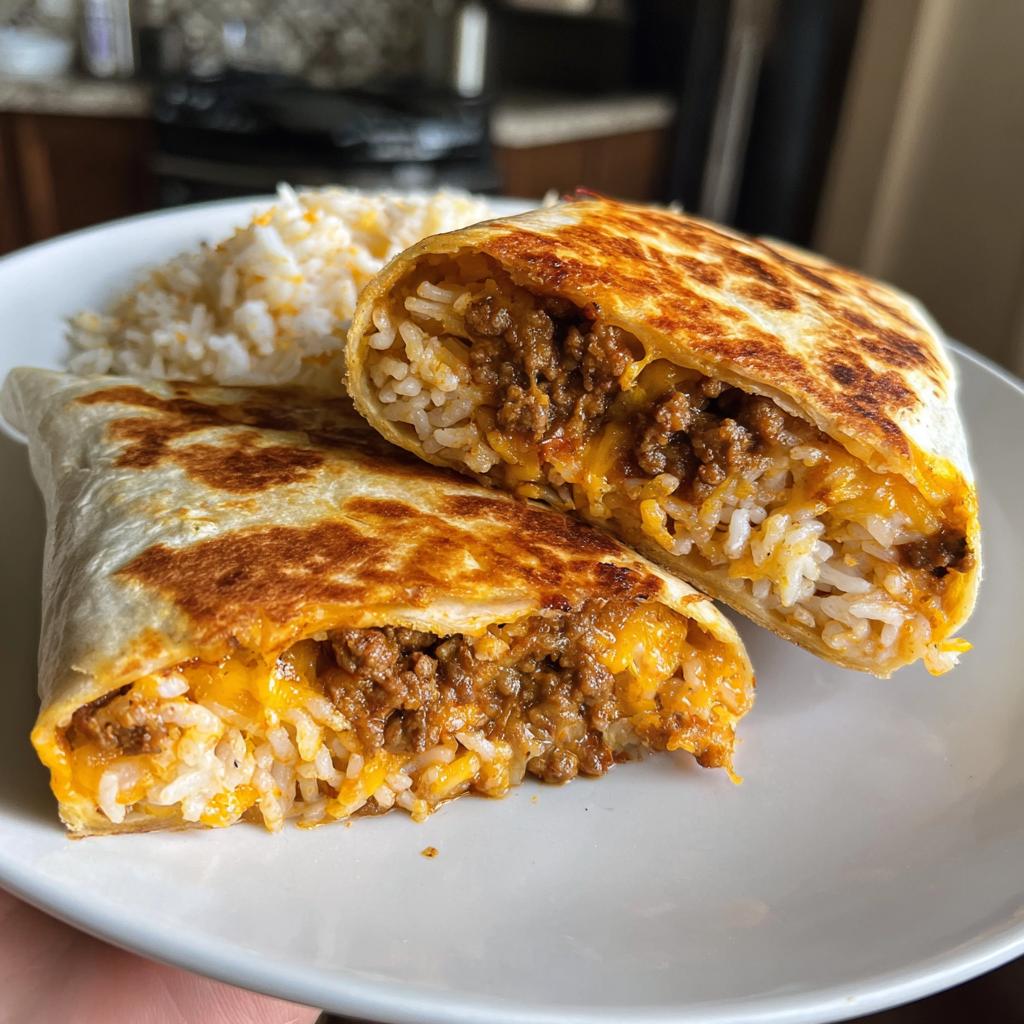
Oh my gosh, you have to try these gegrillte Cheeseburger-Burritos mit Reis und Käse! Picture this: It’s Tuesday night, the kids are starving, and I’m staring at half a pound of ground beef wondering how to jazz up taco night *again*. Then it hits me—why not smash together our favorite burger flavors with the easy, handheld goodness of a burrito? One bite and we were hooked. The crispy grilled tortilla gives way to that juicy beef, melty cheese, and just enough rice to make it hearty without being heavy. After years of perfecting grilled recipes (I may have a slight obsession with my cast iron skillet), this mashup became our weeknight hero. Trust me—it’s like a cheeseburger and burrito had the most delicious baby.

Why You’ll Love These Gegrillte Cheeseburger-Burritos mit Reis und Käse
Listen, these aren’t just any burritos—they’re pure magic wrapped in a tortilla! Here’s why they’ll become your new go-to:
- Weeknight lifesaver: From skillet to table in under 30 minutes (yes, I timed it!). Perfect for those “I forgot to meal plan” nights.
- Flavor bomb: That Worcestershire-ketchup-mustard combo? It tastes exactly like biting into a juicy diner cheeseburger, but with bonus crispy edges.
- Kid-approved: My picky eater actually eats onions now because they’re hidden in all that cheesy, beefy goodness. Parent win!
- Leftover dreams: They reheat shockingly well—just pop ’em back on the grill for a minute. Next-day lunch just got upgraded.
Pro tip: Make a double batch and freeze some. Future you will send present you a thank-you note.
Ingredients for Gegrillte Cheeseburger-Burritos mit Reis und Käse
Grab these simple ingredients—you might already have most in your kitchen! The magic happens when they all come together:
- 1 lb ground beef (80/20 blend) – That little bit of fat keeps these juicy. Leaner beef can dry out.
- 1 cup cooked white rice (cooled) – Day-old rice works great! Just break up any clumps with your fingers.
- 1 cup shredded cheddar cheese – I like sharp cheddar, but any melty cheese like Monterey Jack works.
- 4 large flour tortillas (10-inch) – Fresh tortillas fold without cracking—check the date on the package!
- 1/2 cup diced onions – About 1 small onion. Dice them small so they blend into the beef nicely.
- 1/4 cup ketchup – The classic burger flavor base. Use your favorite brand.
- 1/4 cup yellow mustard – Trust me, don’t skip this! It balances the sweetness.
- 1 tbsp Worcestershire sauce – That “what IS that amazing flavor?” secret weapon.
- 1 tsp garlic powder – Quick flavor boost since we’re not using fresh garlic here.
- Salt and pepper to taste – I do about 1/2 tsp salt and 1/4 tsp pepper to start.
Ingredient Notes & Substitutions
No stress if you need to swap things out—I’ve tested all these variations:
- Ground turkey or chicken works instead of beef—just add 1 tbsp olive oil to keep it moist.
- Gluten-free tortillas hold up surprisingly well on the grill if you warm them slightly first.
- Vegan? Use plant-based beef crumbles and dairy-free cheese. The Worcestershire sauce contains anchovies (look for vegan versions if needed).
- No Worcestershire? Mix 1 tbsp soy sauce + 1/2 tsp lemon juice as a quick fix.
- Spice lovers: Add 1/2 tsp smoked paprika or a dash of hot sauce to the beef mix!
See? No ingredient is a deal-breaker here. Use what you’ve got and make it yours!
How to Make Gegrillte Cheeseburger-Burritos mit Reis und Käse
Okay, let’s get cooking! I’ve made these so many times I could do it in my sleep, but here’s the foolproof method I’ve perfected after a few… let’s call them “learning experiences” (read: tortilla explosions). Follow these steps, and you’ll have golden, crispy burritos stuffed with all that cheeseburger goodness in no time.
Step 1: Cook the Beef Filling
First things first—get your skillet nice and hot over medium heat. Toss in that ground beef and break it up with a wooden spoon (my favorite tool for this—it’s like a mini workout!). You’ll want to hear that satisfying sizzle when the beef hits the pan.
Cook until it’s browned all over, about 5-6 minutes. Now, here’s a pro move: tilt the pan and spoon out the extra fat (I save a tablespoon in the pan for flavor). Add your diced onions and let them get friendly with the beef for 2 minutes—just until they turn translucent. That’s when you’ll stir in the ketchup, mustard, Worcestershire sauce, garlic powder, salt, and pepper. The smell at this point? Absolute heaven. Like a backyard burger joint in your kitchen.
Step 2: Mix in Rice and Cheese
Take the skillet off the heat—this next step is crucial. Dump in your cooked rice and shredded cheese while the beef mixture is still warm. Stir everything together quickly so the cheese starts melting into little pockets of gooey goodness. You’ll see the rice soaking up all those saucy burger flavors—this is what makes the filling so addictive!
Let it cool for about 5 minutes (hot filling = steamy, soggy tortillas, and nobody wants that). While you wait, lay out your tortillas on a clean surface. I like to warm them slightly in the microwave for 10 seconds—just enough to make them pliable without cooking them.
Step 3: Assemble and Grill Burritos
Time for the fun part! Spoon about 3/4 cup of filling onto each tortilla, slightly below center. Here’s my golden rule: leave a 2-inch border at the bottom and sides. Overstuffing leads to breakage, and we want these babies sealed tight!
Fold the bottom edge up over the filling, then fold in the sides like you’re wrapping a present. Roll it up tightly from the bottom, keeping those sides tucked in. If you’ve ever made a burrito at Chipotle, same idea—just with way better filling!
Now, heat a dry skillet or grill pan over medium heat (about 350°F if you’re using a thermometer). Place your burritos seam-side down first—this helps seal them. Grill for 2-3 minutes per side until you get those gorgeous golden-brown grill marks. Listen for that satisfying crackle when they’re perfectly crisp!
Let them rest for a minute before cutting (if you can wait—I know it’s hard). This helps the cheese set so your filling doesn’t spill out. Then? Dive in! That first crispy-cheesy-beefy bite is pure bliss.
Tips for Perfect Gegrillte Cheeseburger-Burritos mit Reis und Käse
After making these burritos more times than I can count (and yes, learning from my mistakes), here are my can’t-miss tips to make sure yours turn out amazing every single time:
1. Keep that skillet dry for maximum crispiness
I learned this the hard way—don’t add oil to the pan before grilling! The tortillas need direct contact with a dry, hot surface to get those perfect crispy grooves. If your filling leaked a bit (we’ve all been there), just wipe the pan between batches. Cast iron works best, but any heavy-bottomed pan will do the trick.
2. Roll ’em tight, tuck ’em right
The secret to no-spill burritos is all in the wrist action. After folding up the bottom edge, use your fingers to really tuck in those sides before rolling. Think of it like swaddling a baby—but way more delicious. If you’re struggling, place less filling next time. A perfectly wrapped half-full burrito beats an overflowing mess any day!
3. Let them rest like good bread
I know it’s tempting to dive right in, but trust me—waiting 60 seconds makes all the difference. That quick rest lets the cheese set up so when you cut or bite into it, the filling stays put instead of oozing out. Pro move: Use this time to wipe down counters or grab drinks so you’re not just staring hungrily at them.
4. Reheat with care
Leftovers? Lucky you! To keep that perfect texture, skip the microwave—it turns tortillas rubbery. Instead, pop them back in a dry skillet over medium-low heat for a minute per side. They’ll taste almost as good as fresh, with bonus extra-crispy edges. My kids fight over the last one every time!
Serving Suggestions for Gegrillte Cheeseburger-Burritos mit Reis und Käse
Okay, let’s be real—these burritos are absolutely delicious all on their own, but why stop there? Here are my favorite ways to serve them up for maximum enjoyment:
- The Classic Diner Combo: Pile on some crispy fries (sweet potato or regular) and a handful of dill pickle chips. It’s like your favorite burger joint meal, but way more fun to eat!
- Cool & Crunchy Side: A simple avocado salad with diced tomatoes, red onion, and lime juice cuts through the richness perfectly. I literally just toss everything together while the burritos grill.
- Extra Cheeseburger Vibes: Set out little bowls of burger toppings—shredded lettuce, sliced tomatoes, extra pickles, even caramelized onions if you’re feeling fancy. Let everyone customize their plate!
- Game Night Special: Cut them into 1-inch pinwheels (so pretty with the layers showing!) and serve with small cups of ketchup and mustard for dipping. Disappears faster than you can say “touchdown!”
My personal favorite? A cold beer or creamy milkshake alongside. The contrast of temperatures and textures is just *chef’s kiss*. But honestly? However you serve them, they’ll be gone before you know it!
Storage & Reheating
Okay, confession time—I rarely have leftovers of these burritos because they disappear so fast at my house! But when I do manage to save some (usually by hiding them in the veggie drawer), here’s how I keep them tasting fresh and crispy:
Fridge storage: Let your burritos cool completely before wrapping each one tightly in foil or popping them in an airtight container. They’ll stay delicious for up to 3 days this way. Pro tip: Write the date on the foil with a Sharpie so you don’t play the “is this still good?” guessing game.
Freezer magic: These burritos freeze like a dream! Wrap them individually in foil, then tuck them into a freezer bag. They’ll keep for 2-3 months—perfect for emergency meals. Just add a minute or two to the reheating time if cooking from frozen.
Reheating do’s and don’ts:
- DO use your oven or stovetop: Preheat to 350°F and bake foil-wrapped burritos for 10 minutes (15 if frozen), or crisp them in a dry skillet over medium-low heat for 2-3 minutes per side. That grill-marked magic comes right back!
- DON’T microwave unless you love soggy tortillas (trust me, you don’t). If you must, wrap in a paper towel and nuke for 30 seconds—but it’s never quite the same.
Fun fact: The filling actually tastes even better the next day as the flavors meld. Sometimes I make extra just to enjoy this bonus “improved” version!
Nutritional Information
Okay, let’s talk numbers—but first, my standard disclaimer: These estimates can vary depending on your specific ingredients and portion sizes. I used USDA data and my trusty kitchen scale to calculate these, but don’t stress over exact digits! This is about giving you a general idea so you can enjoy these burritos guilt-free.
Per serving (1 burrito):
- Calories: 450 (hey, it’s a full meal in one hand!)
- Protein: 25g (thanks to that beef and cheese combo)
- Carbohydrates: 40g (mostly from the tortilla and rice)
- Fiber: 2g (use whole wheat tortillas if you want more)
- Sugar: 5g (that’s the ketchup and natural sugars in the onion)
- Fat: 20g (8g saturated—worth every delicious bite)
- Sodium: 800mg (cut back on added salt if you’re watching this)
Now, before anyone panics about the numbers—remember, these are packed with protein to keep you full, and you can always tweak things! Swap in leaner beef or low-carb tortillas if you prefer. Personally? I think life’s too short not to enjoy that melty cheese and crispy tortilla in all its glory. Everything in moderation, right?
FAQs About Gegrillte Cheeseburger-Burritos mit Reis und Käse
I get asked about these burritos all the time—here are the most common questions that pop up (along with my very honest answers after making them approximately a zillion times):
“Can I freeze these cheeseburger burritos?”
Absolutely! In fact, I always stash a few in the freezer for emergency meals. Just wrap each cooled burrito tightly in foil, then slide them into a freezer bag. They’ll keep beautifully for 2-3 months. When hunger strikes, bake from frozen at 350°F for about 15-20 minutes—no thawing needed! The tortillas stay surprisingly crisp, though I’ll admit the cheese doesn’t get quite as oozy as fresh.
“What cheese works best for that melty burger vibe?”
Oh man, cheese experiments are my favorite part! Sharp cheddar gives that classic cheeseburger punch, but don’t stop there. Pepper Jack adds a nice kick, while Monterey Jack melts into creamy perfection. My secret combo? Half cheddar, half American cheese—it gives that nostalgic, diner-style meltiness. Just avoid pre-shredded bags if you can; the anti-caking coatings can make the texture grainy when melted.
“How do I spice these up for heat lovers?”
Yesss—let’s turn up the heat! Here are my go-to fiery upgrades:
- Mix 1/2 tsp chipotle powder or cayenne into the beef filling
- Swap regular mustard for spicy brown
- Add diced jalapeños (fresh or pickled) with the onions
- Top with sriracha mayo after grilling
Start small—you can always add more heat, but you can’t take it away! My husband likes when I make a “spicy batch” with all these additions, but the kids prefer their version mild. Either way, everyone gets their cheeseburger burrito fix.
Got more questions? Hit me up in the comments—I could talk about these burritos all day!
Ready to Make These Gegrillte Cheeseburger-Burritos?
Alright, my fellow burger-burrito enthusiasts—it’s go time! These little flavor bombs are just waiting to happen in your kitchen. I can practically hear that tortilla sizzling on your skillet already. Whether it’s a lazy Sunday lunch or a “I need dinner NOW” Wednesday, this recipe’s got your back.
Don’t forget to snap a pic of your masterpiece! Tag me @YourBurritoBestie on Instagram—I wanna see those golden grill marks and oozy cheese pulls (extra points if you caught a mid-bite shot!). And hey, if these become your new obsession like they did mine? Drop a 5-star rating below to pay it forward to other busy food lovers. Now grab that spatula and let’s make some magic!
P.S. If you tweaked the recipe in a genius way, shout it out in the comments. My notebook’s always open for new ideas—I’m already dreaming up a buffalo chicken version next…
Print
Tasty 30-Minute Gegrillte Cheeseburger-Burritos mit Reis und Käse
- Total Time: 35 minutes
- Yield: 4 burritos 1x
- Diet: Low Lactose
Description
Grilled cheeseburger burritos with rice and cheese, combining the flavors of a classic cheeseburger with the convenience of a burrito.
Ingredients
- 1 lb ground beef
- 1 cup cooked rice
- 1 cup shredded cheddar cheese
- 4 large flour tortillas
- 1/2 cup diced onions
- 1/4 cup ketchup
- 1/4 cup mustard
- 1 tbsp Worcestershire sauce
- 1 tsp garlic powder
- Salt and pepper to taste
Instructions
- Cook ground beef in a skillet over medium heat until browned. Drain excess fat.
- Add onions, ketchup, mustard, Worcestershire sauce, garlic powder, salt, and pepper. Stir well.
- Mix in cooked rice and shredded cheese. Remove from heat.
- Spoon filling onto tortillas, fold, and grill on both sides until golden.
Notes
- Use fresh tortillas for best results.
- Adjust seasoning to taste.
- Serve with extra ketchup or mustard if desired.
- Prep Time: 15 minutes
- Cook Time: 20 minutes
- Category: Main Dish
- Method: Grilling
- Cuisine: American
Nutrition
- Serving Size: 1 burrito
- Calories: 450
- Sugar: 5g
- Sodium: 800mg
- Fat: 20g
- Saturated Fat: 8g
- Unsaturated Fat: 10g
- Trans Fat: 0g
- Carbohydrates: 40g
- Fiber: 2g
- Protein: 25g
- Cholesterol: 70mg
Keywords: grilled cheeseburger burritos, rice and cheese burritos, easy dinner recipes


